


840653
66
12.3.18
Removal Of Rear Duct Cover
•
Remove the drawer front panel (refer to
Section 12.3.8).
•
Remove the drawer slides (refer to Section
12.3.11).
•
Remover the humidity tray slide (refer to
Section 12.3.13).
•
Remove the rear slide screws on each side.
•
Disconnect the main chassis harness from
the duct cover.
•
At the top corner edge of the duct, push
down to unclip each side and pull forward.
Refit in reverse order.
Summary of Contents for RB36S25MKIW
Page 1: ...840653 Service Manual CoolDrawer Models RB36S25MKIW RB90S64MKIW ...
Page 12: ...840653 12 3 4 Integrated Panel Preparation ...
Page 14: ...840653 14 3 5 Create Cut Outs In Frame 3 6 Locate And Secure Install Brackets ...
Page 15: ...840653 15 3 7 Attach Inlet And Outlet Vent Ducts 3 8 Attach Power Cord And Trim Brackets ...
Page 16: ...840653 16 3 9 Move Product Into Cavity 3 10 Fit Drawer Panel Attachment Hooks ...
Page 17: ...840653 17 3 11 Attach Drawer Panel To Front Of Drawer ...
Page 18: ...840653 18 3 12 Secure Trim Brackets To Cabinetry 3 13 Attach Trims To Sides Of Cabinetry ...
Page 19: ...840653 19 3 14 Attach False Panel 3 15 Check Operation ...
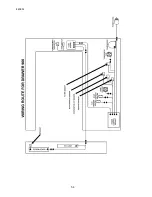
Page 53: ...840653 53 11 WIRING DIAGRAMS Ω Ω Ω Ω Ω Ω Ω Ω Ω Ω ...
Page 54: ...840653 54 ...
Page 77: ...840653 77 ...


