background image

7

INSTALLATION INSTRUCTIONS

Installation options

Your dryer can be installed one of two ways, either freestanding, or stacked on top of a 
Fisher & Paykel front loading washer.

1

  Free standing

The dryer stands on the floor and can easily be moved into position.

2

 Stacking

Your dryer has been designed to be able to be stacked on top of a Fisher & Paykel 
front loading washer. 

A stacking kit MUST BE USED between the products and fitted 

correctly to the washing machine and dryer, as per the stacking kit instructions.


–  Stacking Kit White: Part No. 427976. 

1

  Move the machine into the desired position. Do not lift the dryer by the top panel. 

2

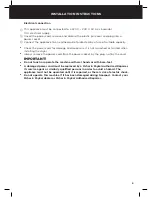
  Have a minimum clearance on all sides of at least 20 mm.

3

  Install the machine on a stable and level floor (if not stacking on top of a front 

loading washer).

Do not install your dryer in such a way that the dryer door cannot be opened fully.

Do not install the dryer outside, in a damp place, where there is a risk of freezing, where 
it may be rained on, in direct sunlight or close to a source of heat.

Do not place your machine on top of its power cable.

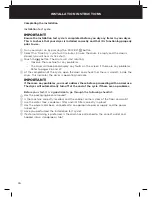
Levelling the machine

It is IMPORTANT to level the machine to ensure the machine runs efficiently with minimal 
noise. The dryer should be levelled in as close to its final position as possible so it stands 
balanced evenly on all four feet. Ensure the dryer does not rock in any direction.

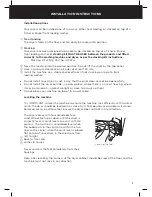
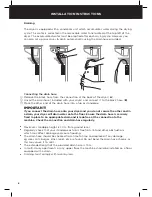
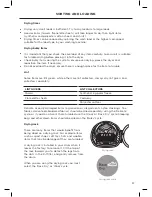
The dryer comes with four adjustable feet, 
wind all four feet up or down until the dryer is 
correctly level. A spirit level can assist with this 
process. The machine is considered level when 
the bubble sits in the centre (ie within the two 
lines or the circle), when the spirit level is placed 
flat on top of your dryer, in the directions from: 

1

  left to right, 

2

  back to front and 

3

  corner to corner.

Never unscrew the feet completely from their 
housings.

Note: after levelling, the corners of the dryer cabinet should be clear of the floor and the 
machine must not rock in any direction.

Levelling the feet

Summary of Contents for DH8060P

Page 1: ...Heat pump clothes dryer DH8060P model NZ AU INSTALLATION INSTRUCTIONS USER GUIDE ...

Page 2: ......

Page 3: ...anty 34 Customer Care 36 IMPORTANT SAVE THESE INSTRUCTIONS The models shown in this user guide may not be available in all markets and are subject to change at any time For current details about model and specification availability in your country please go to our website www fisherpaykel com or contact your local Fisher Paykel dealer Registration Register your product with us so we can provide yo...

Page 4: ...convenience of tumble drying and your clothes the advantage of not being subjected to the harsh overdrying effects of the sun Your clothes will feel softer retain their shape and require less ironing This dryer has been specifically designed to complement our front loading Fisher Paykel washers Your heat pump dryer has numerous cycles and options so you can perform every drying task including flat...

Page 5: ...d be removed immediately and not left in the dryer Clothes should be quickly spread out flat to cool so heat can dissipate not left bunched up eg in a clothes basket This dryer has been designed for domestic use only not for commercial applications such as massage beauty clinics where there may be increased lint accumulation or flammable materials in the atmosphere or load Do not operate this prod...

Page 6: ... or portable electrical outlet device eg multi socket outlet box ensure that it is positioned so that it does not come into contact with water or moisture Lint Accumulated lint in the dryer can become a fire hazard it also reduces the efficiency of the dryer by causing longer drying times and increased power consumption Clean the lint filters before every load Ensure the area around the dryer is c...

Page 7: ...ustrial chemicals have been used for cleaning Fabric softeners or similar products should not be used in a tumble dryer to eliminate the effects of static electricity unless this practice is specifically recommended by the manufacturer of the fabric softener product Rubber backed articles foam rubber latex foam clothes or pillows fitted with foam rubber pads fibreglass shoes containing rubber show...

Page 8: ...st be removed prior to use 2 Tilt the machine backwards and walk it off the base one foot at a time Not doing so may cause damage to your floor and dryer 3 Remove all packaging and accessories from inside the drum and ensure you remove protective covers from door and console IMPORTANT Ensure packaging materials are kept out of reach of children Please help protect the environment and dispose of th...

Page 9: ...all the dryer outside in a damp place where there is a risk of freezing where it may be rained on in direct sunlight or close to a source of heat Do not place your machine on top of its power cable Levelling the machine It is IMPORTANT to level the machine to ensure the machine runs efficiently with minimal noise The dryer should be levelled in as close to its final position as possible so it stan...

Page 10: ...e onto your dryer and you do not secure the other end in a drain your dryer will drain water onto the floor Ensure the drain hose is securely fixed in place to an appropriate drain and is leak free at the connection to the machine Check the connection and drain hose regularly Maximum standpipe height is 1 0 m from ground level Regularly check that your standpipe or tub is free from lint and other ...

Page 11: ...ashed or twisted when installing the dryer Always remove the power cord from the power socket by the plug not by the cord IMPORTANT Do not touch or operate the machine with wet hands or with bare feet A damaged power cord must be replaced by a Fisher Paykel Authorised Repairer its service agent or similarly qualified persons in order to avoid a hazard The appliance must not be operated until it is...

Page 12: ... At the completion of the cycle open the door and check that there is warmth inside the dryer This indicates the dryer is operating normally IMPORTANT If there are any problems you must address these before proceeding with normal use The dryer will automatically turn off at the end of the cycle if there are no problems Before you start it is a good idea to go through the following checklist 1 Has ...

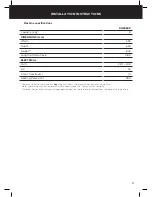
Page 13: ...1300 ELECTRICAL Volts 220 240 HZ 50 Amps maximum 10 Heating Power W 900 Capacity refers to the maximum dry weight of items the machine can dry at any one time Note some cycles have a lower maximum capacity see the Drying cycles section The exact height of your dryer is dependent on how far the feet are extended from the base of the machine ...

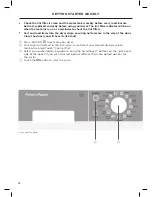
Page 14: ...er drum ensuring no items are in the way of the door Close the door you will hear it click shut 1 Press POWER to activate your dryer 2 Your dryer will default to the Everyday cycle Select your desired drying cycle by turning the SmartTouch Control Dial 3 Select your preferred drying options using the SmartTouch buttons on the right hand side of the panel if you wish to select options different fro...

Page 15: ...ect a different option once a drying cycle has started touch the button then select the new cycle or option Touch to restart the dryer with the new cycle and or settings IMPORTANT If you wish to stop the dryer before the cycle has finished you MUST remove the clothes IMMEDIATELY and spread them out to cool DO NOT leave the clothes in the dryer or bunched up in a clothes basket Take extreme care as...

Page 16: ...cycle you are running has remaining if you have chosen one of the Time Dry cycles If you have chosen an automatic cycle ie not Time Dry the word will appear on the screen until it reaches the cool down phase at which time the dryer will display how long the cycle has left to go Please be aware that a number of factors can influence the overall cycle time eg the fabric type of garments load size th...

Page 17: ...a care label stating tumble drying is suitable Separate coloured items from white light items where possible especially when new Colour run may be an issue especially if you intend to delay the start of the drying cycle SPECIFIC ITEM DRYING REQUIREMENTS SUGGESTED CYCLE AND OPTIONS SUGGESTED TEMPERATURE COMMENTS Towels Towels High Towels produce a lot of lint and are best dried on their own Sheets ...

Page 18: ...er and clothes It is a good idea to dry permanent press type garments eg business shirts together on the Easy Iron cycle with the Wrinkle Free option on This will help reduce wrinkling and the need for ironing To reduce tangling Load items individually Dry sheets and duvet doona covers on the Sheets cycle Ensure duvet doona cover openings are fastened before placing in the dryer Only dry a sheet l...

Page 19: ...lectors Always dry lint givers and collectors separately LINT GIVERS LINT COLLECTORS Towels Synthetics eg polar fleece Flannelette sheets Corduroy Polyester cottons Delicate or easily damaged items eg woollen or silk garments nylon stockings fine fabrics delicate embroidered fabrics should be dried separately using the Delicate cycle or if you do not want them tumbled use the Wool or Rack Dry cycl...

Page 20: ... for drying thick absorbent items such as towels 6 Dry High Bulky Bigger items like jackets and duvet doona covers A medium heat cycle for the special care of bulky items 4 Dry Medium Sports Sports clothing eg running gear A low heat cycle designed to care for synthetic sports clothing 4 Dry Low Wool Woollen items eg jerseys A low heat cycle for use with the drying rack to dry machine washable woo...

Page 21: ... selection under certain conditions and after particular stages of the drying cycle have passed Dryness Level Your dryer takes the guess work out of choosing drying times by sensing the dryness of the load When your dryer senses that the clothes have dried to the dryness level selected the dryer will automatically finish the cycle The dryer has five dryness levels ranging from Damp through to Extr...

Page 22: ...operation for 1 hour Extra provides Wrinkle Free operation for 24 hours If you wish to stop the dryer at any point during the Wrinkle Free stage of the cycle simply touch You can then open the dryer door and remove your items Press POWER to turn the dryer off Signal The Signal option automatically defaults to On for all cycles This means a series of beeps will sound at the end of a cycle to alert ...

Page 23: ...the start of the drying cycle from between 5 minutes and 12 hours Times you can select are 5 min 15 min 30 min 1 hour then hourly up to 12 hours This can be useful to time your drying to finish when you arrive home from work or to start when power rates are lower To programme a Delay Start simply touch the More button to increase the delay time and Less button to decrease the time or to turn Delay...

Page 24: ...s buttons for 3 seconds The lights will flash on and off and the display will show to indicate that the machine is in cycle adjustment mode 4 Select the drying options you prefer by touching the relevant option button 5 Touch to save the selected settings The dryer will beep to indicate your customised cycle has been saved Note touching before pressing Keylock will exit the cycle adjustment mode a...

Page 25: ...lected in the lint filter It is important to clean the lint filter after every load as the lint produced in the drying process can become a fire hazard if it is allowed to accumulate in or around your dryer The lint filter is located in the door opening at the bottom There is a warning light that will flash at the beginning of every cycle to remind you to clean the filter and will stop once the bu...

Page 26: ...ave set up the drain hose to drain the water automatically To empty the water tank 1 Remove the water tank by holding onto the handle and pulling outwards gently to remove it Ensure that you keep the tank level when it is being removed to prevent the water collected from spilling 2 Pour the water down the sink or into a bucket and then put the tank back in place IMPORTANT Do not use the water coll...

Page 27: ...evers to lock the condenser filter back in place again Make sure that these locks are engaged securely 7 Close the condenser filter cover Note if the evaporator behind the condenser filter is dirty it can be cleaned carefully with a vacuum cleaner using a dusting brush or narrow crevice nozzle Cleaning the sensors There are sensors in your dryer that detect whether the laundry is dry or not These ...

Page 28: ...r which may be blocking the air flow Check the lint filter is in place correctly in your dryer Clean the condenser filter refer to the Caring for your dryer section Ensure the condenser filter unit has been placed or replaced correctly into your dryer The water tank is full and needs to be emptied Check if the water tank is full Empty the water tank If using the drain hose check whether the water ...

Page 29: ...rectly refer to the Installation instructions section 4 Remove your load from the dryer and retry 5 Perform a Time Dry cycle eg Time Dry for 10 minutes 6 If the fault re occurs repeat steps 1 and 2 7 If the machine still will not work you will be required to call a Fisher Paykel Authorised Repairer to arrange service refer to the Customer Care section Record the fault code number displayed and the...

Page 30: ...age 19 Touching does not start the drying cycle Dryer door not closed properly Open and reclose the door Check that the lint filter is correctly in place and not obstructing the door Is the dryer displaying a user warning or fault code Refer to pages 26 and 27 Water tank full or not properly in place Empty the water tank refer to page 24 Ensure the water tank is properly in place Lint filter needs...

Page 31: ...fecting dryer operation In hot humid conditions the dryer will take longer to dry a load and be less efficient Load overly wet at the start of cycle Remove more water from the load before placing it in the dryer eg select a faster spin speed on your washer if appropriate for your load Dryer not draining water out properly Check the drain hose if connected for blockages or damage You may need to ca...

Page 32: ... tank may need to be emptied Empty the water tank Water tank may be damaged Check the water tank for any signs of damage Drain hose may not be attached properly at the machine end Ensure the drain hose is attached properly Refer to page 8 Drain hose could be damaged Check the drain hose for damage Drain hose has slipped out of the drain Ensure the drain hose is securely fixed in place Sometimes dr...

Page 33: ...ar noises when the compressor turns on Vibration Dryer is not installed on a stable surface Ensure the dryer is installed on a flat stable surface Refer page 6 Dryer is not level Ensure the dryer is correctly levelled Refer page 7 Dryer is overloaded Remove some items from the dryer Creasing Cycle selection not appropriate for the load Select the Easy Iron cycle to minimise creasing Dryer is overl...

Page 34: ... the instructions on the care label of the items Dry Temp or Dryness Level selected not appropriate for the fabric type Ensure the Dry Temp and Dryness Level selected is appropriate for the fabric type Refer to the items care label Refer to pages 19 and 20 Metal parts on the items or in the load Fasten zips and other clasps before placing items in the dryer Items not separated or dried on an appro...

Page 35: ...items Items loaded into the dryer incorrectly Load items individually into the dryer Do not place folded items in the dryer Incorrect cycle selection Try using the Easy Iron cycle to dry shirts and the Sheets cycle to dry sheets Refer to pages 15 and 18 Load size too large Try drying smaller load sizes Some cycles have a lower maximum load size Refer to page 18 Delicate items not dried on Rack Dry...

Page 36: ...rformance due to incorrect installation and maintenance eg blocked lint filter blocked condenser or full water tank 8 Poor drying performance due to incorrect loading eg overloading or underloading 9 Damage from articles in the drum eg bra wires pens crayons dye transfer or flammable material B Defects caused by factors other than 1 Normal domestic use or 2 Use in accordance with the product s use...

Page 37: ...stralian Customers This Manufacturer s Warranty is an extra benefit and does not affect your legal rights Our goods come with guarantees that cannot be excluded under the Australian Consumer Law You are entitled to a replacement or refund for a major failure and for compensation for any other reasonably foreseeable loss or damage You are also entitled to have the goods repaired or replaced if the ...

Page 38: ...sher Paykel Authorised Repairers whose fully trained technicians can carry out any service necessary on your appliance Your dealer or our Customer Care Centre can recommend a Fisher Paykel Authorised Repairer in your area In Australia if you need assistance Call the Fisher Paykel Customer Care Centre and talk to one of our Customer Care Consultants Toll Free 1300 650 590 Fax 07 3826 9298 Website w...

Page 39: ...your product with us so we can provide you with the best service possible To register your product visit our website www fisherpaykel com Complete and keep for safe reference Model Serial No Purchase Date Purchaser Dealer Suburb Town Country ...

Page 40: ...ns in this booklet apply to the specific products and models described at the date of issue Under our policy of continuous product improvement these specifications may change at any time You should therefore check with your dealer to ensure this booklet correctly describes the product currently available NZ AU ...

Reviews: