


S E C T I O N 4
Data Field Programming
• • • • • • • • • • • • • • • • • • • • • • • • • • • • • • • • • • • • • • •
About Data Field Programming
The following pages list this control’s data fields in numerical order. Field numbers are listed in the
left column followed by a “Title and Data Entries” column, which lists the valid entries for each field.
Experienced installers can simply follow this column when programming the data fields. The
“Explanation” column provides explanatory information and special notes where applicable.
Use the blank programming form to record the data for this installation.
Programming Data Fields
Data field programming involves making the appropriate entries for each of the data fields.
Start Data Field programming by entering the installer code + 8 + 0 + 0.
SIA Guidelines: Notes in certain fields give instructions for programming the FA168CPS/FA148CP
for False Alarm Reduction. Fields unique to the
FA168CPSSIA/FA148CPSIA
are indicated by
heavy borders and reverse type heading
SIA-Compliant Controls
for easy identification.
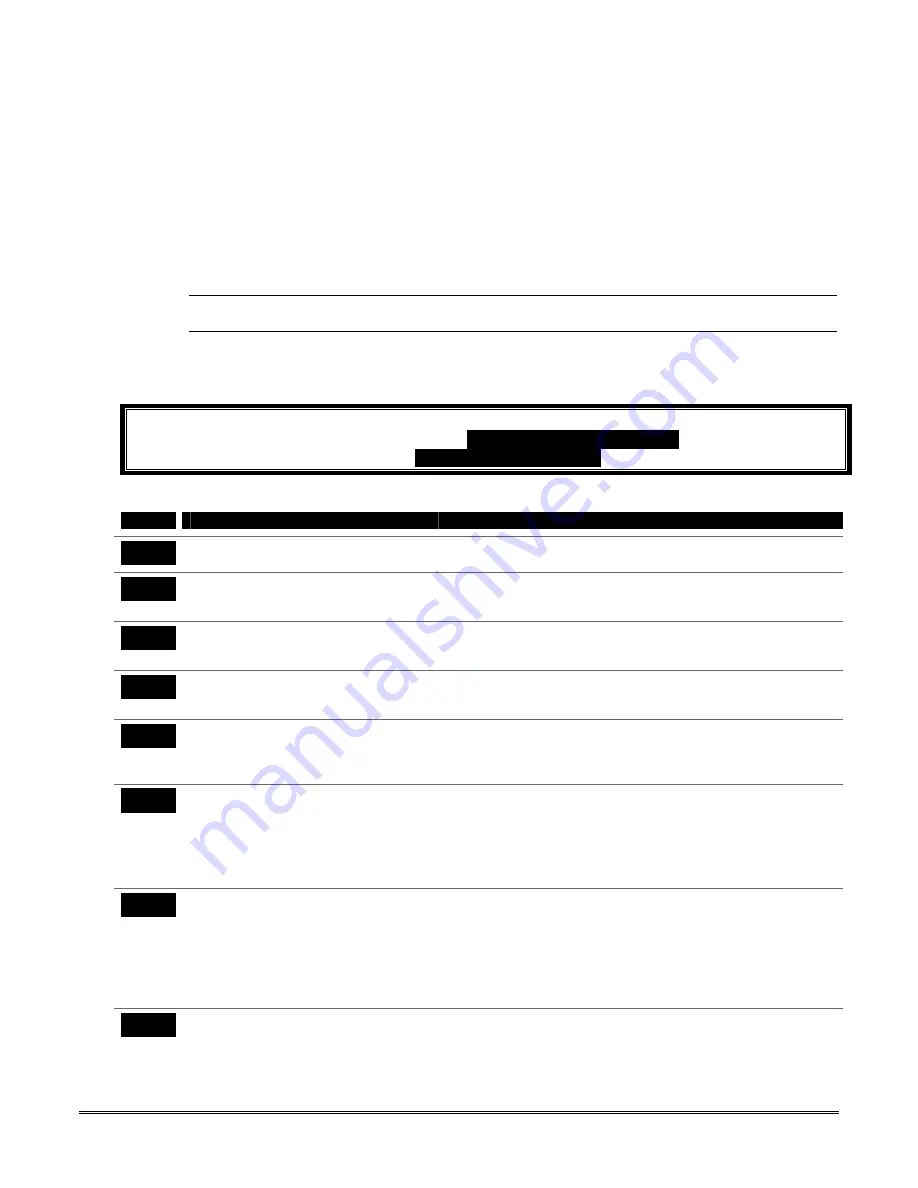
System Setup Fields (
∗∗∗∗
20 –
∗∗∗∗
29)
FIELD
TITLE and DATA ENTRIES
EXPLANATION
*20
Installer Code
Enter 4 digits, 0-9
The Installer Code can perform all system functions except it cannot
disarm the system unless it is used to arm the system.
*21
Quick Arm Enable
0 = do not allow quick arm
1 = allow quick arm
If enabled, a user code is not needed to arm the system. Instead,
users can press the [#] followed by an arming key to arm the system.
However, the user code is always needed to disarm the system.
*22
RF Jam Option
0 = no RF jam detection
1 = send RF jam report
If enabled, a report is sent if the system detects an RF jamming
signal.
UL installations must be 1 if wireless devices are used.
*23
Quick (Forced) Bypass
0 = no quick bypass
1 = allow quick bypass (code + [6] + [#] )
All zones bypassed by this function will be displayed after the bypass
is initiated.
UL installations must be 0 (no forced bypass)
*24
RF House ID Code
00 = disable all wireless keypad usage
01–31 = House ID for partition 1, 2 and
common
The House ID identifies receivers and wireless keypads. If a 5827 or
5827BD Wireless Keypad or 5804BD Transmitter is being used, a
House ID code must be entered, and the keypad should be set to the
same House ID. You can assign RF house ID for each partition.
*26
Chime By Zone List 3
0 = no zone list (chimes on fault of any
entry/exit or perimeter zone when chime
mode on)
1 = use zone list (chimes on fault of
specific zones programmed in relay
zone list 3 when Chime mode on)
If enabled, you can define the specific zones intended to chime when
faulted while the system is in Chime mode. Use zone list 3 to assign
these zones (see
∗
81 Zone List Programming section for details).
*27
Powerline Carrier Device (X-10)
House ID
0 = A
6 = G
# + 11 = L
1 = B
7 = H
# + 12 = M
2 = C
8 = I
# + 13 = N
3 = D
9 = J
# + 14 = O
4 = E
# + 10 = K
# + 15 = P
5 = F
Powerline Carrier devices require a House ID, identified in this field.
Program Powerline Carrier devices in interactive modes
∗
79, *80 and
*81.
Not intended for fire or UL installations.
*28
Access Code for Phone Module
1-9 = first digit of access code
∗
or # = second digit of access code (enter #
+11 for “
∗
”, or # +12 for “#”)
You need to assign a 2-digit access code for the FA4285/FA4286
Phone Module, if used. Example: If desired access code is 7
∗
, 7 is the
first entry, and [#] + 11 (for
∗
) is the second entry.
NOTE: A “0” in either digit disables the phone module.
Must be “00” for UL Commercial Burglar Alarm installations.
4-1
Summary of Contents for FA148CP Series
Page 20: ...Installation Instructions 2 14...
Page 48: ...Installation Instructions 5 8...
Page 54: ...Installation Instructions 6 6...
Page 58: ...Installation Instructions 8 2...
Page 68: ...11 4...
Page 76: ...Installation Instructions 13 4...
Page 81: ...NOTES 14 5...
Page 82: ...NOTES Installation Instructions 14 6...
Page 83: ...NOTES 14 7...
Page 84: ...NOTES Installation Instructions 14 8...
Page 85: ...NOTES 14 9...
Page 86: ...NOTES Installation Instructions 14 10...
Page 87: ...NOTES 14 11...


