INSTALLATION 9
1c
CEILING
1
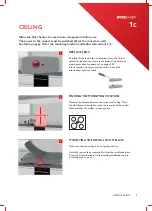
REPLACE LENS
Carefully lift the lens with a screwdriver. Insert the IR lens
extension (included) as shown in the picture. The extension
should point directly upwards at an angle of 90°.
If the extension moves around, check that it has been
inserted the right way round.
2
Measure distance
FINDING THE MOUNTING POSITION
Measure the distance between the cooker and ceiling. Place
the Heat Sensor directly above the center point of the cooker.
Make sure that the surface is clean and dry.
MOUNTING THE INSTALLATION PLATE
Make sure that the ceiling is free of grease and dry.
Carefully remove the protective film from the installation plate.
Press for at least a minute while attaching installation plate to
allow adhesive to work.
3
Allow the Heat Sensor to reach room temperature before use.
The power to the cooker must be switched off (at the consumer unit).
See table on page 10 for the mounting location and follow instructions 1–5.


