I N S T A L L A T I O N
14.
12. Insert the Bend-Relief Grommet into the HM-10 so the groove in the grommet is
over the side case of the HM-10 (Figure 12).
13. Replace the bottom plate of the HM-10 and secure with the 2 screws.
14. Mount the HM-10 in place on the apparatus.
15. Route the CA Cables to the rear of the Intercom Unit (or the next Headset
Module in a Daisy-Chain).
16. Attach an RJ-12 Modular Plug to the end of the flat CA Cable (see page 28 for
instructions if necessary).
17. With the “release-tab” on the RJ-12 Modular Plug facing up (Figure 13), insert
the RJ-12 Modular Plug into a modular jack on the rear of the intercom unit
(Figure 14).
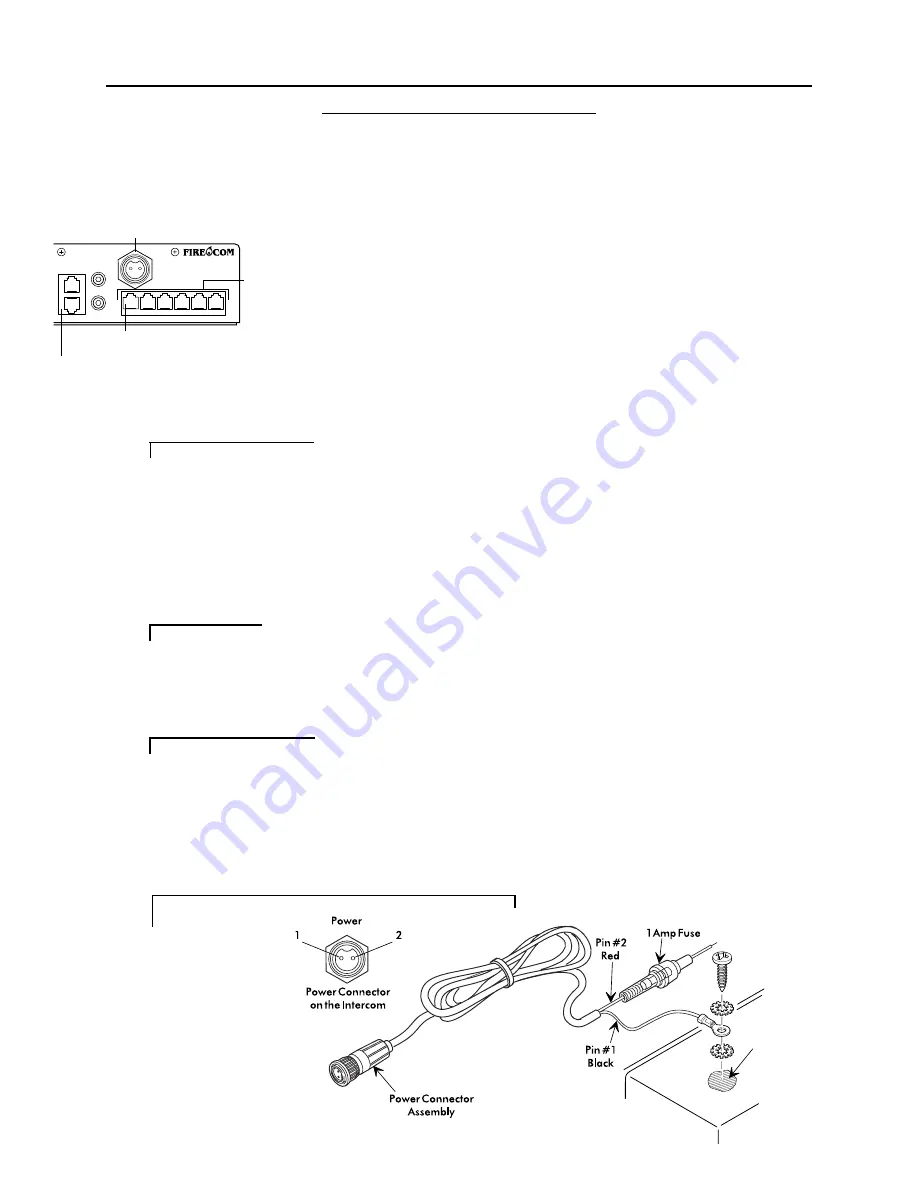
The Modular Jack closest to the AUX OUT connector (Figure 14) is the Priority
Transmit Position. The Headset Location plugged into this jack will have priority
over all other Headset Locations for transmitting on the radio.
18. Repeat steps 8 through 17 until all remaining Headset Modules have been
connected with the CA Cable to the Intercom Unit or the next Headset Module
in a Daisy-Chain.
POWER & GROUND CONNECTIONS
Before making the power connections, make sure the apparatus master switch is OFF!
19. Connect the Power Cable Assembly (Figure 15) to the rear of the Intercom Unit.
20. Connect the black wire (from pin 1) to the vehicle's negative ground, or use the
supplied self tapping screw and star washers as shown in Figure 15.
We suggest connecting the intercom power connections to the apparatus power
buses (preferably, to the same point that the 2-way radio is connected).
21. Connect the red wire (from pin 2) to one end of the supplied in-line fuse holder.
22. Connect the other end of the fuse holder to the vehicle's switched positive power
supply.
The 3010R Series Intercom System is installed and ready for connection to the radio.
IMPORTANT
FIGURE 14:
Modular Jacks
Power Connector
Modular
Jacks
Priority Transmit
Position
Remote Jacks
(Identical)
IMPORTANT
IMPORTANT
FIGURE 15:
Power Cable Assembly
POWER
INTERCOM
AUX
REMOTE
IN
OUT
PR
Clean with a
wire brush


