background image

CR-2000 OMEGA User Manual

11

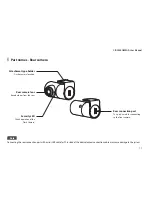
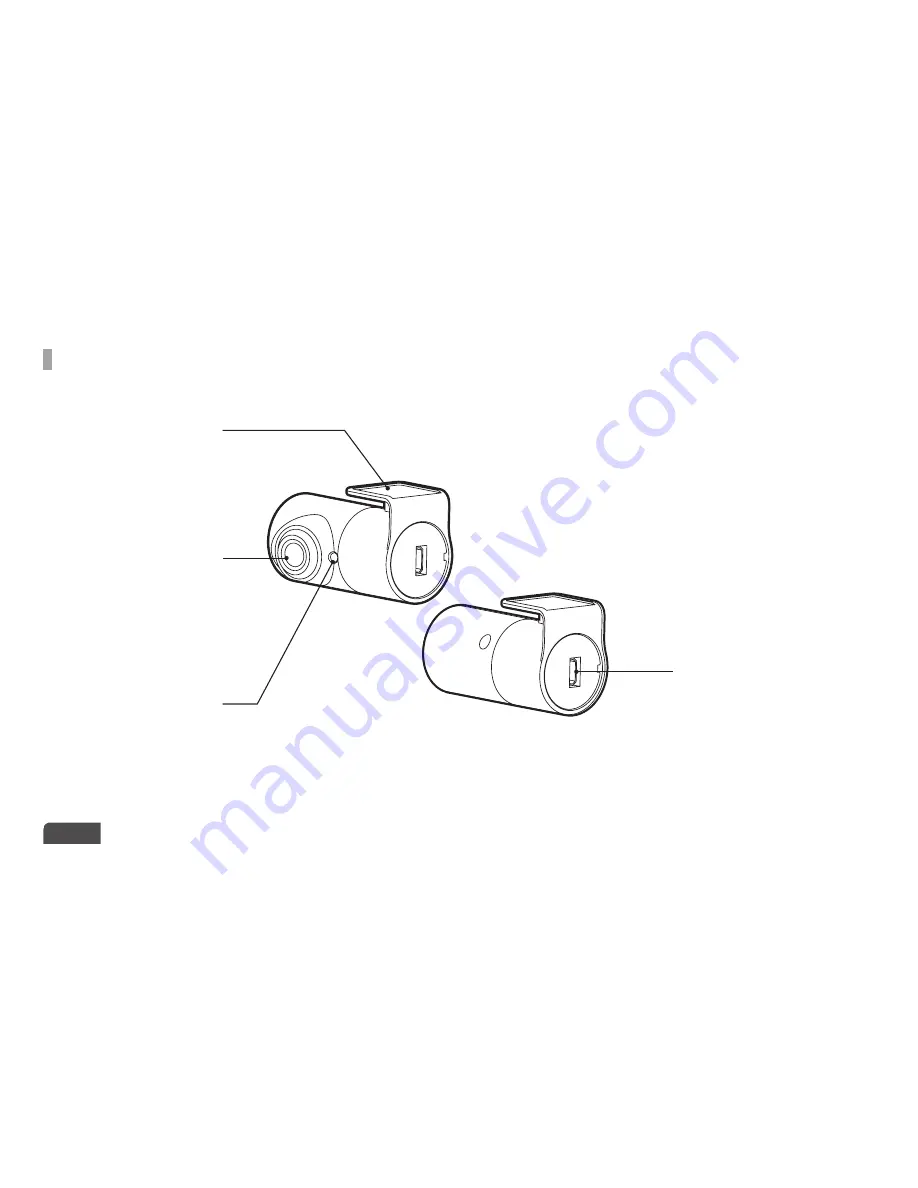
  Part names - Rear camera

Part names - Rear camera

Note

Connecting the rear connection port with a mini USB cable for PC instead of the dedicated rear connection cable may cause damage to the system.

Attachment type holder

Fix the camera location.

Security LED

Check operation of the  

Dash Camera.

Rear connection port

This port is used for connecting 
to the front camera.

Rear camera lens

Record videos from the rear.

Summary of Contents for CR-2000 OMEGA

Page 1: ...OMEGA...

Page 2: ...All trade names and trademarks are the properties of FINEDIGITAL Inc Copyright 2015 All Rights Reserved UM CR 2000 EN100 Note This equipment has been tested and found to comply with the limits for a...

Page 3: ...tallation location for a rear camera 12 Inserting the micro SDHC card 12 Inserting the SDHC card 12 Installation Front 13 Installation Rear 14 Using the product Display configuration 15 Switch to Live...

Page 4: ...oduct in a position where it won t obstruct your view Failure to do so can cause a car accident Plug in USB and video cables properly Failure to do so may result in fire or product failure Use Do not...

Page 5: ...foramoment Thisisnotamalfunction Thesystemwilloperate normallywhenthetemperatureisnormal Changing camera composition may result in an after image on the LCD monitor CAUTION Breaching the following pre...

Page 6: ...nch wide LCD Speedy booting Front rear live display Emergency video audio recording buttons on the live display System setting without connecting to PC Super capacitor used When the power is suddenly...

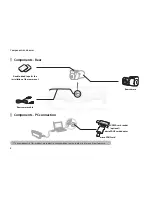
Page 7: ...bject to change without notice in order to improve its performance Components and names Double sided tape for the installation of the front mount Front camera Continuous power cable Mount Polarized fi...

Page 8: ...ject to change without notice in order to improve its performance Components Rear Components PC connection USB SD card reader optional micro SDHC card adapter micro SDHC card Rear camera Rear camera c...

Page 9: ...CR 2000 OMEGA User Manual 9 Accessories Note All accessories are available from the store where you purchased the product USB SD card reader GPS Polarizing filter...

Page 10: ...HC card Security LED Check operation of the Dash Camera Mount connection area This is where the mounting bracket is combined Front camera lens Record videos from the front Cooling vents Dissipates hea...

Page 11: ...B cable for PC instead of the dedicated rear connection cable may cause damage to the system Attachment type holder Fix the camera location Security LED Check operation of the Dash Camera Rear connect...

Page 12: ...ror Selectingtheinstallationlocationforarearcamera You are recommended to install it at the top of the rear window of the car Inserting the micro SDHC card Insert the SDHC card Note Ensure that the pl...

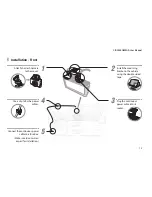
Page 13: ...ower cable into its socket 2 Install the mounting bracket in the vehicle using the double sided tape Attach the Dash Camera to the mount Use a clip to fix the power cables 1 5 Connect the continuous p...

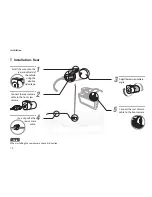
Page 14: ...Connect the rear camera cable to the front view camera 3 Connect the rear camera cable to the front camera 5 Install the mount on the rear windshield of the vehicle using the double sided tape Adjustt...

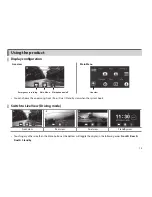
Page 15: ...on off Live view You can choose the one among Front Rear Dual Standby view when the system boots Switch to Live View Driving mode Front view Rear view Dual view Standby view Touching any other area th...

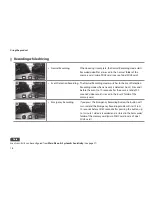
Page 16: ...m 10 seconds before the event to 10 seconds after the event a total of 20 seconds video record is saved in the event folder of the memory card Emergency Recording If you press the Emergency Recording...

Page 17: ...ion Detection Recording If the Dash Camera detects a moving object in Parking mode recording starts 10 seconds before 20 seconds after detection total 30 seconds Thevideofilewillbestoredinthe motion f...

Page 18: ...Main Menu page If you go to the Main Menu page in the Normal Recording mode video recording will pause It is dangerous to operate Main Menu while driving Always stop the car before you do it In the Ma...

Page 19: ...camera settings Memory You can change or format memory settings Info You can view the current settings Play You can check recorded videos Live view Goes back to the shooting mode where you can view vi...

Page 20: ...iew camera Resolution You can change the Driving mode resolution settings Save You can save the changed setting values Cancel Back to the Main Menu page Frame You can change the frame settings Brightn...

Page 21: ...Brightness You can adjust the brightness of videos Shooting Mode You can change the shooting mode according to the illumination when shooting Wide Dynamic Range WDR You can adjust the WDR settings Nig...

Page 22: ...ettings Format the SDHC Card Formats the memory card that is highlighted If only the micro SDHC card is installed Videos recorded in both Driving and Event modes are all stored in the micro SDHC card...

Page 23: ...n Menu Memory to change the settings Format the SDHC Card Formats the memory card that is highlighted If both the micro SDHC card and the SDHC card are installed The videos recorded in Driving mode ar...

Page 24: ...normal Event detection recording From 10 seconds before to 10 seconds after event detection 20 seconds in total event Video recording while parking Event detection recording From 10 seconds before to...

Page 25: ...ng You can change the time settings Display You can change the screen settings Sensitivity You can configure the sensitivity for normal event parking event and parking motion Speaker You can adjust th...

Page 26: ...0km h 100km h OFF FCWS 30km h 60km h 90km h OFF FVMA ON OFF Alarm Beep sound Vehicle Sedan SUV Truck When the lane departure is detected a warning sound will occur LDWS Red When the vehicle leaves the...

Page 27: ...ting voltage can become lower Low voltage block Go to Main Menu System Low voltage block to change the settings You can change a cut off voltage and timer settings Sensitivity Go to Main Menu System S...

Page 28: ...ton to view the next 3 video clips Press this button to jump 9 video clips You can store chosen images to a separate folder Press this button to skip 5 seconds Press this button to jump to the next pr...

Page 29: ...the USB cable 2 After booting is complete the Dash Camera switches to USB mode and is executed as a removable disk 4 You can view or play the recorded videos saved in each folder Note Each folder cont...

Page 30: ...folders containing videos will appear 2 When you connect the micro SDHC card to a PC it is executed as a removable disk 4 You can view or play the recorded videos saved in each folder Note Each folde...

Page 31: ...o You can play the recorded video in your FINEVu player on a PC as follows Rear camera Product setting information and car speed Acceleration sensor value DashCamera s operationalvoltage Front camera...

Page 32: ...memory card prior to the firmware upgrade 4 Unzip the downloaded firmware and copy it to the root directory of the memory card 5 Insert the micro SDHC card into the Dash Camera and turn the power on t...

Page 33: ...its performance before storing the Dash Camera Cleaning If there is a foreign object on the lens wipe it down with a soft cloth To obtain high quality video do not touch the lens with your hands or a...

Page 34: ...t to the minimum level If there is still no sound after adjusting the volume request after sales service The LCD does not turn on Check if the Dash Camera has booted properly If you can hear the voice...

Page 35: ...a navigation device but it is not working Video recording can not be done using the power from the USB port in the navigation system But it is recognized as a removable USB disk Nothing is recorded i...

Page 36: ...ts ends 10 seconds before 10 seconds after an event 20 seconds in total Emergency recording Video recording starts ends 10 seconds before 50 seconds after an emergency is detected Manual stop function...

Page 37: ...nal Acceleration sensor 3 Axis Acceleration Sensor 2 g 2 g Input power 12V 3A Batteries Super capacitor If external power is cut off it will supply stable power to save video Power consumption 5W Oper...

Page 38: ...tall it 1 This is the main screen where your video recording is played 2 This is the sub screen to magnify and play selected sections of your video recording 3 This is the screen that shows the list o...

Page 39: ...s in the control bar you can check them while moving across the video screen Playing and viewing recorded videos Recommended PC specifications for FINEVu player Minimum specifications Recommended spec...

Page 40: ...without warranty condition or other liability even though the defect or loss is caused by negligence or other fault Damage resulting from use accident or normal wear and tear is not covered by this or...

Page 41: ......

Page 42: ......

Page 43: ......

Page 44: ......

Reviews: