background image

3

8

ES

INSTRUCCIONES DE MONTAJE

EN 5 SENCILLOS PASOS, USTED ESTARÁ LISTO PARA HACER EJERCICIO: SE NECESITAN 

APROXIMADAMENTE 30 MINUTOS PARA EL MONTAJE.

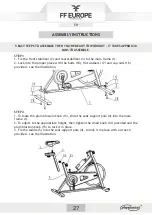
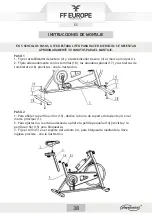
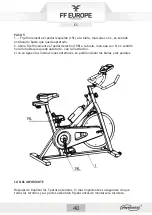
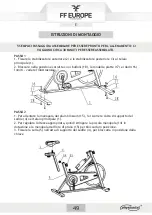
PASO 2

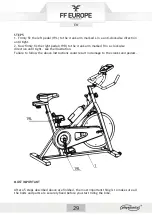
1. Para aflojar la perilla en flor (15), deslice la barra de soporte del asiento (4) en el

marco principal (1).

2. Para ajustarlo a la altura adecuada, apriete la perilla pequeña (14) provista y la

perilla en flor (15) para bloquearla.

3. Fije el sillín (5) en el soporte del asiento (4), para bloquearla mediante la llave

inglesa provista - vea la ilustración.

PASO 1 

1. Fije el estabilizador delantero (2) y el estabilizador trasero (3) al marco principal (1).

2. Fíjelo adecuadamente con los tornillos (18), las arandelas planas (17) y las tuercas de

sombrerete (16) provistas - vea la ilustración.

Summary of Contents for EXBK01

Page 1: ...zie per aver scelto il nostro prodotto La preghiamo di leggere attentamente questo manuale prima di procedere con il montaggio o utilizzo del prodotto per evitare danni causati da un uso improprio Si...

Page 2: ...wenn sich das Ger t im ordnungsgem en Betriebszustand befindet F hren Sie die erforderlichen Wartungsarbeiten mit Original Ersatzteilen durch 9 Achten Sie beim Einstellen der Ausr stung auf die beste...

Page 3: ...3 DE EXPLOSIONSZEICHNUNG...

Page 4: ...1 3 hinterer Stabilisator 1 13 M4 2 35 Blechschraube 1 4 Sitzst tzstange 1 14 M8 kleines Verstellungsrad 2 5 Sattel 1 15 M16 gro es Verstellungsrad 2 6 Computer 1 16 M8 Hutmutter 4 7 Handgriff 1 17 8...

Page 5: ...H he einzustellen ziehen Sie das kleine Verstellungsrad 14 und das gro e Verstellungsrad 15 fest um ihn zu arretieren 3 Befestigen Sie den Sattel 5 in der Sitzst tzstange 4 um ihn mit dem Schl ssel zu...

Page 6: ...ffst tze 9 Siehe Abbildung SCHRITT 4 1 Befestigen Sie die mitgelieferte Computerhalterung 12 mit einer Blechschraube 13 an den Handgriff 7 2 Setzen Sie die Computerhalterung 12 in die Kannelierung an...

Page 7: ...dal 19R im Uhrzeigersinn fest an dem mit R gekennzeichneten Kurbelarm siehe Abbildung Bei Nichtbeachtung der obigen Anweisungen k nnen Kurbeln und Pedale besch digt werden AM WICHTIGSTEN Nach den f nf...

Page 8: ...hlen dr cken Sie die MODE Taste und w hlen Sie dann die gew nschte Funktion aus der obigen Tabelle aus 3 Um den Computer zur ckzusetzen halten Sie die MODE Taste 5 Sekunden lang gedr ckt 4 Der Comput...

Page 9: ...aggressive Chemikalien die Schutzbeschichtung des Computers zerst ren und eine statische Aufladung im Computer verursachen die die Komponenten besch digen kann 3 berpr fen Sie die vorderen und hinter...

Page 10: ...lte ungef hr 30 Sekunden lang gehalten werden Bitte Ihre Muskeln bei Dehnungs bungen nicht zwingen oder dr cken wenn es weh tut STOPPEN 2 DIE BUNGSPHASE Dies ist die Phase in der Sie die Anstrengung e...

Page 11: ...hen Ihre Ert chtigung Niveau zu verbessern m ssen Sie Ihr Trainingsprogramm ndern Sie sollten w hrend der Aufw rm und Abk hlphase normal trainieren aber gegen Ende der bungsphase sollten Sie den Wider...

Page 12: ...den Artikel deshalb ber geeignete Sammelsysteme oder senden Sie den Artikel zur Entsorgung an die Stelle bei der Sie es gekauft haben Diese wird dann den Artikel der stofflichen Verwertung zuf hren Re...

Page 13: ...es pi ces de rechange d origine 9 Lors de la r gulation de l quipement veillez respecter la meilleure position et la plus grande position r glable pour vous assurer que la position ajust e est s re 10...

Page 14: ...14 FR VUE CLAT E...

Page 15: ...port informatique 1 3 Stabilisateur arri re 1 13 Vis t le M4 2 35 1 4 Support de si ge 1 14 M8 Petit Bouton 2 5 Selle 1 15 Bouton M16 Fleur De Prunier 2 6 Ordinateur 1 16 crou borgne M8 4 7 Guidon 1 1...

Page 16: ...2 Pour ajuster la hauteur appropri e serrez le petit bouton 14 fourni et le bouton de fleur de prunier 15 pour le verrouiller 3 Fixez la selle 5 la barre de support du si ge 4 pour la verrouiller en...

Page 17: ...x 10 et des rondelles autobloquantes 11 voir l illustration TAPE 4 1 Fixez le support de l ordinateur 12 fourni sur le guidon 7 l aide d une vis taraudeuse 13 2 Ins rez le support de l ordinateur 12 d...

Page 18: ...nivelle marqu e R dans le sens des aiguilles d une montre jusqu ce qu elle soit serr e voir l illustration Si vous ne suivez pas les instructions ci dessus vous risquez d endommager les manivelles et...

Page 19: ...r le bouton MODE puis s lectionnez la fonction choisir dans le tableau ci dessus 3 Pour r initialiser l ordinateur maintenez le bouton MODE enfonc pendant 5 secondes 4 L ordinateur s teint automatique...

Page 20: ...miques agressifs d truiront le rev tement de protection de l ordinateur et provoqueront une accumulation d lectricit statique l int rieur de l ordinateur susceptible d endommager les composants 3 V ri...

Page 21: ...aque tirement doit tre maintenu pendant environ 30 secondes Ne forcez pas et ne secouez pas vos muscles Si cela vous fait mal ARR TEZ 2 LA PHASE D EXERCICE C est ce stade que vous faites l effort Apr...

Page 22: ...ngtemps que vous le souhaitez Si vous essayez galement d am liorer votre condition physique vous devez modifier votre programme d entra nement Vous devez vous entra ner normalement pendant les phases...

Page 23: ...ar l interm diaire d un syst me de collecte appropri ou bien envoyez l article l endroit o vous l avez achet pour qu il soit jet L article sera limin conform ment au recyclage des mati res Alternative...

Page 24: ...n proper operating state Perform the necessary maintenance using original spare parts 9 When regulating the equipment pay attention to the best position and largest adjustable position to ensure the a...

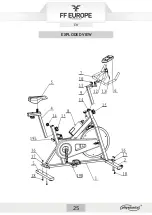
Page 25: ...25 EN EXPLODED VIEW...

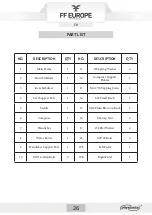
Page 26: ...Support Holder 1 3 Rear Stabilizer 1 13 M4 2 35 Tapping Screw 1 4 Seat Support Pole 1 14 M8 Small Knob 2 5 Saddle 1 15 M16 Plum Blossom Knob 2 6 Computer 1 16 M8 Cap Nut 4 7 Handlebar 1 17 8 Flat Wash...

Page 27: ...djust to the appropriate height then tighten the small knob 14 provided and the plum blossom knob 15 to lock it in place 3 Fix the saddle 5 into the seat support pole 4 to lock it in place with a wren...

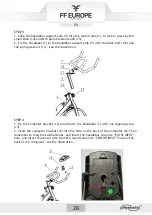
Page 28: ...he spring washers 11 see the illustration STEP 4 1 Fix the Computer bracket 12 provided to the handlebar 7 with one tapping screw 13 2 Insert the computer bracket 12 into the flute on the back of the...

Page 29: ...he crank arm marked R in a clockwise direction until tight see the illustration Failure to follow the above instructions could result in damage to the cranks and pedals MOST IMPORTANT After a5 steps d...

Page 30: ...ction you want press the MODE button and then select the function of choice from the table above 3 To reset the Computer hold down the MODE button for 5 seconds 4 The Computer will automatically turn...

Page 31: ...r prints Note harsh chemicals will destroy the protective coating on the Computer and cause a static build up inside the Computer that could damage the components 3 Check the front and back stabilizer...

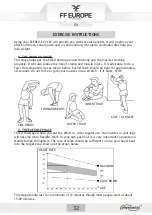
Page 32: ...stretch should be held for approximately 30 seconds do not force or jerk your muscles into a stretch if it hurts STOP 2 THE EXERCISE PHASE This is the stage where you put the effort in After regular...

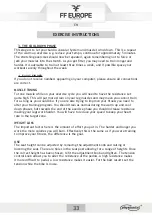
Page 33: ...e If you are also trying to improve your fitness you need to alter your training program You should train as normal during the warm up and cool down phases but towards the end of the exercise phase yo...

Page 34: ...e of the product using appropriate collection systems or send the product for disposal to the place where you bought it From there the product will then be delivered to recycling Recycling alternative...

Page 35: ...la bicicleta de ejercicios cuando el equipo funcione correctamente Realice el mantenimiento necesario utilizando repuestos originales 9 Cuando regule el equipo tenga en cuenta la mejor posici n y la p...

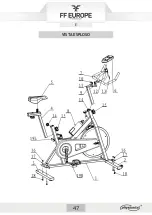
Page 36: ...36 ES VISTA EN DESPIECE...

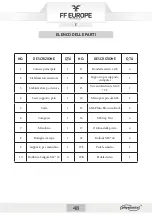
Page 37: ...3 Estabilizador Trasero 1 13 Tornillo de roscado M4 2 35 1 4 Barra de Soporte de Asiento 1 14 Perilla Peque a M8 2 5 Sill n 1 15 Perilla en Flor M16 2 6 Ordenador 1 16 Tuerca de Sombrerete M8 4 7 Mani...

Page 38: ...2 Para ajustarlo a la altura adecuada apriete la perilla peque a 14 provista y la perilla en flor 15 para bloquearla 3 Fije el sill n 5 en el soporte del asiento 4 para bloquearla mediante la llave i...

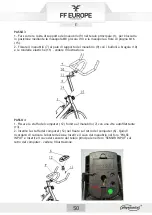
Page 39: ...ulte la ilustraci n ETAPA 4 1 Fije el soporte para Ordenador 12 provisto al manillar 7 con un tornillo de rosca 13 2 Inserte el soporte para Ordenador 12 en la flauta de la parte posterior del Ordenad...

Page 40: ...R a la biela marcada con R en sentido horario hasta que quede apretado vea la ilustraci n Si no se siguen las instrucciones anteriores se podr an da ar las bielas y los pedales LO M S IMPORTANTE Despu...

Page 41: ...ue desea presione el bot n MODE y luego seleccione la funci n que desee en la tabla de arriba 3 Para reiniciar el ordenador mantenga presionado el bot n MODE durante 5 segundos 4 El ordenador se apaga...

Page 42: ...n cuenta que los productos qu micos da inos destruir n la capa protectora del ordenador y causar n una acumulaci n est tica dentro del ordenador que podr a da ar los componentes 3 Revise los estabiliz...

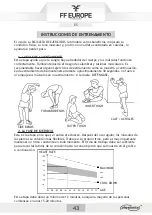
Page 43: ...antenerse durante aproximadamente 30 segundos no fuerce ni empuje sus m sculos en un estiramiento si le duele DET NGASE 2 LA FASE DE EJERCICIO Esta es la etapa en la que se realiza el esfuerzo Despu s...

Page 44: ...deseada Si est tratando de mejorar su condici n f sica necesita modificar su programa de entrenamiento Debe entrenar normalmente durante las fases de calentamiento y enfriamiento pero hacia el final...

Page 45: ...de residuos podr a perjudicar Deseche el producto utilizando los sistemas de recogida adecuados o envi ndolo al lugar donde lo compr All el producto ser dispuesto para su reciclaje Alternativa a la de...

Page 46: ...icambi originali 9 Durante la regolazione dell apparecchiatura notare di osservare la posizione migliore e la pi ampia posizione regolabile per garantire che la posizione regolata sia sicura 10 Salvo...

Page 47: ...47 IT VISTA ESPLOSO...
Page 48: ...computer 1 3 Stabilizzatore posteriore 1 13 Vite autofilettante M4 2 35 1 4 Sede supporto palo 1 14 Manopola piccola M8 2 5 Sella 1 15 M16 Plum Blossom Knob 2 6 Computer 1 16 M8 Cap Nut 4 7 Manubrio...

Page 49: ...1 2 Per regolare l altezza appropriata quindi stringere la piccola manopola 14 in dotazione e la manopola del fiore di pruno 15 per bloccarla in posizione 3 Fissare la sella 5 nell asta di supporto d...

Page 50: ...oni a brugola 10 e le rondelle elastiche 11 vedere l illustrazione PASSO 4 1 Fissare la staffa del computer 12 fornita al manubrio 7 con una vite autofilettante 13 2 Inserire la staffa del computer 12...

Page 51: ...braccio della pedivella contrassegnato con R in senso orario finch non serrato vedere l illustrazione La mancata osservanza delle istruzioni di cui sopra potrebbe provocare danni alle pedivelle e ai...

Page 52: ...nte MODE e selezionare la funzione desiderata dalla tabella sopra 3 Per ripristinare il computer tenere premuto il pulsante MODE per 5 secondi 4 Il computer si spegne automaticamente dopo 4 minuti qua...

Page 53: ...truggono il rivestimento protettivo del computer e causano un accumulo di elettricit statica all interno del computer che potrebbe danneggiare i componenti 3 Controllare gli stabilizzatori anteriore e...

Page 54: ...nto dovrebbe essere tenuto per circa 30 secondi non forzare o strappare i muscoli in un tratto se fa male FERMARSI 2 LA FASE DEGLI ESERCIZI Questo lo stadio in cui si mette lo sforzo Dopo l uso regola...

Page 55: ...e desideri Se stai anche cercando di migliorare la tua forma fisica devi modificare il tuo programma di allenamento Dovresti allenarti normalmente durante le fasi di riscaldamento e raffreddamento ma...

Page 56: ...prega di smaltire il prodotto usando sistemi di raccolta appropriati o inviare il prodotto per lo smaltimento nel luogo dove l hai comprato Da l il prodotto verr quindi consegnato al riciclaggio In a...

Page 57: ...jahn Str 7 64372 Ober Ramstadt Allemagne Packaging details This item is shipped in 1 package Produced for FF Europe E Commerce GmbH Dr Robert Murjahn Str 7 64372 Ober Ramstadt Germany Detalles del env...

Reviews: