background image

19

or brush may expand in diameter due to work 
load and centrifugal forces.

Further safety instructions


-

The machine may not be used in damp and wet 
spaces, outdoor when it is rainy, foggy or snowy 
or in the explosive environment.


-

Before use always inspect the fl exible lead and 
the plug. Have the defects repaired by a spe-
cialist repair shop.


-

Outside the premise use only approved exten-
sion leads and cable connections.


-

Apply the machine to the material only when 
switched on.


-

Do not carry the machine by the lead.


-

Do not work on a ladder.


-

When operating the tool, use protective gloves 
and tough footwear.


-

When operating the tool, use goggles and ear 
protectors.


-

The dust generated during work is harmful to 
health. When operating the tool, use the dust 
extraction system and the respirator.


-

Materials containing asbestos can only be pro-
cessed by qualifi ed individuals. Comply with the 
safety regulations that apply in your country.


-

Flexible power supply cable always route from 
the tool backwards.


-

Only use milling rings recommended by the 
manufacturer.


-

The machine is only allowed be used when pro-
tective guard is in place and additional handle 
is fastened.


-

Plug in the fl exible power supply cable’s plug 
into the wall socket when the machine is off.


-

Make yourself sure whether the material that is 
going to be machined does not contain electric, 
water or gas lines – an injury could occur.


-

Do not mill over metal objects, nails or screws.


-

The machine is not allowed to be operated by a 
person under 16 years of age.


-

Only for AS/NZS:

 The tool shall always be sup-

plied via residual current device with a rated re-
sidual current of 30 mA or less.


-

Do not use quick-change nuts for clamping the 
disc.


-

When clamping, be careful about the direc-
tion of rotation marked on the label and/or the 
diamond tool, which must be the same as the 
direction of the actual rotation of the machine 
used.


-

The fl ange and fastening nuts must be properly 
tightened.


-

Use a tool with specifi cations suitable for the 
worked material – cf. the information on the 
diamond tool and its packaging.


-

Put the diamond disc vertically to the cut.


-

Always apply oscillating cuts to let the disc cool 
down and prevent overload of the diamond disc.


-

After several cuts or intensive cutting make a 
cool-down break to prevent overheating of the 
diamond tool.


-

Avoid mechanical damage to the diamond tool, 
whether by force, impact or heat.


-

Do not use a diamond cutting disc for grinding. 
Do not apply a lateral pressure on a diamond 
cutting disc.


-

Diamond tools are self-sharpening. A blunt tool 
is recognised by reduced cutting power and a 
circular “fi re” edge. Short cuts into abrasive 
materials (limestone/sandstone bricks, asphalt 
or gas concrete) may sharpen a blunt tool. Spo-
radic sparks while cutting stone are typical and 
do not mean a critical problem.

6 Emission 

levels

Measured values determined according to EN 
60 745.
Typically the A-weighted noise level of the tool 
are:
Sound pressure level:    

90 dB (A)

Sound power level:  


101 dB (A)

Inaccuracy of measurement  

K = 3 dB (A)


CAUTION

Operating noise

Damage to hearing


Use ear protection!

Measured values determined according to EN 
60 745.

Vibration emission value 

a

h

 = 4,0 m/s²

Inaccuracy of measurement 

K = 1.5 m/s²

The specifi ed emissions values (vibration, noise)


-

are used to compare machines.


-

They are also used for making preliminary esti-
mates regarding vibration and noise loads dur-
ing operation.


-

They represent the primary applications of the 
power tool.

Summary of Contents for DSC-AG 125

Page 1: ...troncatura diamantato 42 Originele gebruiksaanwijzing Dia doorslijpsysteem 51 Originalbruksanvisning Dia kapsystemet 60 Alkuper iset k ytt ohjeet Dia katkaisuj rjestelm 68 Original brugsanvisning Dia...

Page 2: ...1 1 1 1 3 1 6 1 7 1 8 1 9 1 12 1 13 1 14 1 11 1 10 1 2 1 4 1 5 1 15...

Page 3: ...2 2 2 2 3 2 4 2 5 2 6 2 1...

Page 4: ...3 3 1 4 4 a 3 2...

Page 5: ...5 6 5 1 6 1 6 2 6 3 6 4...

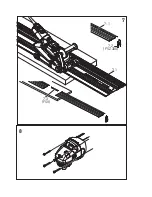
Page 6: ...7 1 7 FSZ 300 7 1 7 2 FSV 7 3 8...

Page 7: ...gegebenen Abbildungen be nden sich am Anfang der Betriebsanleitung 4 Bestimmungsm e Verwendung Das Dia Trennsystem bestehend aus Winkel schleifer und Absaughaube ist bestimmt zum Nuten und Trennen von...

Page 8: ...Staubmaske Geh rschutz Schutzhandschuhe oder Spezi alsch rze die kleine Schleif und Materialp artikel von Ihnen fernhalten Die Augen sollen vor herum iegenden Fremdk rpern gesch tzt werden die bei ver...

Page 9: ...kst ck zur ckprallen und verklemmen Das rotieren de Einsatzwerkzeug neigt bei Ecken scharfen Kanten oder wenn es abprallt dazu sich zu verklemmen Dies verursacht einen Kontroll verlust oder R ckschlag...

Page 10: ...verliert berlasten Sie die Dr hte nicht durch zu hohen Anpressdruck Weg iegende Drahtst cke k nnen sehr leicht durch d nne Kleidung und oder Haut dringen b WirdeineSchutzhaubeempfohlen verhindern Sie...

Page 11: ...Kalksandstein As phalt oder Gasbeton kann das Werkzeug ge sch rft werden Sporadische Funken kommen beim Steintrennen typisch vor sie sind daher nicht kritisch 6 Emissionswerte Messwerte ermittelt ents...

Page 12: ...sche die im Lie ferumfang der Abdeckung und des Schleifers enthalten sind Aus Sicherheitsgr nden d rfen nur Original Trennscheiben von Festool verwendet werden Bindemittel Trennscheiben d rfen nicht v...

Page 13: ...n befestigt werden 9 Inbetriebnahme WARNUNG Unfallgefahr falls die Maschine bei unzul ssi ger Spannung oder Frequenz betrieben wird Die Netzspannung und die Frequenz der Stromquelle m ssen mit den Ang...

Page 14: ...von ca 10 20 Sek ist die Maschine wieder betriebsbereit und voll belastbar Bei durch Betrieb erhitzte Maschinen reagiert der W rmeschutz entsprechend fr her 9 3 Drehen des Getriebegeh uses F r speziel...

Page 15: ...t gesammelt und einer umweltgerechten Wiederverwertung zugef hrt werden Informationen zu REACh www festool com reach 12 EG Konformit tserkl rung Dia Trennsystem Serien Nr AG 125 14 DE Basis f r DSC AG...

Page 16: ...lustrations can be found at the be ginning of the operating instructions 4 Intended use Consisting of an angle grinder and extraction hood the Dia cutting system is designed for grooving and cutting i...

Page 17: ...roken acces sory may y away and cause injury beyond im mediate area of operation j Hold power tool by insulated gripping surfaces only when performing an operation where the cutting accessory may cont...

Page 18: ...for larger power tool is not suitable for the higher speed of a smaller tool and may burst Additional safety instructions for abrasive cut ting Other special safety instructions for abrasive cutting...

Page 19: ...nt of 30 mA or less Do not use quick change nuts for clamping the disc When clamping be careful about the direc tion of rotation marked on the label and or the diamond tool which must be the same as t...

Page 20: ...r Set the cover to a cut depth of 10 mm and put it down with the grinder at the bottom Loosen screw of sleeve Set the cover to the top position Turn the guiding tab 5 1 into the groove on the grinder...

Page 21: ...th burr protec tor which must be cut off before the rst use Connector Depending on the particular application and the workpiece size several guide bars can be con nected with the aid of a connector sp...

Page 22: ...Turning the gear box For special cases the gearbox can be turned in steps of 90 This achieves a better handling posi tion of the switch For such work we recommend to use the Festool service Remove fou...

Page 23: ...l com reach 12 EU Declaration of Conformity Dia cutting system Serial no AG 125 14 DE Basis for DSC AG 125 500591 Year of CE mark 2013 We declare under sole responsibility that this product comply wit...

Reviews: