background image

15

DOMIcompact F 30 D

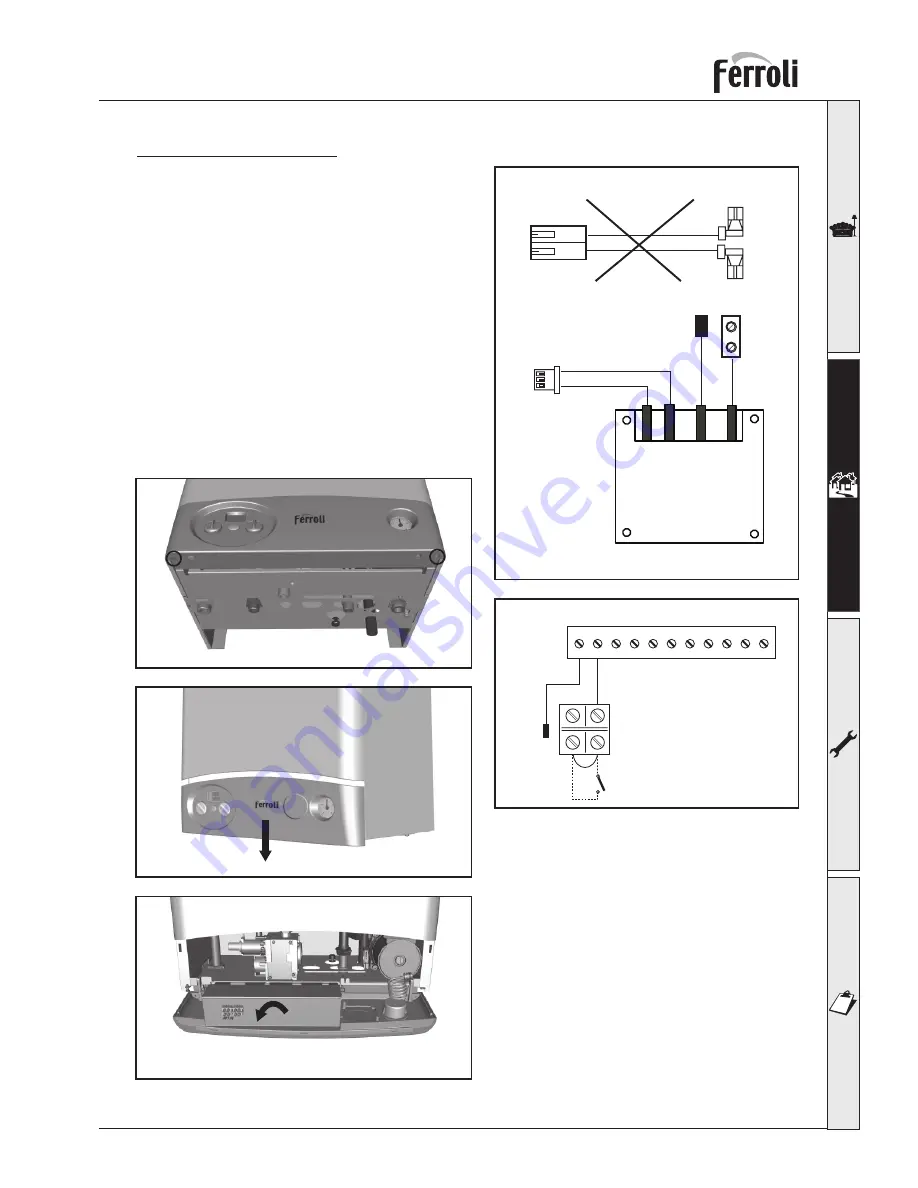
Integral clock installation

1

 Unscrew the two screws “

A

” (Fig. 8a).

2

 Lower the instrument panel (Fig. 8b).

3

 Turn the instrument panel (Fig. 8c).

4

 Open the instrument panel “

B

” (Fig. 8c), mount 

the clock into the facia panel using the two screws 
provided.

5

 Take the cable with blue and brown wires and the 

"JST" connector: connect the loose spades to clock 
terminal 1 & 2 (Fig. 8e).

6

 Connect the plug end of the cable to terminal X5 of 

the MF08FA.1 board.

7

 Remove one cable from the terminal block (Fig. 

8d).

8

 Connect it to the cable “

C

” of the Fig. 8e.

9

 Connect the cable “

D

” in the free space of terminal 

block (Fig. 8d).

10

 Replace everything in reverse order.

1   2   3   4   5   6   7   8   9 10 11

X2

72

fig. 8d

C

D

Clock

1 2

3 5

JST

Molex

NOT USED!!!

fig. 8e

Fig. 8b

B

fig. 8c

A

A

fig. 8a

Summary of Contents for DOMIcompact F 30 D

Page 1: ...wall mounted gas fired combination boiler DOMIcompact F 30 D INSTRUCTIONS FOR USE INSTALLATION AND MAINTENANCE FOR THE UNITED KINGDOM EIRE cod 3540B62 3 05 2006 GC N 47 267 40 ...

Page 2: ...ed out isolate the appliance from the mains electricity supply In the event of malfunction or faulty operation iso late the appliance Do not attempt to repair or carry out any other operation on the appliance directly Contact Ferroli or a qualified engineer only Repairs or the replacement of components must be carried out exclusively by qualified personnel using originalsparepartsonly Failuretoadh...

Page 3: ...2 2 4 Connection to the gas system 14 2 5 Electrical Connections 14 2 6 Flue System 17 3 Service and maintenance 24 3 1 Adjustments 24 3 2 Initial start up 26 3 3 Maintenance 27 3 4 Troubleshooting 29 4 Technical characteristics and data 30 4 1 Dimensions and connections 30 4 2 General view and main components 31 4 3 Hydraulic diagram 32 4 4 Technical data table 33 4 5 Diagrams 34 4 6 Time Clock o...

Page 4: ...ors a safety thermostat and a low water pressure switch Thanks to the microprocessor control and adjustment system with advanced self diagnosis unit ope ration is for the most part automatic The power for heating is automatically governed by the control system combined with the room thermostat not supplied The power for hot water is automatically and continually governed to ensure a fast delivery ...

Page 5: ... ture 6 Flame symbol Appears when the burner is on 7 ECO symbol ECOisdisplayedwhentheEconomyfunction is on 8 Hot water demand symbol Appears during hot water operation or when adjusting the hot water set point temperature Fig 1 Boiler on stand by Boiler on stand by ECO Heating operation burner on Hot tap water operation burner on Fault codes See chap 1 6 or 3 0 TEST mode operation burner on Boiler...

Page 6: ...and room thermostat call for heating Turning off Turn the knobs ref 1 and 2 Fig 1 onto minimum If the boiler is turned off this way then the P C B is still powe red Hot water and heating operation are disabled the display shows but the frost protection function remains active The frost protection will not work if the electricity and or gas supply to the unit are cut off To avoid damage caused by f...

Page 7: ...lay will stay on for another 5 seconds to then go back to the actual operating temperature providing there is a demand If the boiler is connected to the optional remote open therm control the above adjustments system and hot water temperature can only be made with the remote control ECO COMFORT selection The unit is equipped with a special internal device that ensures a high hot water delivery spe...

Page 8: ... that are automatically reset as soon as the value causing the fault comes back within the boiler s normal working range Listed below are some anomalies that can be caused by simple user solvable problems If the problem remains after two attempts at resetting contact the Ferroli Service Centre For other faults refer to section 3 4 Troubleshooting Before calling a Ferroli service engineer check tha...

Page 9: ...uld be made to the current ETCI rules for electrical installation Incorrect installation can cause damage or physical injury for which the manufacturer declines any responsibility This appliance must be installed strictly in accordance with these instructions and regulations The Gas Safety Regulations Installations Use The Local Building Regulations The Building Regulations Part L The Buildings St...

Page 10: ...lid wall The wall fixing must ensure a stable and effective support for the appliance using the bracket and fixings supplied If the unit is enclosed in a cupboard or mounted alongside there must be space for normal maintenance work Fig 2 and tab 1 give the minimum clearances to leave around the unit This appliance does not require compartment ventilation for combustion purposes Drilling Template S...

Page 11: ...h connection must be disconnected after use The temporary filling loop Not supplied is shown in fig 5 Ensure the filling point is on the return pipe to the boiler Attention is drawn to the Local Water Byelaws Fittings manufactured from duplex alpha beta brass are not acceptable for underground use and certain water undertakings will not accept their use above ground Ensure all pipework is adequate...

Page 12: ... according to current regulations For efficient operation and long life of the boiler the plumbing system must be well designed and always complete with all those accessories that guarantee regular operation and running ie room thermostat trv s and automatic bypass etc If the flow and return pipes follow a path where air pockets could form in certain places it is essential to install air vent valv...

Page 13: ...ers instruc tions For further information contact Fernox Manufacturing Co LTD Cookson Electronics Forsyth Road Sheerwater Woking Surrey GU21 5RZ Tel 0870 8700362 Sentinel Performance Solutions The Heath Business Technical Park Runcorn Cheshire WA7 4QX Tel 01928 588 331 Note When the boiler is installed with an existing or new system any unsuitable additives or system debris must be removed by thor...

Page 14: ...t 50 Hz electrical supply The unit s electrical safety is only guaranteed when correctly connected to an efficient earthing system installed according to current safety standards and checked by a professionally qualified person The manufacturer is not responsible for any damage caused by failure to earth the system Also make sure that the electrical system is adequate for the maximum power absorbe...

Page 15: ...with blue and brown wires and the JST connector connect the loose spades to clock terminal 1 2 Fig 8e 6 Connect the plug end of the cable to terminal X5 of the MF08FA 1 board 7 Remove one cable from the terminal block Fig 8d 8 Connect it to the cable C of the Fig 8e 9 Connect the cable D in the free space of terminal block Fig 8d 10 Replace everything in reverse order 1 2 3 4 5 6 7 8 9 10 11 X2 72...

Page 16: ...at Low voltage or the remote timer control is to be connected carry out the following operations 1 Unscrew the two screws A Fig 9a 2 Lower the instrument panel Fig 9b 3 Turn the instrument panel Fig 9c You can now access the terminal block B Fig 9c fig 9a 1 2 Room thermostat 1 2 Remote timer control Opentherm Or Voltage free contacts ...

Page 17: ... p A in accordance with UNI CIG 7129 92 Failure to use them automatically forfeits all warranty and liability of FERROLI S p A Restrictors Boiler operation requires fitting the restrictors supplied with the unit as instructed in the following tables The restrictor Ø45 is fitted as standard on all boilers Before inserting the flue outlet pipe it is therefore necessary to check there is the right re...

Page 18: ...t Fig 10b Front view View from above P S 191 5 mm L S D 215 mm Drill the wall 10 20 mm more than the pipe diameter between 10 e 60 mm Codo 60 100 010007X0 Codo 60 100 010007X0 P 125 S 70 70 S 50 125 P 70 D S 50 125 30 L 95 D S L 125 70 208 208 141 5 30 43 Cut the internal pipe 70 mm longer than P Cut the internal pipe 70 mm longer than L between 10 e 60 mm Drill the wall 10 20 mm more than the pip...

Page 19: ...er positioning the gaskets correctly and seal the wall coupling points with special sleeves Fig 10c The total length in linear metres of the flue pipe must not exceed the maximum lengths stated in the following table considering that each bend gives rise to the stated reduction For example a duct D 60 100 composed of 1 bend of 90 1 horizontal metre 2 bends of 45 1 horizontal metre has a total equi...

Page 20: ...tion vertical or horizontal The loss is called equivalent in linear metres since it is compa red to the loss of one metre of duct in air inlet defined as equal to 1 For example a bend at 90 of Ø80 in flue extraction has an equivalent loss of 2 5 linear metres i e it has a loss equal to that of 2 5 linear metres of duct in air inlet 2 After completely defining the layout of the system of split flue...

Page 21: ... Horizontal Description Equivalent losses in metres linear Air Flue Vertical Vertical Horizontal Horizontal A c c e s s o r i e s Ø 8 0 A c c e s s o r i e s Ø 8 0 Condensate collection cup coupling Bend 90 Ø 80 mm male female Bend 45 Ø 80 mm Pipe Ø 80 male female Fume vertical terminal for two pipe system Concentric vertical terminal Horizontal air terminal Ø 80 mm Horizontal flue terminal combus...

Page 22: ...l From a terminal facing the terminal From the wall on which the terminal is mounted From a vertical structure on the roof Above intersection with roof Horizontally from a terminal on the same wall Vertically from a terminal on the same wall From an opening in the car port e g door window into the dwelling Above ground roof or balcony level 300mm 300mm 300mm 200mm 75mm 200mm 150mm 100mm 300mm 600m...

Page 23: ...e sized according to the method of calculation stated in the standard Be airtight to the products of combustion resistant to the fumes heat and waterproof for the conden sate Have a circular or quadrangular cross section some hydraulically equivalent sections are permissible with a vertical progression and with no constrictions Have the ducts conveying the hot flue gases adequately distanced or is...

Page 24: ...setting the values given in the technical data chart for the type of gas used 3 How to Adjust the parameter for the specific type of gas to be used turn the boiler onto standby press the RESET button for 10 seconds P1 will appear on the display press the RESET button for 5 seconds turn the hot water knob ref 2 fig 1 onto 0 for Natural Gas operation or onto 1 for LPG operation press the RESET butto...

Page 25: ...s from the modureg C on the gas valve Adjust the minimum pressure with the screw E clockwise to decrease it and anticlockwise to increase it Reconnect the electrical connector disconnected from the modureg on the gas valve Check that the maximum pressure has not changed Reconnect the pressure compensation tube H Put the protective cap D back on To end TEST mode repeat the sequence for turning it o...

Page 26: ...ng a suitable leak detection fluid to detect any leaks in connections after completing a tightness test Fill the water system and make sure that all air contained in the boiler and the system has been vented by opening the air vent valve on the boiler and any vent valves on the system Make sure there are no water leaks in the system hot water circuits connections or boiler Make sure the electrical...

Page 27: ...rost protection mode remains active The frost protection system will not work if the electricity and or gas supply to the boiler are cut off To avoid damage caused by freezing during long shutdowns in winter it is advisable to drain all water from the boiler both tap and the system water or drain off just the tap water and add a suitable antifreeze to the heating system as prescribed in chap 2 3 3...

Page 28: ...on and thermostat operation the gas valve and circulation pump After these checks make sure there are no gas leaks Combustion analysis Two sampling points have been included in the boiler one for fumes and the other for air To take the samples 1 Remove the boiler casing 2 Open the air and fume sampling points on the sealed chamber 3 Insert the probes as far as the stop 4 Open a hot water tap 5 Adj...

Page 29: ...ning on the fan Air pressure switch contact open Incorrect wiring to the air pressure switch Wrong restrictor Flue not correctly sized or obstructed Fault No burner ignition Possible cause Low system pressure System empty Low water pressure switch not connected or damaged Cure Flame present with burner off signal Electrode fault PCB trouble Sensor fault Sensor damaged Wiring shorted Wiring broken ...

Page 30: ... 4 1 Dimensions and connections Fig 17 Top view Bottom view Key 1 Heating system flow Ø 3 4 2 Hot water outlet Ø 1 2 3 Gas inlet 1 2 4 Tap water inlet Ø 1 2 5 Heating system return Ø 3 4 36 95 60 120 95 54 460 196 110 120 120 110 460 208 1 2 3 4 5 365 680 247 ...

Page 31: ...ger for heating and hot water 28 Flue hood 29 Flue outlet manifold 32 Central heating pump 34 Heating temp sensor 36 Automatic air vent 38 Flow switch 42 Tap water temperature sensor 43 Air pressure switch 44 Gas valve 47 Modureg 49 Safety thermostat 56 Expansion vessel 81 Ignition and detection electrode 90 Flue sample point 91 Air sample point 114 Low water pressure switch 132 Flue deflector 187...

Page 32: ... 20 Burner assembly 27 Heat exchanger 29 Flue outlet collar 32 Heating pump 34 Heating temperature sensor 38 Flow switch 42 Tap water temperature sensor 43 Air pressure switch 44 Gas valve 49 Safety thermostat 56 Expansion vessel 81 Ignition and detection electrode 114 Low water pressure switch 187 Flue restrictor 43 56 81 44 49 20 27 5 29 16 114 42 34 187 14 32 38 11 10 7 8 9 ...

Page 33: ...oltage frequency Max electrical power absorbed Hot water circuit connections Heating system connections Gas system connection Weight Heating Natural Gas delivery G20 Natural Gas main nozzles G20 Pressure at Natural Gas burner G20 Natural Gas supply pressure G20 LPG delivery G31 LPG main nozzles G31 Pressure at LPG burner G31 LPG supply pressure G31 Safety valve Hot water content Pmax Pmin Pmax Pmi...

Page 34: ... Fig 21 Circulator speed 3 2 1 A Boiler losses of head Circulator losses of head kW mbar 18 19 20 21 22 23 5 10 15 20 25 30 35 9 10 11 12 13 14 15 16 17 8 24 25 26 27 28 29 30 31 32 33 34 G31 LPG G20 Natural gas kW 0 1 2 3 4 5 6 7 0 500 1 000 1 500 2 000 Q l h H m H2O A 3 2 1 ...

Page 35: ...s button P Display 3 Press button P Display 4 Press button P Display 5 Press button P Display 6 Press button P Display 7 The timer can be programmed with up to 8 ON and 8 OFF times by repeating the above procedure 6 30 1 8 30 2 12 00 3 12 00 4 6 00 1 9 00 2 12 30 3 14 00 4 16 30 5 22 30 6 16 00 5 23 30 6 Over ride By pressing the over ride button E the timer programme is over ridden ie if programm...

Page 36: ... thermostat 81 Ignition detection electrode 114 Low water pressure switch 139 Remote timer control opentherm 34 43 49 MF08FA 1 TRANSFORMER 42 114 44 16 32 230V 50Hz X5 X3 X7 X2 X4 1 2 1 2 3 1 2 3 4 1 2 3 4 5 6 7 1 2 3 4 5 6 7 8 9 10 11 FUSE FUSE X1 N L 81 47 38 F 3 15A F 3 15A 72 139 CAUTION Before connecting the room thermostat or the remote timer control remove the jumper on the terminal block U...

Page 37: ...TED FOR THE DOMESTIC HOT WATER MODE MEASURE RECORD GAS RATE ft3 hr MAXIMUM BURNER OPERATING PRESSURE IF APPLICABLE mbar COLD WATER INLET TEMPERATURE C HOT WATER OUTLET TEMPERATURE C WATER FLOW RATE lts min FOR CONDENSING BOILERS ONLY CONFIRM THE FOLLOWING THE CONDENSATE DRAIN HAS BEEN INSTALLED IN ACCORDANCE WITH THE MANUFACTURER S INSTRUCTIONS YES FOR ALL INSTALLATIONS CONFIRM THE FOLLOWING THE H...

Page 38: ...IGNATURE SERVICE 3 DATE ENGINEER NAME COMPANY NAME TEL No CORGI ID CARD SERIAL No COMMENTS SIGNATURE SERVICE 4 DATE ENGINEER NAME COMPANY NAME TEL No CORGI ID CARD SERIAL No COMMENTS SIGNATURE SERVICE 5 DATE ENGINEER NAME COMPANY NAME TEL No CORGI ID CARD SERIAL No COMMENTS SIGNATURE SERVICE 6 DATE ENGINEER NAME COMPANY NAME TEL No CORGI ID CARD SERIAL No COMMENTS SIGNATURE SERVICE 7 DATE ENGINEER...

Page 39: ......

Page 40: ...fore calling our Customer Service Helpline Lichfield Road Branston Industrial Estate Burton Upon Trent Staffordshire DE14 3HD Tel 08707 282 885 Fax 08707 282 886 EIRE only HEATOVENT Greenhills Industrial Estate Greenhills Road Walkinstown Dublin 12 IRELAND Tel 014508166 Fax 014508501 Should you require any assistance during the installation call our Technical Service Helpline on 08707 282 885 opti...

Reviews: