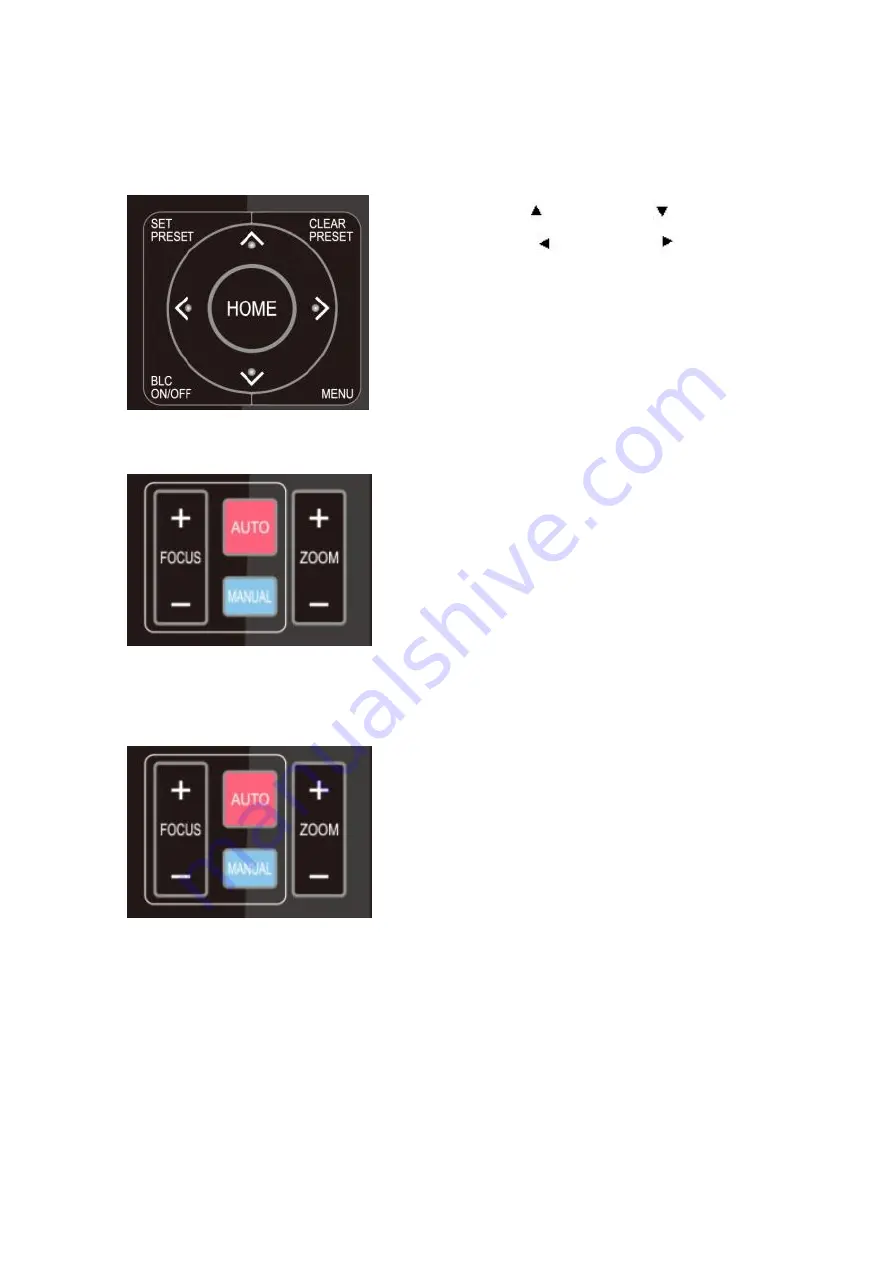
background image

2) Pan/Tilt Control

Up: press Down: press
Left: press

Right: press

Back to middle position: press“

HOME

Press and hold the up/down/left/right key, the
pan/tilt will keep running, from slow to fast,
until it runs to the endpoint; the pan/tilt running
stops as soon as the key is released.

3

Zoom Control

ZOOM IN: press “ZOOM+ “ key
ZOOM OUT: press “ZOOM- ” key
Press and hold the key, the camera will keep
zooming in or zooming out and stops as soon
as the key is released.

4) Focus Control

Focus (near):Press “

focus+

” key (Valid only

in manual focus mode)

Focus (far): Press “

focus-

”key (Valid only in

manual focus mode)
Auto Focus: Support
Manual Focus: Support
Press and hold the key, the action of focus will
keep continue and stops as soon as the key is
released.

5

Presets Setting, Running, Clearing

Summary of Contents for UHD4K12X

Page 1: ...4K PTZ Camera User Manual...

Page 2: ...l is about 4K PTZ camera operation Graphic Symbols Description of graphic symbols used in this manual Symbols Description This symbol indicates that the words are clarification or supplement to this a...

Page 3: ...he camera If the camera is very dirty clean it with diluted neutral detergent do not use any type of solvents which may damage the surface Electrical Safety Installation and use of this product must s...

Page 4: ...Manual iii Magnetic Interference Electromagnetic fields at specific frequencies may affect the video image This product is Class A It may cause radio interference in household application Appropriate...

Page 5: ...Wall Mount 2 1 4 2 Steps of Ceiling Mount 4 2 Product Overview 7 2 1 Product Overview 7 2 1 1 Product Dimension 7 2 2 Product Feature 7 2 3 Technical Specification 9 2 4 Interface Introduction 12 2 4...

Page 6: ...nction Web Page Configuration 30 4 2 4 Configuration 32 4 2 5 Audio Configuration 33 4 2 6 Video Configuration 33 4 2 7 Network Configuration 37 4 2 8 System Configuration 39 4 2 9 Logout 41 5 Serial...

Page 7: ...Power Indicator 7 USB C 3 0 12 Power Input Socket DC12V 3 Statue Indicator 8 HDMI 4 Audio Voice Pickup 9 RS232 Input 5 Fixation Hole for Tripod 10 Line IN When using the camera please put the plastic...

Page 8: ...nnection Shown as diagram 1 1 11 b Log in You can reach the Web Interface by typing in the camera s IP address default 192 168 5 163 into a web browser To log in type in admin into the username and pa...

Page 9: ...4K PTZ Camera User Manual 3 Figure1 2 Steps of Wall Mount...

Page 10: ...4K PTZ Camera User Manual 4 1 4 2 Steps of Ceiling Mount...

Page 11: ...4K PTZ Camera User Manual 5...

Page 12: ...4K PTZ Camera User Manual 6 Figure1 3 Steps of Ceiling Mount...

Page 13: ...rfaces advanced ISP processing technology and algorithms make the image effect vivid uniform picture brightness strong light and color layering high definition and color reproduction it supports H 265...

Page 14: ...Input Interface Support AAC audio encoding support 16000 32000 44100 48000 sampling rate Two Methods of Voice Pickup Users can use the built in microphone to have the effect of picking up sound witho...

Page 15: ...0P25 720P60 720P50 1080P59 94 1080P29 97 720P59 94 USB C3 0 Main Stream YUY2 NV12 1920 1080 10 5fps 1280 720 25 20 15 10 5fps 1024 576 800 600 800 448 640 360 480 270 320 180 30 25 20 15 10 5fps MJPG...

Page 16: ...brightness priority Aperture F1 8 F11 CLOSE Shutter Speed 1 25 1 20000 BLC On Off Dynamic Range Off 1 8 Video Adjustment Brightness Hue Saturation Contrast Sharpness W B Mode Gama Curve SNR 50dB Tabl...

Page 17: ...erial Port Communication Protocols VISCA Pelco D Pelco P Baud Rate 115200 38400 9600 4800 2400 USB Communication Protocols UVC Video Communication Protocols UAC Audio Communication Protocols Power Sup...

Page 18: ...Real time tracking The longest tracking distance can reach 6 to 7 meters which can support the speaker to walk at a speed of 3 to 4 mph Zone tracking Support setting 4 tracking areas support horizonta...

Page 19: ...4K PTZ Camera User Manual 13 Figure1 5 Interface Diagram 2 4 2 RS 232 1 RS 232 Diagram RS232 Connection Method 1 GND 2 TXD 3 RXD Figure1 6 RS 232 Diagram...

Page 20: ...oller key combination 2 HDMI Output Connect the monitor with the corresponding video output interface 3 USB C3 0 Output Connect this product with computer USB3 0 interface open the Device Manager to s...

Page 21: ...e is no operation in the working state it will immediately enter the sleep mode and press any key to wake up 3 2 1 IR Remote Control 1 Standby Key After 3S long press the camera will step into standby...

Page 22: ...ack light 10 Menu Setting Open or close the OSD menu Enter exit the OSD menu or return to the previous menu 11 Camera IR Remote Control Address Setting F1 Camera Address No 1 F2 Camera Address No 2 F3...

Page 23: ...Remote Control Usage Finishing initialization it can receive and execute the IR commands Press the remote controller button the indicator light is flashing release the button the indicator light stops...

Page 24: ...om Control ZOOM IN press ZOOM key ZOOM OUT press ZOOM key Press and hold the key the camera will keep zooming in or zooming out and stops as soon as the key is released 4 Focus Control Focus near Pres...

Page 25: ...osition is not existed 3 Preset clearing to clear a preset position the user can press the CLEAR PRESET key first and then press the number key 0 9 to clear the relative preset Note press the key thre...

Page 26: ...ameter P T Z Enter into submenu of PTZ parameter Version Enter into submenu of version Revise Press to revise parameter Restore Factory Default Select Yes or No to restore factory default Home Confirm...

Page 27: ...Address 1 PELCO D Address 1 Baudrate 9600 USB tranmissiong mode OFF Auto Flip ON Select Change Value Menu Back PROTOCOL VISCA Pelco Pelco D Auto Visca ADDR VISCA 1 7 Pelco P 1 255 Pelco D 1 255 Baud...

Page 28: ...Enter into noise reduction Style Default standard clear bright soft 1 Exposure Move the pointer to the EXPOSURE in the Main Menu click the HOME and enter the EXPOSURE SET as follow EXPOSURE Mode Auto...

Page 29: ...0 F1 8 only available in Manual and Iris priority mode Brightness 0 23 only available in Brightness priority mode Gain 0 15 only available in Manual and SAE mode 2 Color Move the pointer to the COLOR...

Page 30: ...IMAGE as follow IMAGE Brightness 50 Contrast 50 Sharpness 4 B W Mode Color Gamma 0 55 DZoom OFF Low Light Mode Close Select Change Value Menu Back Brightness 0 100 Contrast 0 100 Sharpness 0 15 B W Mo...

Page 31: ...5 Noise Reduction Move the pointer to the NOISE REDUCTION in the Menu click the HOME and enter the NOISE REDUCTION as follow NOISE REDUCTION NR 2D 3 NR 3D 3 Select Change Value Menu Back 2D Noise Red...

Page 32: ...Tilt control speed by remoter will become slow Zoom Speed Set the zoom speed for remote controller 1 8 Image Freezing On Off Accelerating Curve Fast slow Preset Speed 1 10 3 3 6 Video Format Move the...

Page 33: ...3 3 8 Restore Default Move the pointer to the VERSION in the Main Menu click the HOME and enter the VERSION as follow RESTORE DEFAULT Restore Default NO Select Change Value Menu Back Home OK Restore d...

Page 34: ...open the window of Local Area Connection Properties on computer select the Internet protocol version 4 TCP IPv4 as shown by picture on the left Double click or click the property Internet protocol ver...

Page 35: ...rk connection as steps above mentioned after the finish of camera self check If IP is default open DOS command window and input 192 168 5 163 then press Enter key It will show message as below which m...

Page 36: ...preview interface In the preview screen users can control PTZ zoom focus video capture sound focus full screen and set the preset position run delete and other operations You can record the video and...

Page 37: ...shing region1 setting click Set to complete the Region1 Tracking Other region settings are same as region1 setting steps You can set 4 different regions and minimum 2 regions And the Regional Tracking...

Page 38: ...tion detailed description see the following table Table1 6 Explanation of Camera Configuration Menu Explanation Audio Configuration Including audio compressing format sampling frequency sampling preci...

Page 39: ...eo Configuration 1 Video Encoding Code Stream Different video output mode setting use different streams Main stream secondary stream Compression Format Set the video compression format save to take it...

Page 40: ...Protocol primary secondary stream applies RTMP protocol Host Port server port number default 1935 0 65535 optional Host Address server IP addresses default 192 168 5 11 Stream Name choose a different...

Page 41: ...priority default 0 0 20 optional Dynamic Range Set the dynamic range default 4 1 8 optional Shutter Speed Set shutter speed value valid in manual focus and shutter priority default 1 100 1 25 1 30 1...

Page 42: ...white optional Digital Zoom Set digital zoom default off on optional Lens Distortion Calibration Set image distortion default off on optional E Noise Reduction 2D noise reduction 3D noise reduction a...

Page 43: ...ideo Output Output Format Set the video output format 4KP30 4KP25 1080P30 1080P25 1080P29 97 optional 4K Output Option network stream output 4K USB 1080P USB output 4K network stream 1080p optional Cl...

Page 44: ...ss after saved reboot the device to takes effect default 192 168 5 163 Note This IP address is the same with the one used to login Web page Subnet Mask Set the subnet mask default 255 255 255 0 Defaul...

Page 45: ...essage Parameters saved successfully It will take effect after restarting 6 RTMP Enable RTMP Enable Disable RTMP Click the Save button and it will display Parameters saved successfully The new paramet...

Page 46: ...alid when display Save successful 3 User Management Select Users Set the user type the default administrator User 1 User 2 optional User Name Set the user name Select User Administrator default admin...

Page 47: ...account and password of method a are also restored to the default 5 Restore Factory Setting Click Restore Factory Defaults button and choose yes or no on pop up window then the device will restart aut...

Page 48: ...ne After power on the camera will have a brief tour and then back to the center position The zoom lens is pulled to the farthest position and then pulled back after that self test is completed 5 1 VIS...

Page 49: ...in a socket specified by the cancel command is canceled The completion message for the command is not returned No Socket z0 6y 05 FF y Socket No Returned when no command is executed in a socket specif...

Page 50: ...h Wide Variable 8x 01 04 07 3p FF Direct 8x 01 04 47 0p 0q 0r 0s FF pqrs Zoom Position CAM _Focus Stop 8x 01 04 08 00 FF Far Standard 8x 01 04 08 02 FF Near Standard 8x 01 04 08 03 FF Far Variable 8x...

Page 51: ...03 FF CAM_WB Auto 8x 01 04 35 00 FF 2400K 8x 01 04 35 0C FF 2500K 8x 01 04 35 0D FF 2600K 8x 01 04 35 0E FF 2700K 8x 01 04 35 0F FF 2800K 8x 01 04 35 10 FF 2900K 8x 01 04 35 11 FF 3000K 8x 01 04 35 01...

Page 52: ...5200K 8x 01 04 35 24 FF 5300K 8x 01 04 35 25 FF 5400K 8x 01 04 35 26 FF 5500K 8x 01 04 35 09 FF 5600K 8x 01 04 35 27 FF 5700K 8x 01 04 35 28 FF 5800K 8x 01 04 35 29 FF 5900K 8x 01 04 35 2A FF 6000K 8x...

Page 53: ...eset 8x 01 04 03 00 FF Manual Control of R Gain Up 8x 01 04 03 02 FF Down 8x 01 04 03 03 FF Direct 8x 01 04 43 00 00 0p 0q FF pq R Gain CAM_ Bgain Reset 8x 01 04 04 00 FF Manual Control of B Gain Up 8...

Page 54: ...Gain Limit Reset 8x 01 04 0C 00 FF Gain Limit Setting Up 8x 01 04 0C 02 FF Down 8x 01 04 0C 03 FF Gain Limit 8x 01 04 2C 0p FF p Gain Positon CAM_Bright Reset 8x 01 04 0D 00 FF Bright Setting Up 8x 01...

Page 55: ...50 3 0 55 4 0 63 CAM_Low Lig ht Mode ON 8x 01 04 2D 01 FF Low Light Mode Setting OFF 8x 01 04 2D 00 FF CAM_Gain 8x 01 04 4C 00 00 0p 0q FF pq 0 15 CAM PresetSpeed 8x 01 01 0p FF p 1 10 CAM_Flicker OF...

Page 56: ...on CAM_IDWrite 8x 01 04 22 0p 0q 0r 0s FF pqrs Camera ID 0000 to FFFF SYS_Menu ON 8x 01 04 06 06 02 FF Turn on the menu screen OFF 8x 01 04 06 06 03 FF Turn off the menu screen IR_Receive ON 8x 01 06...

Page 57: ...X1A 4KP25 Pan_tiltDrive Up 8x 01 06 01 VV WW 03 01 FF VV Pan speed 0x01 low speed to 0x18 high speed WW Tilt speed 0x01 low speed to 0x14 high speed YYYY Pan Position ZZZZ Tilt Position Down 8x 01 06...

Page 58: ...0W 0Y 0Y 0Y 0Y 0Z 0Z 0Z 0Z FF W 1 UpRight 0 DownLeft YYYY Pan Limit Position TBD ZZZZ Tilt Limit Position TBD Clear 8x 01 06 07 01 0W 07 0F 0F 0F 07 0F 0F 0F FF 5 1 3 Inquiry Command Command Command P...

Page 59: ...CAM_AWBSe nsitivityInq 8x 09 04 A9 FF y0 50 00 FF Low y0 50 01 FF Normal y0 50 02 FF High CAM_RGainIn q 8x 09 04 43 FF y0 50 00 00 0p 0q FF pq R Gain CAM_BGainIn q 8x 09 04 44 FF y0 50 00 00 0p 0q FF...

Page 60: ...0p FF P 2DNRLevel CAM_NRLeve l 3D Inq 8x 09 04 54 FF y0 50 0p FF P 3D NRLevel CAM_Flicker ModeInq 8x 09 04 55 FF y0 50 0p FF p Flicker Settings 0 OFF 1 50Hz 2 60Hz CAM_Apertur eInq 8x 09 04 42 FF y0...

Page 61: ...Contras tInq 8x 09 04 A2 FF y0 50 00 00 0p 0q FF pq Contrast Position CAM_FlipInq 8x 09 04 A4 FF y0 50 00 FF Off y0 50 01 FF Flip H y0 50 02 FF Flip V y0 50 03 FF Flip HV CAM_Gamma Inq 8x 09 04 5B FF...

Page 62: ...the device to be operated y x 8 5 2 Pelco D Protocols Command List Function Byte1 Byte2 Byte3 Byte4 Byte5 Byte6 Byte7 Up 0xFF Address 0x00 0x08 Pan Speed Tilt Speed SUM Down 0xFF Address 0x00 0x10 Pa...

Page 63: ...UM Clear Preset 0xFF Address 0x00 0x05 0x00 Preset ID SUM Call Preset 0xFF Address 0x00 0x07 0x00 Preset ID SUM Query Pan Position 0xFF Address 0x00 0x51 0x00 0x00 SUM Query Pan Position Response 0xFF...

Page 64: ...Speed 0xAF XOR DownLeft 0xA0 Address 0x00 0x14 Pan Speed Tilt Speed 0xAF XOR DownRight 0xA0 Address 0x00 0x12 Pan Speed Tilt Speed 0xAF XOR Zoom In 0xA0 Address 0x00 0x20 0x00 0x00 0xAF XOR Zoom Out...

Page 65: ...lt Position 0xA0 Address 0x00 0x53 0x00 0x00 0xAF XOR Query Tilt Position Response 0xA0 Address 0x00 0x5B Value High Byte Value Low Byte 0xAF XOR Query Zoom Position 0xA0 Address 0x00 0x55 0x00 0x00 0...

Page 66: ...ker Do not operate close to powerful electromagnetic radiation such as TV or radio transmitters etc 6 3 Troubleshooting No image 1 Check whether the power cord is connected voltage is OK POWER lamp is...

Page 67: ...y supporting furniture for vibration Ceiling mounts are often affected by building vibration more than wall mounts 3 Any external vibration that is affecting the camera will be more apparent when in t...

Reviews: