background image

GL-35DSR Network Storage & Extra Features 


EN 

34/37 

3.7 USB Copy 

When a USB drive is connected to the GL-35DSR via USB, all files on the USB drive can be 
copied to the internal hard drive of the network drive with a push of the BACKUP button. 
 

1.  Connect the USB drive to the front port of your GL-35DSR  network drive. We recommend 

using self-powered USB devices. In order for the network drive to mount the USB drive, the 
file system has to be FAT32 (read/write). NTFS / EXT3 or other file formats are not 
supported. 

2. Press 

the 

BACKUP button for one second to copy all the files from the attached USB drive 

to the Public folder on the network drive. 

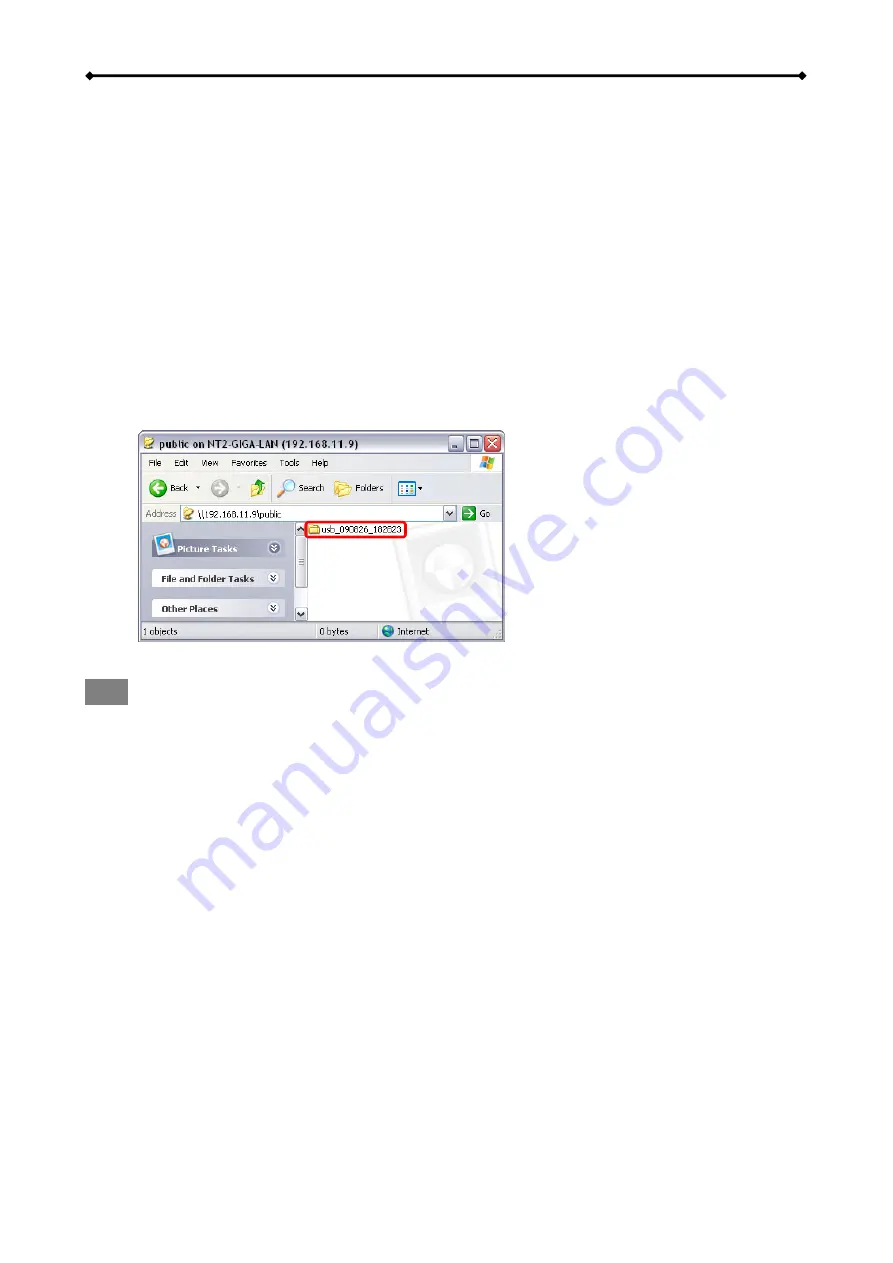
3.  A new folder with the current date and time will automatically be created and all files from 

the USB drive will be copied into this folder. When the backup is done, the USB drive will 
be unmounted and you cannot access to the USB drive anymore. 

4.  The USB drive can now be removed and the data can be accessed on the network drive in 

the Public directory. 


Note  

To safely unmount the USB drive without doing a backup, go to the Disk Management menu, 
select the external USB drive and click Remove USB device in order to eject the drive. 
 

Summary of Contents for GL-35DSR

Page 1: ...EN FANTEC GL 35DSR Network Attached Storage for 2 HDDs User Manual ...

Page 2: ...Preference 13 2 2 4 Applications 18 2 2 5 Registration 20 2 2 6 About 20 3 Network Storage Extra Features 21 3 1 File Access on a PC 21 3 1 1 Windows Explorer 21 3 1 2 Mapping a Network Drive 21 3 1 3 Disconnecting a Network Drive 22 3 1 4 FTP 23 3 2 File Access on a Mac 24 3 2 1 SMB 24 3 2 2 FTP 25 3 3 BitTorrent Download Manager 26 3 3 1 Starting a Download 26 3 4 Printer Server 27 3 4 1 Install...

Page 3: ...s for setup Switch or Router with one free Ethernet port for the GL 35DSR LAN One or two 3 5 SATA I or SATA II hard drives 1 5Gb s or 3 0Gb s 80GB 2TB per HDD for RAID identical capacities are recommended 1 3 1 Supported Operating Systems PC running Windows XP Windows Vista or Windows 7 Mac running Mac OS 10 2 or above Note PC running Windows required to initialize NAS system 1 3 2 Supported USB D...

Page 4: ...D Icon Status Function Blue Power ON Access Flashing blue Read Write data access HDD1 2 ERROR Red Error or empty drive bay HDD 1 will light up during start up READY Green NAS system is ready and running in standard mode from HDD LAN Green NAS is connected to the network BACKUP Press this button for one second to copy all the files from the attached USB drive to the public folder on the network dri...

Page 5: ...en the power is turned off press and hold this button turn on the power and let go of the button when you see the LED at HDD 1 light up red 2 seconds in order to enter the flash mode USB 1 1 host port for USB printers Yellow Indicates data access read write Green Indicates LINK status of network connection Power receptacle EN 3 37 ...

Page 6: ...ll socket To turn on the GL 35DSR LAN press the power switch to start up the system It will take about one to two minutes for the device to go online The green READY LED will indicate when the system is ready To safely turn off the GL 35DSR LAN press and hold the power switch for 3 seconds The system will shut down all services and about 20 seconds later it will power off If for some reasons the s...

Page 7: ...nto the SATA interface and then lock the front panel Note Be careful not to damage any components and do not force the drives into the SATA interface to hard If they not easily slide into it and fit make sure the drives have been installed correctly The top of the drives where the label is located should face each other Important It is not possible to start with only one HDD and then adding a seco...

Page 8: ...he local network 2 Press and hold the reset button turn on the power and let go of the reset button about 2 seconds later 3 Wait for the green READY LED to start flashing and then start the Discover Tool from a computer that is connected to the same local network 4 It will automatically search for the network drive but if it doesn t start by itself or didn t find the drive click Refresh to start t...

Page 9: ...econd drive This is useful when reliability and backup take precedence over storage capacity Should one hard drive fail it can be replaced and the data rebuilt automatically RAID0 The drives show up as one large single volume combining the capacities of all drives RAID0 is an array that is written sequentially across the drives By itself it does not provide any performance or redundancy benefits H...

Page 10: ... by itself It will restart even if the dialog has not yet been closed Once the NAS is ready the green READY LED will light up Note Initializing the NAS system is only necessary the very first time when new hard drives were installed or when the drives have been formatted again To change the settings of the network drive or to upgrade the firmware after initializing the system login to your network...

Page 11: ... that the network drive has already been initialized that it is connected to the same local network as your computer and the power is turned on 2 Wait at least 15 seconds after turning on the network drive and then start the Discover Tool It will automatically search for the device but if it does not find it click Refresh to start the search again and make sure the program is not being blocked by ...

Page 12: ...erface of your GL 35DSR Note This method of login only works on Windows and not on a Mac 2 1 3 Safari Web Browser Bonjour Bookmarks on a Mac Start your Safari web browser open the Bookmarks panel and select Bonjour Locate and select the gl 35dsr GIGA LAN UI link and double click on it to open the login page of the network drive in order to access the web configuration interface of your GL 35DSR 1 ...

Page 13: ...the web browser Select your preferred View to browse your media files or download them to your computer Note The use of Subfolders is currently not supported The more content is stored in one Album the more time is needed to load the preview The albums are shared with all users by default enabling access to all users who have an account on this system making it an easy way to quickly share your me...

Page 14: ...on the left hand side to create a new album browse for your media files in the Media Library and then simply drag and drop the files into your new album When removing an album it will only delete the link to your media files but not actually remove them from the drive Private All files stored inside the Private directory will only be accessible by the current user Use this to store your personal f...

Page 15: ...ly delete the files inside the share folder Note To upload single or multiple files by dragging them from your computer and dropping them in the Media Library install Gears from Google See http gears google com for more details Important For a large number of files or folders to be copied it s recommended to copy these files via SMB This way is a lot faster than the use of GUI copy mode with Googl...

Page 16: ...new user click fill out the user name no special characters enter the password twice and then click 9 To remove an existing user select the name from the list click and then confirm the removal The admin account for the system administrator is created by default and cannot be deleted However for security reasons we recommend changing the default password as soon as possible Note Only the system ad...

Page 17: ...tart the system It will automatically rebuild the RAID1 array Rebuilding the RAID1 array will take a while The time of rebuilding depends on the capacity of your hard drives Important Changing the RAID mode will erase all existing data Make sure you have a backup of your data before you change the RAID mode Note Before disconnecting and shutting down an attached USB drive it is recommended to use ...

Page 18: ...the network time server Date and Time Time zone Internet time server Date and time Date and Time If internet access is available we recommend selecting the correct time zone from the list enabling the function Synchronize with a NTP server and clicking Submit to update and synchronize the time The time will also be synchronized again after every restart of the system Note To use the time server yo...

Page 19: ...btain its IP address from the DHCP server If required you can also set it to a static IP address and fill out all information manually If you need assistance with these settings please contact your network administrator for help Note After changing any of the settings click Submit to save the new configuration FTP Service Advanced Settings Option to enable or disable the FTP server By default the ...

Page 20: ...irectory for the shared music files is set to Public Music and cannot be changed Songs that are not stored inside that directory will therefore not show up on iTunes 2 2 4 Applications Downloader List and details of current files Toolbar Click to start HTTP download Enter URL of file to download To start downloading files copy the URL HTTP or FTP to the file you like to get and paste it into the a...

Page 21: ...queue The download speed may not be as fast as a BitTorrent client on the computer but once the Torrent has been added to the queue it can download the files by itself and the computer can be turned off Note Make sure the port for the BitTorrent client is not blocked by your router or its firewall If necessary set up port forwarding so that the traffic for that port e g 6881 is forwarded to your n...

Page 22: ...5DSR NAS Configuration EN 20 37 2 2 5 Registration Device registration for remote access Note This function is currently not yet available 2 2 6 About Displays copyright information and warranty disclaimer ...

Page 23: ...ata to your local drive or video player first Note When you have to access multiple folders with different passwords or have modified the settings without a computer restart go to Tools Options and disconnect the temporary network drive first before accessing the new folder 3 1 2 Mapping a Network Drive Mapping the network drive will allow you to create a permanent drive letter that will be presen...

Page 24: ...d and access it under My Computer This link will still be there even after restarting the computer Note You can also map a network drive by using the Discover Tool program and by clicking on the Map Network Drive icon 3 1 3 Disconnecting a Network Drive When you don t need a mapped network drive any more we recommend disconnecting it It is also necessary to disconnect a temporary network drive whe...

Page 25: ...program Note Files cannot be opened directly via FTP you will always have to transfer them to your computer first before reading or playing them 1 Using Windows Explorer type ftp followed by the IP address of your network drive into the address field If the account is password protected add the user name and password in front of the IP address with a sign in between like this ftp test test 192 168...

Page 26: ...s the network drive use the Connect to Server command 1 Click on Go and select Connect to Server 2 Type smb followed by the IP address of your network drive and click on Connect 3 Select Registered User and enter your user name and password 4 Choose a folder from the list and click OK EN 24 37 ...

Page 27: ...ich can either be a free utility or shareware program The FTP utility on the Mac will only be able to read the data on the network drive but cannot upload any new data to it 1 Click on Go and select Connect to Server 2 Type ftp followed by the IP address of your network drive and then click on Connect 3 Enter the correct username and password The FTP folder will then be listed in your finder under...

Page 28: ...e and the download starts automatically You can now turn off your computer if desired 5 For further commands select the file from the list and you will have the option to stop and start the download as well as completely remove a file from the queue or see more details 6 Once the download process has reached 100 and if the file is not removed from the download queue it will start seeding uploading...

Page 29: ...ect your USB printer to the USB host port on the network drive and turn both units on 2 Login to your network drive and go to the Applications menu to make sure the printer server service has been enabled We also recommend using a fixed IP address in order to prevent having to modify the printer setup whenever the IP changes 3 On your PC go to Start and select Printers and Faxes 4 Go to File selec...

Page 30: ...are both turned on and connected to the same local network as your computer then click on Next 8 Enter the IP address of your network drive the port name will be filled out automatically and then click on Next 9 Select Custom and click on Settings to modify the configuration EN 28 37 ...

Page 31: ...ve 13 In the next few steps you will be able to give the printer a name set it as default printer add a description and print a test page It is not necessary to share the printer with other network users because it can be installed on other computers in the same way as here 14 Once you have completed the wizard set up your printer should be properly installed and ready to print Note Not all USB pr...

Page 32: ...3 Select the IP tab For the Protocol select HP Jetdirect Socket and for the Address enter the IP address of your network drive The Name and Location are used to easily identify the printer and do not have to be the same as the ones used in this example For the last step select the corresponding printer driver and click on Add 4 Done Your printer has been set up and you are now ready to print Note ...

Page 33: ...BMP Music MP3 WMA WAV Video MKV AVI MPEG MPG WMV DAT DivX VOB MOV TS MTS M2TS FLV Note Playback support for the various file formats also depends on the UPnP AV client e g PS3 or Xbox 360 For more details please refer to the documentation of your game console or digital media adapter DMA 3 5 1 Xbox 360 1 On your NAS make sure that the media files you would like to share are stored in the Public fo...

Page 34: ...2 On your PS3 open the Settings menu go to Network Settings select Media Server Connection and Enable it This will allow the PS3 to automatically detect the media server on the network drive 3 When you turn on the PS3 media servers on the same local network are automatically detected and a shortcut will be displayed under Photo Music and Video 4 Select the network drive to access the Public folder...

Page 35: ...ess from iTunes on the network drive in the Public directory inside the Music folder 2 If you have only just added your music files wait for about 1 minute until the music files have been added to the database of the NAS system 3 Start iTunes go to shared devices and select your network drive from the list You can now play back your music files directly in iTunes Note If your music files do not ap...

Page 36: ...ts are not supported 2 Press the BACKUP button for one second to copy all the files from the attached USB drive to the Public folder on the network drive 3 A new folder with the current date and time will automatically be created and all files from the USB drive will be copied into this folder When the backup is done the USB drive will be unmounted and you cannot access to the USB drive anymore 4 ...

Page 37: ...erver Port 6881 for BitTorrent downloads Power AC adapter AC Input 100 240V 1 3A 50 60Hz DC Output 5V 4 2A 12V 3A Dimensions 17 0cm x 12 0cm x 8 0cm Operating Temperature Humidity 5 C 40 C 10 RH 80 RH non condensing Storage Temperature Humidity 20 C 70 C 5 RH 90 RH non condensing Note Design and specifications are subject to change without prior notice and will depend on the current firmware relea...

Page 38: ... systems for personal computers LAN A Local Area Network LAN is a computer network covering a small local area like a home office or small group of buildings such as a home office or college FTP FTP or file transfer protocol is a commonly used protocol for exchanging files over any network that supports the TCP IP protocol such as the Internet or an intranet There are two computers involved in an ...

Page 39: ... Cables Use only the cables supplied or in order to avoid the risk of malfunction electric shock and or possible interference to the device 4 6 Important Notices 4 6 1 About this Manual This manual was written for the FANTEC GL 35DSR network drive with the firmware version FT_2 0 0_20100324 Images and descriptions may slightly vary between this document and the actual product you have and the avai...

Reviews: