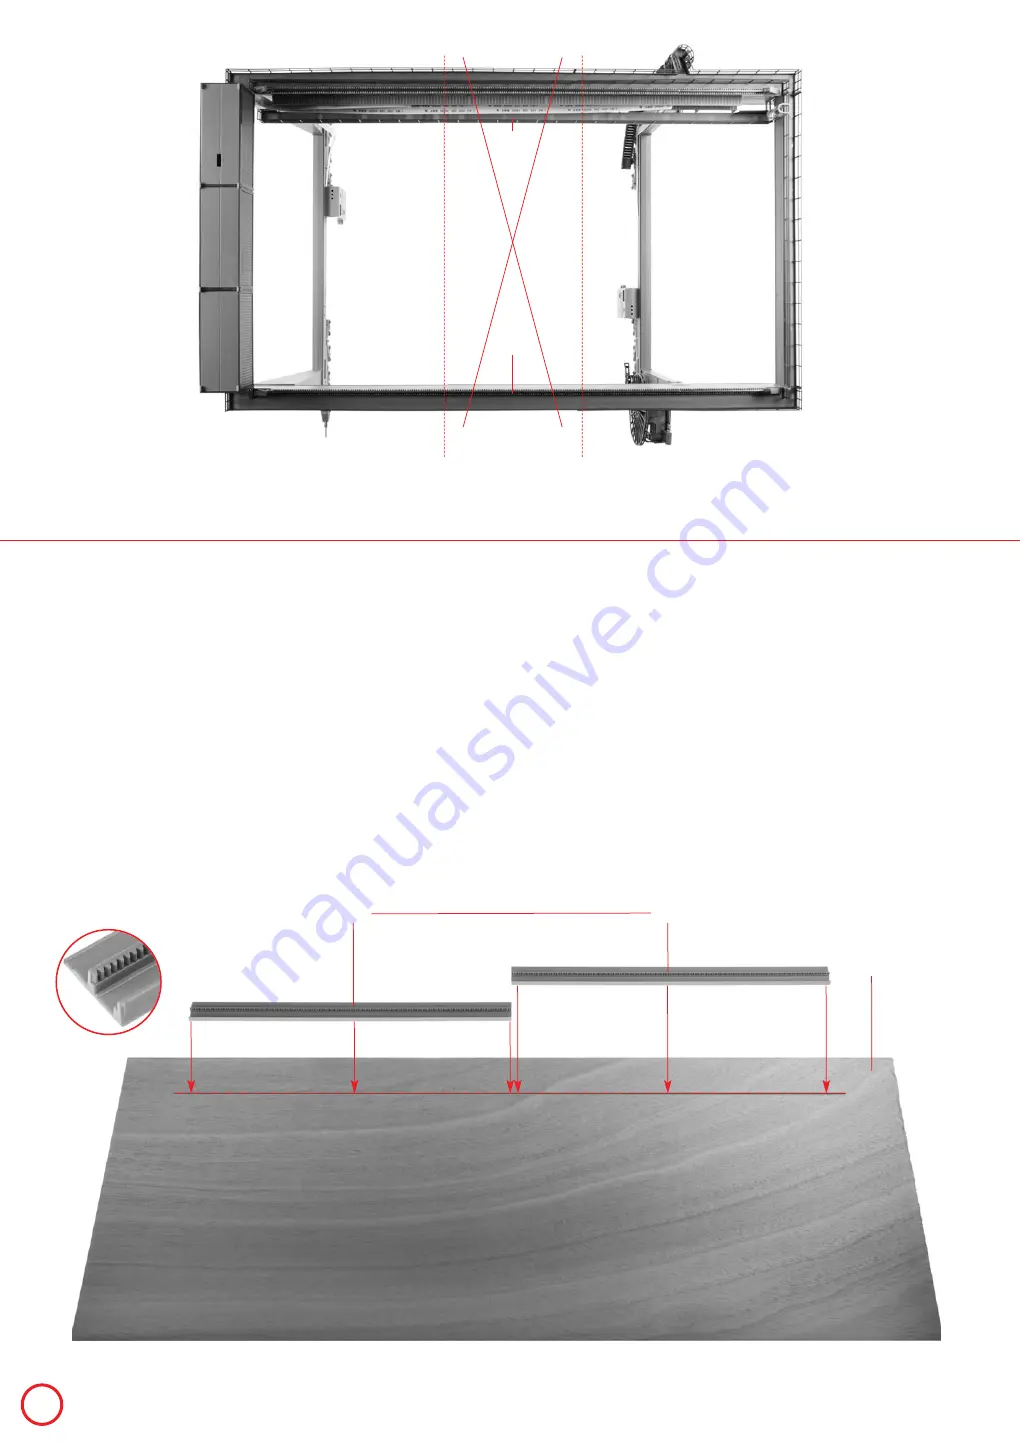
Für den Einbau der Schienen auf der Anlage ist es Wichtig, dass die zu bebauende Fläche absolut eben ist! Prüfen sie die Fläche mit entsprechenden Hilfsmitteln (Wasserwaage, Winkel) auf 100% Ebenheit.
Kleben sie die Teile 6/1 absolut fluchtend hintereinander auf die entsprechende Stelle der Anlage.
Die schwarz/weiß-Rasterung (siehe Seite 5) muss min. 3 cm weiß zum Auslösen der Lichtschranke am Anfang und Ende enthalten und der Abstand von Lichtschranke zum Rollen Anfang/Ende muss zusätzlich
berücksichtigt werden, damit der Schlitten an der richtigen Endposition hält und nicht zu weit fährt. Das gilt für beide Seiten der Schienen, am Anfang und am Ende.
To mount the rails on the installation, it is essential that the surface to build onto be perfectly level! Check with suitable tools (spirit level, try square) that the surface is level to 100%.
Glue parts 6/1 one behind the other, in perfect alignment, onto the selected surface area of your installation.
The black and white screening (see page 5) must contain at least 3 cm of white to ensure the triggering of the light-barrier at the start and at the end, the spacing of light-barrier and roller at the start and
at the end having in addition to be taken into account to allow the travelling crab to stop in the right end position, without driving too far. This applies to both sides of the rails, at the start and at the end.
Pour la mise en place des rails sur l’installation, il est essentiel que la surface à bâtir soit parfaitement horizontale! Contrôlez que la surface présente une horizontalité à 100 % au moyen d’auxiliaires adéquats
(niveau à bulle, équerre). Collez les pièces 6/1 les unes derrière les autres de façon qu’elles soient parfaitement alignées, à l’endroit correspondant de votre installation.
La trame noire et blanche (voir page 5) doit présenter au moins 3 cm de blanc pour assurer le déclenchement de la cellule photo au début et à la fin, et il faut en plus tenir compte au début
et à la fin de l’espacement existant entre la cellule photo et le galet, pour que le chariot s’arrête dans la position finale correcte sans rouler trop loin. Ceci vaut pour les deux côtés des rails, au début et à la fin.
Voor het aanbrengen van de rails op uw modelopzet is het belangrijk dat het betreffende oppervlak absoluut vlak is! Controleer met geschikte hulpmiddelen (waterpas, winkelhaak) of het oppervlak ook daadwerkelijk
100% vlak is. Plak de onderdelen 6/1 absoluut op één lijn achter elkaar op de betreffende plek van de modelopzet.
De zwart/wit-rastering (zie pagina 5) moet aan het begin en aan het einde min. 3 cm wit bevatten om de fotocel te activeren en er moet ook rekening worden gehouden met de afstand van de fotocel tot start/einde
rollen om ervoor te zorgen dat de slede bij het juiste eindpunt stopt en niet te ver doorrijdt. Dit geldt voor beide kanten van de rails, aan het begin en aan het einde.
6/1
6/1
Achtung: Die Containerbrücke ist in verschiedenen Längen baubar. Die Geländer müssen dann entsprechend gekürzt werden.
Caution: The Container bridge-crane can be built with different lengths. Railings must then be shortened accordingly.
Attention: On peut construire le Portique à conteneurs en différentes longueurs. Il faut alors raccourcir les garde-corps de façon correspondante.
Let op: de containerkraan kan in verschillende lengtes worden gebouwd. De balustrades moeten dan passend worden ingekort.
1/8
A
Auf Ebenheit des Untergrundes achten!
Make sure the support is level!
Veiller à ce que le support soit horizontal!
Let erop dat de ondergrond vlak is!
3
1/8
liegt nicht bei
not included
non jointe
niet bijgevoegd
Art. Nr. 180290
Art. Nr. 180290


