background image

Ważne

7/16

1

2 3

4

x1

1

4

IN/EX

x1

1

2

1

3 4

2 3 4

I

II

III

IV

V

VI

VII

IN/EX

VIII

 IX

x1

5s.

0.5s.

x1

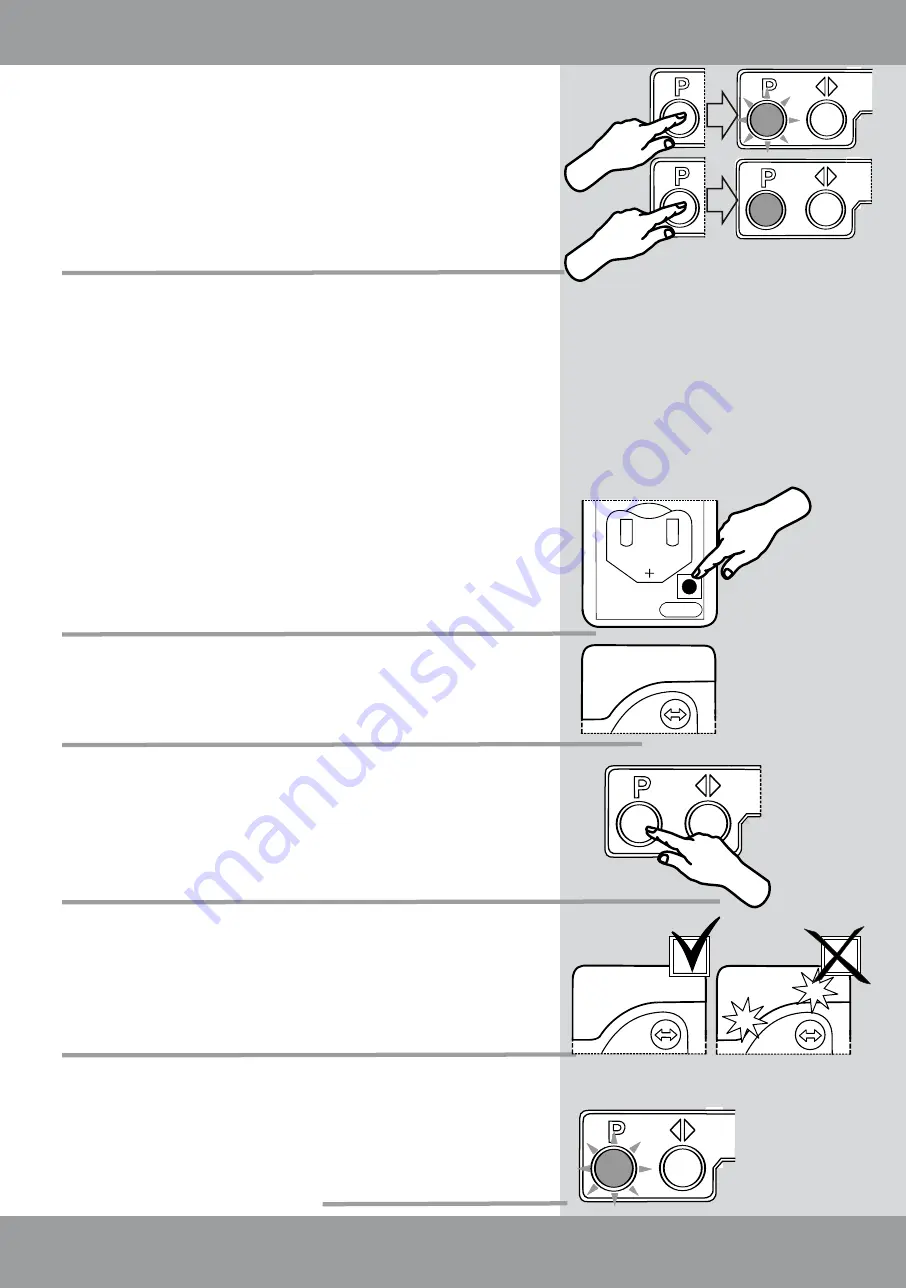
Device programming

Below exemplary procedure of adding device to the network (INCLUDE

FUNCTION):

1 . Press once In/Ex button on the controller (remote)

2. The controller signals awaiting for information about the device being

added to the network – external LEDs (1 ,4) light up for about 1 0

seconds.

then within 1 0 seconds:

3. Press the programming button on the blind longer than 1 second:

4. The controller (remote) signals:

correct adding the device to the network – two LEDs (2,3) light up

for 2 seconds.

incorrect device adding – two LEDs (1 ,4) blink three times, it is

necessary to repeat the process

5. The awning blind signals:

- correct adding the device to the network – network status LED 2 blinks

once after pressing the button)

NOTE!!!

The awning blind is factory programmed for

ZWP SA4

controller

on channel 1 . In case of need for controller replacement, change of

configuration or programming additional device, it is necessary to follow

recommendations presented below. Before proceeding to programming

check whether the device is not already a part of another network. The

device is in the network when after pressing P button the network status

LED blinks once

for 0.5 sec

. The device does not belong to any network

when after pressing P button the network status LED blinks

for 5 sec

.

Adding the device to the network (remote) – INCLUDE function

For the device to communicate in the Z-Wave network, it is necessary

to connect to this network and assign a specific number (Node ID). The

device can be added to the network, only if it is not already a part of

another network. To add the device to another network, it must be first

removed from the existing network or restored to factory settings by

means of any PRIMARY controller. Readiness to be added to the network

is signalled by the network status LED (fig. on page 4).

Summary of Contents for AMZ

Page 1: ...1 User manual AMZ Z Wave Solar Awning Blind Read the instruction below carefully before proceeding to device usage www FAKRO com GB ...

Page 2: ...he network operate by the controller of other manufacturer 11 Special function ALL ON ALL OFF 11 Manual operating 11 Remote control 12 Modes of control 12 Switching between control mades 12 Procedure for selection of mode control 12 Operation mode and automatic control 13 14 Modes of the awning blind operation 13 Change of parameters 13 Opening or closing time in A and S mode 13 Insolation level 1...

Page 3: ...hey may be a potential source of danger The awning blind should be used according to its intended design The FAKRO Company shall not be responsible for any consequences being the result of improper awning blind use Any activities relating to cleaning adjustment or dismantling should be preceded with disconnecting the power supply The awning blind cannot be washed using solvent based substances or ...

Page 4: ...omatic semi automatic and manual The AMZ Z Wave Solar Awning Blind is equipped with three protections at the maximum unrolling of the awning blind outskirt at the maximum rolling up of the awning blind outskirt current limiting protecting the awning blind against damage and the user against accidental injury as a result of contact with movable elements of the awning blind To be able to control the...

Page 5: ... signalling are on the right side of the awning blind guide ZWMS controller terminals of the AMZ Z Wave Solar awning blind are under right cover of the awning blind see the picture below 7 place of power supply connection photovoltaic panel 8 place of motor connection 9 photovoltaic panel for recharging the battery ...

Page 6: ...tion V operating button for rolling up the awning blind VI stop button for stopping the awning blind in requested position VII operating button for unrolling the awning bind NOTE Programming button IN EX and 3VDC button cell battery is positioned under back part of the cover NOTE Older controllers of the Z Wave system cannot operate awakening function of energy efficient devices such as the AMZ Z ...

Page 7: ...oller on channel 1 In case of need for controller replacement change of configuration or programming additional device it is necessary to follow recommendations presented below Before proceeding to programming check whether the device is not already a part of another network The device is in the network when after pressing P button the network status LED blinks once for 0 5 sec The device does not...

Page 8: ...tarily and then 3 Press one of the operating buttons or or 4 Readiness to assign the device is signalled by the controller LEDs 1 2 3 light up for 10 sec Assigning the device to the operating buttons of the controller ASSOCIATE function Please find below exemplary procedure of adding the device to the operating buttons of the controller ASSOCIATE FUNCTION In order to control the device the awning ...

Page 9: ...n the network and the rapid wear on the batteries of portable controllers The order of execution of the function is also very important First perform the DELETE function and at the very end the EXCLUDE function Please find below exemplary procedure of removing the device from the operating buttons 1 By pressing button choose one of four channels which will be used for programming the blind and the...

Page 10: ...g for information about the device being removed from the network LEDs 2 3 light up for about 10 sec then within 10 sec 3 Press the programming button on the awning blind for longer than 1 sec 4 The controller signals correct device removal from the network LEDs 1 4 light up for 2 sec incorrect removal from the network LEDs 2 3 blink three times 5 The awning blind signals correct device removal fr...

Page 11: ...he awning blind being added to the network Note Information on how to initiate and perform the INCLUDE and ASSOCIATE functions with the use of controllers of other manufacturers is to be found in the manuals of these devices Special function ALL ON ALL OFF It is possible to define whether the awning blind has to obey CLOSE ALL and OPEN ALL commands Note Instructions on how to define CLOSE ALL and ...

Page 12: ...lind unrolls Rolling up is possible only with the remote control After manual rolling up of the awning blind due to the exceeding set value of solar insolation and after expiration of set time the actuator one more time unrolls the awning blind In manual mode the awning blind can be controlled only via the remote control automatic control is turned off Switching between control modes Switching bet...

Page 13: ...ning blind operation In automatic control the solar blind utilizes 2 sensors solar radiation and temperature Solar radiation sensor is realized by measuring the voltage from photovoltaic panel and has direct influence on the awning blind unrolling and rolling up Temperature sensor influences mode of the awning blind operation summer or winter The awning blind works in summer mode when the temperat...

Page 14: ...t mode it is necessary to press SELECT and UP DOWN buttons 1 Press and hold SELECT and then 2 By pressing one of the operating buttons or or choose requested value 3 Release SELECT button Restoring default parameters 1 Press and hold for 5 sec programming button P on the awning blind until single blink of motor status LED and then 2 Not releasing P button press manual operating button for longer t...

Page 15: ...he controller s LEDs I 1 25 battery charge level II 1 2 50 battery charge level III 1 2 3 75 battery charge level IV 1 2 3 4 100 battery charge level Checking opening closing status 1 Choose with the SELECT button appropriate channel on which the awning blind is programmed e g 1 2 Press the button and hold for 3 sec until LED of the channel 1 starts blinking 3 Channel LED blinks for about 10 sec 4...

Page 16: ...pheric phenomena The manufacturer is not liable for damage which occurred as a result of improper use or mechanical damage In case of failure the device must be submitted for repair with a Warranty Card Defects revealed within the warranty period will be removed free of charge no longer than 14 days after accepting the product for repair Warranty and post warranty repairs are performed by the manu...

Reviews: