background image

7

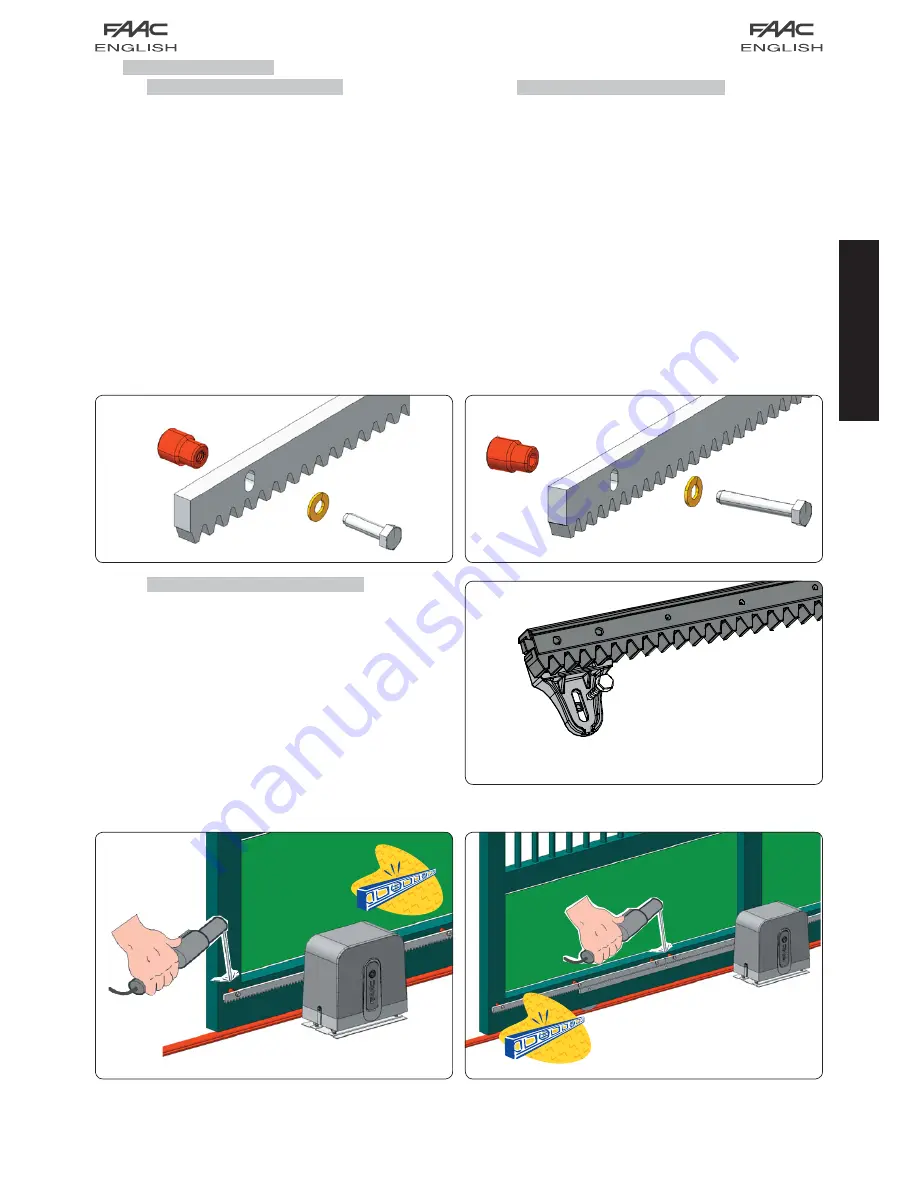
Fig. 11

Fig. 12

Fig. 13

Fig. 14

Fig. 15

ENGLISH

5.4  INSTALLING THE RACK

5.4.1  STEEL RACK TO WELD (Fig.11)

Place the three threaded pawls on the rack element, posi-

tioning them at the top of the slot. In this way,  the slot play 

will enable any adjustments to be made.
Manually take the leaf into its closing position.
Lay the first piece of rack level on the pinion and weld the 

threaded pawl on the gate as shown in Fig. 14.
Move the gate manually, checking if the rack is resting on 

the pinion, and weld the second and third pawls.
Bring another rack element near to the previous one, using a 

piece of rack (as shown in Fig. 15), to synchronise the teeth 

of the two elements.
Move the gate manually and weld the three threaded pawls, 

thus proceeding until the gate is fully covered.

1.

2.
3.

4.

5.

6.

5.4.2  STEEL RACK TO SCREW (Fig. 12) 

Manually take the leaf into its closing position.
Lay the first piece of rack level on the pinion and place the 

spacer between the rack and the gate, positioning it at 

the top of the slot. In this way,  the slot play will enable any 

adjustments to be made.
Mark the drilling point on the gate. Drill a Ø 6.5 mm hole and 

apply thread with a Ø 8 mm  male tap. Screw the bolt.
Move the gate manually, checking if the rack is resting on 

the pinion, and repeat the operations at point 3.
Bring another rack element near to the previous one, using 

a piece of rack (as shown in figure 15) to synchronise the 

teeth of the two elements.
Move the gate manually and carry out the securing opera-

tions as for the first element, thus proceeding until the gate 

is fully covered.

1.
2.

3.

4.

5.

6.

5.4.3  NYLON RACK TO SCREW (Fig. 13) 

Manually take the leaf into its closing position.
Lay the first piece of the rack level on the pinion and mark 

the drilling point on the gate; drill Ø 6.5 mm and screw in the 

self-tapping screw provided with its reinforcing plate.
Move the gate manually, checking if the rack is resting on 

the pinion, and repeat the operations at point 2.
Couple another rack element and fit to the previous ele-

ment.
Move the gate manually and carry out the securing opera-

tions as for the first element, thus proceeding until the gate 

is fully covered.

1.
2.

3.

4.

5.

Summary of Contents for C720

Page 1: ...C720 C720...

Page 2: ...must be checked as specified in the Standards indicated at point 10 16 The safety devices EN 12978 standard protect any danger areas against mechanical movement Risks such as crushing dragging and she...

Page 3: ...HANICAL INSTALLATION 6 5 4 INSTALLING THE RACK 7 5 4 1 STEEL RACK TO WELD Fig 11 7 5 4 3 NYLON RACK TO SCREW Fig 13 7 5 4 2 STEEL RACK TO SCREW Fig 12 7 6 OPERATIONAL START UP 8 6 1 ELECTRONIC BOARD C...

Page 4: ...d when the operator is not working and therefore no electric lock needs to be installed A convenient manual release device allows the gate to be manoeuvred in the event of a power cut if emergency bat...

Page 5: ...per guide must be provided plus mechanical limit switches to prevent the gate derailing The gate slide track must be linear and horizontal Manual movement of the gate must be easy throughout its trave...

Page 6: ...NYLON rack left closure Dimensions in mm This symbol must always face to wards the gate Prepare a foundation plinth as shown in Fig 7 and wall in the foundation plate supplying one or more sheaths for...

Page 7: ...with rack in GALVANISED STEEL Adjust the height of the gearmotor and the distance from the gate with reference to the dimensions in Fig 10 Operation required for correct fastening of the rack and to...

Page 8: ...it at the top of the slot In this way the slot play will enable any adjustments to be made Mark the drilling point on the gate Drill a 6 5 mm hole and apply thread with a 8 mm male tap Screw the bolt...

Page 9: ...the control board connections programming mainte nance always turn off power Observe points 10 11 12 13 14 of the GENERAL SAFETY OBLIGATIONS Follow the instructions in Fig 3 to arrange the cables in t...

Page 10: ...approximately 40 mm must be left from the mechanical limit switches 7 TESTING THE AUTOMATED SYSTEM Once the operator has been installed carry out a thorough operational check of all accessories and co...

Page 11: ...the motor thrust force which must comply with current standards and of the release devices 10 REPAIR Contact an authorised Repair Centre for repairs 11 ACCESSORIES 11 1 BATTERY KIT Install the batter...

Page 12: ...er the selected pause time If semi automatic operating mode has been selected a second pulse must be sent to re close the gate An opening pulse issued during the re closing stage always causes a rever...

Page 13: ...n in vorliegendem Handbuch sind unverbindlich FAAC beh lt sich das Recht vor ohne die wesentlichen Eigenschaften dieses Ger tes zu ver ndern und ohne Verbindlichkeiten in Bezug auf die Neufassung der...

Reviews: