


USER’S GUIDE
746 AUTOMATION
Read the instructions carefully before using the product and
keep them for future reference.
GENERAL SAFETY INSTRUCTIONS
The 746 automation, when installed and used correctly,
affords a high level of safety.
However, some simple rules should be followed to avoid
accidents:
- Do not stand in the vicinity of the automation or allow anyone
else, especially children, to do so, and do not place objects
in the vicinity of the automation. This is particularly important
during operation.
- Keep remote controls or any other control devices out of the
reach of children to prevent them from accidentally operat-
ing the automation.
- Do not allow children to play with the automation.
- Do not deliberately obstruct the movement of the gate.
- Make sure that branches or bushes do not interfere with the
movement of the gate.
- Ensure that the signalling lights are efficient and clearly
visible.
- Do not attempt to move the gate manually without first
releasing it.
- In the event of a malfunction, release the gate to allow
access and call a qualified technician for service.
- After setting manual operation, disconnect the electricity
supply from the system before returning to normal operation.
- Do not make any modifications to components of the auto-
mation system.
- Do not attempt to perform any repair work or tamper with the
automation. Call FAAC qualified personnel for repairs.
- At least once every six months have the automation, the
safety devices and the earth connection checked by a
qualified technician.
DESCRIPTION
The FAAC 746 automation is ideal for controlling vehicle access
areas with medium transit frequencies.
The FAAC model 746 automation for sliding gates are
electromechanical operators which transmit movement to
the leaf by means of a pinion with rack or chain coupled in
appropriate manner to the sliding gate.
The operation of the sliding gate is controlled by an electronic
control unit housed inside the operator.
When the gate is closed, on receipt of an opening impulse
from a remote control or other suitable control device, the
control unit will start the motor to move the gate to the open
position.
If automatic operation has been selected, sending an impulse
causes the gate to reclose on its own after the selected pause
time.
If semiautomatic operation has been selected, a second
impulse must be sent to reclose the gate.
An opening impulse send while the gate is reclosing causes it
to change direction of movement.
A stop command (if available) stops movement at any time.
For detailed information on operation of the sliding gate in the
various operating modes, contact the installation technician.
The automations have safety devices (photocells) which
prevent the gate from reclosing when an obstacle lies within
the area they are protecting.
The system ensures mechanical locking when the motor is not
in operation, so it is not necessary to install a lock.
For this reason the release system must be operated before the
gate can be opened manually.
The gear motor has a mechanical clutch which, in conjunction
with an electronic sensor, affords the necessary anti-crushing
safety, reversing a closing movement or stopping an opening
movement.
An inductive sensor detects the passage of the metal stop
plates fixed to the rack in correspondence with the travel limit
positions. The electronic control unit is incorporated in the gear
motor.
A convenient manual release device allows the gate to be
operated in the event of a power failure or malfunction.
The light flashes while the gate is moving.
MANUAL OPERATION
If the gate has to be operated manually due to a power failure
or malfunction of the automation, use the release device as
follows.
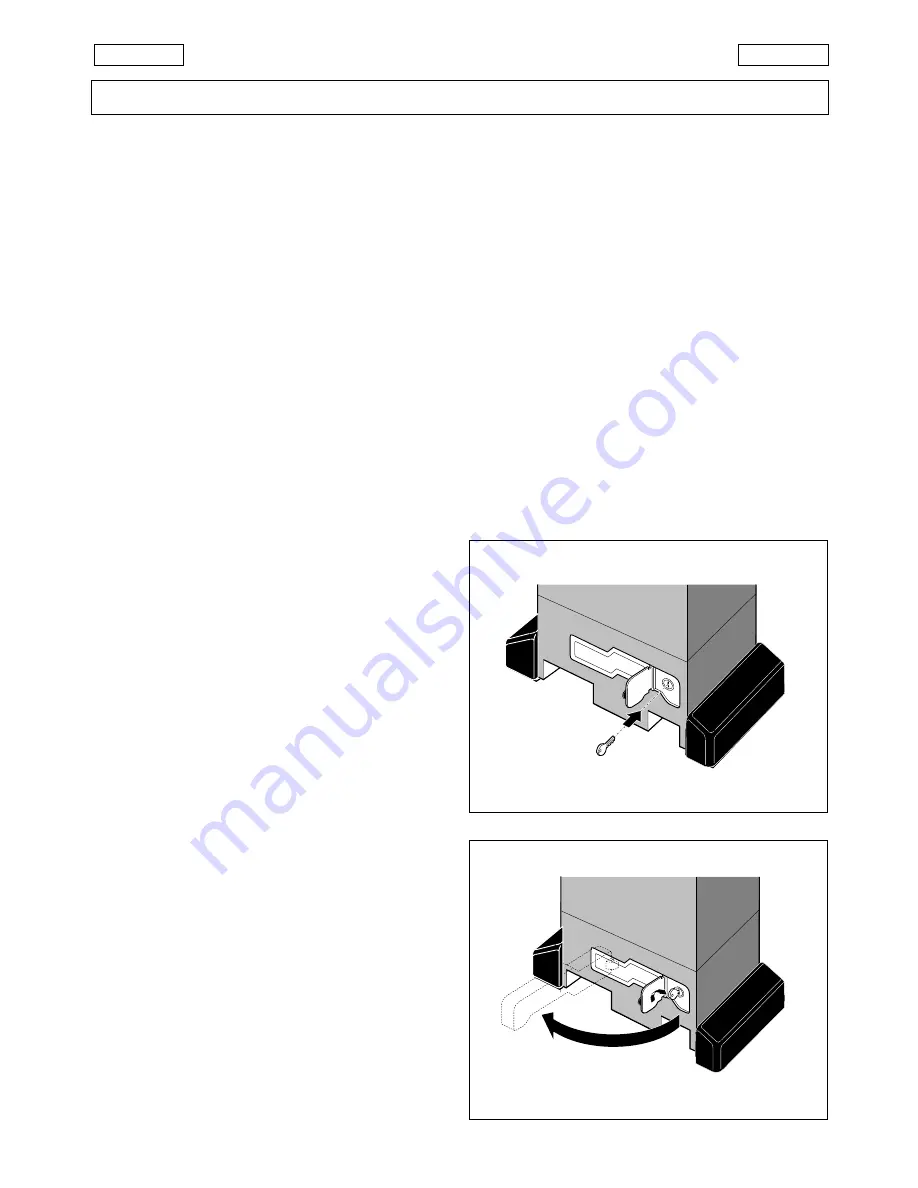
1)
Open the lock cover plate and insert the key supplied in
the lock (Fig.1).
2)
Turn the key clockwise and pull the release lever as shown
in Fig. 2.
3)
Open or close the gate manually.
RETURN TO NORMAL OPERATION
To prevent accidental operation of the gate during this
procedure, turn off the electricity supply to the system before
relocking the operator.
1)
Reclose the release lever.
2)
Turn the key anti-clockwise.
3)
Remove the key and close lock cover plate.
4)
Move the gate until the release device engages.
Fig. 1
Fig. 2
ENGLISH
ENGLISH


