background image

3

2� Connect to the Internet

1� Get the EZVIZ App


-

Connect your mobile phone to Wi-Fi (suggested). 


-

Download and install the EZVIZ app by searching “EZVIZ” in the App Store or Google Play

TM

.


-

Launch the app and register an EZVIZ user account.

EZVIZ App

If you have already used the app, please make sure that it is the latest version. To find out if an update is available, go to the app store and 
search for EZVIZ.

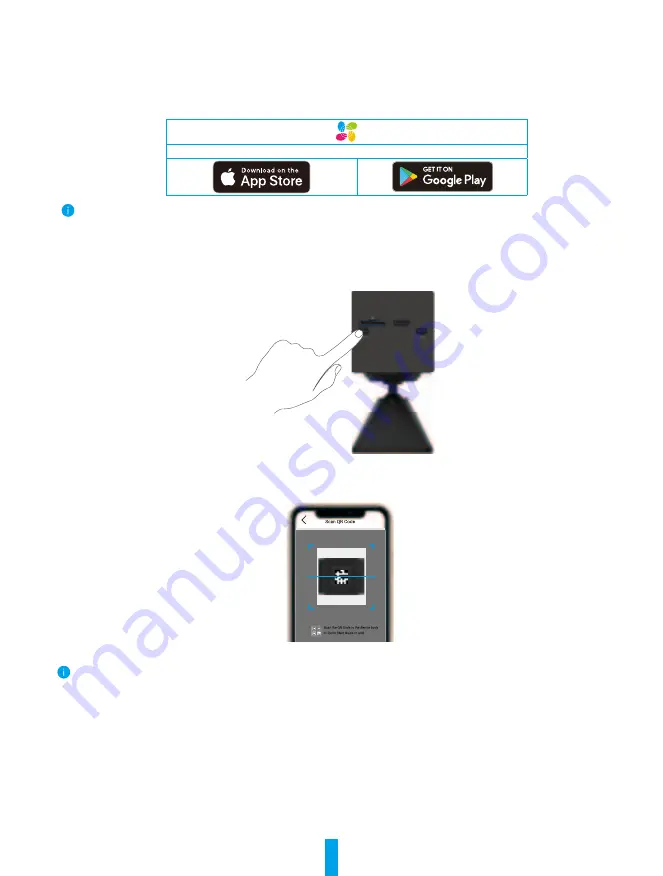
2� Add camera to EZVIZ


-

Press and hold the reset button on the camera for 4 seconds. When the LED indicator flashes blue quickly, indicates that the 

camera is ready for Wi-Fi configuration.


-

Log in to your account using the EZVIZ app.


-

On the Home screen, tap “+” on the upper-right corner to go to the Scan QR Code interface.


-

Scan the QR code on the Quick Start Guide cover or on the body of the camera.


-

Follow the EZVIZ app wizard to finish Wi-Fi configuration.

If you want to change your camera's Wi-Fi, press and hold the reset button for 4 seconds and repeat the steps above.

Summary of Contents for CSC6N1G2WF

Page 1: ...INFRINGEMENT OF THIRD PARTY IN NO EVENT WILL EZVIZ ITS DIRECTORS OFFICERS EMPLOYEES OR AGENTS BE LIABLE TO YOU FOR ANY SPECIAL CONSEQUENTIAL INCIDENTAL OR INDIRECT DAMAGES INCLUDING AMONG OTHERS DAMA...

Page 2: ...nts 1 2 Basics 1 Setup 2 1 Power on 2 2 Connect to the Internet 3 Installation 4 1 Installation Location 4 2 Installation Steps 4 View Your Device 6 1 Live View 6 2 Settings 7 EZVIZ Connect 8 1 Use Am...

Page 3: ...e x1 Foam Sticker x1 Metal Plate x1 5mm Hole Diameter Regulatory Information x2 Quick Start Guide x1 2 Basics IR Light IR Light LED Indicator MIC PIR Photoresistor Lens Front View Reset Button Power B...

Page 4: ...he camera Press and hold the reset button and power button at the same time for 2 seconds and when the LED indicator flashes red and blue alternately indicates that the camera turns to Wi Fi direct mo...

Page 5: ...d search for EZVIZ 2 Add camera to EZVIZ Press and hold the reset button on the camera for 4 seconds When the LED indicator flashes blue quickly indicates that the camera is ready for Wi Fi configurat...

Page 6: ...height 6 ft 1 8 m above the ground Recommended installation angle Tilt down 15 degrees Do not install outdoors Do not install facing direct sunlight Do not install at the place with blocked field of v...

Page 7: ...ce Foam Sticker Metal Plate Magnetic Base Camera 3 4 1 2 Fig 1 Mount by Foam Sticker Option 2 Secure the metal plate with screws Pick a clean and flat surface For cement wall only Drill screw holes ac...

Page 8: ...d choose video definition as needed Swipe left and right across the screen to see more icons Icon Description Share Share your device Settings View or change the device settings Snapshot Take a snapsh...

Page 9: ...fication You can set the notification from the device side and app side Audio When disabled both live view and recorded videos will not have audio Image Original Default image style Soft Lower color s...

Page 10: ...lexa can control your EZVIZ devices 6 You will see EZVIZ has been successfully linked then tap DISCOVER DEVICES to allow Alexa to discover all your EZVIZ devices 7 Go back to Alexa app menu and select...

Page 11: ...er your EZVIZ account tap on the EZVIZ service icon 9 Now try some commands Use the name of the camera that you created when you set up the system Users can manage devices as a single entity or in a g...

Page 12: ...risk of personal injury due to overheating of the components wait until the surface cools down before touching it Alternating current Direct current Caution Do not block ventilation openings while th...

Page 13: ...ice Under Industry Canada regulations this radio transmitter may only operate using an antenna of a type and maximum or lesser gain approved for the transmitter by Industry Canada To reduce potential...

Reviews: