background image

Music

Photo

Return

File 

manager system

USER
DCIM
ring

DIALOG

are you sure to delete?

Yes

No

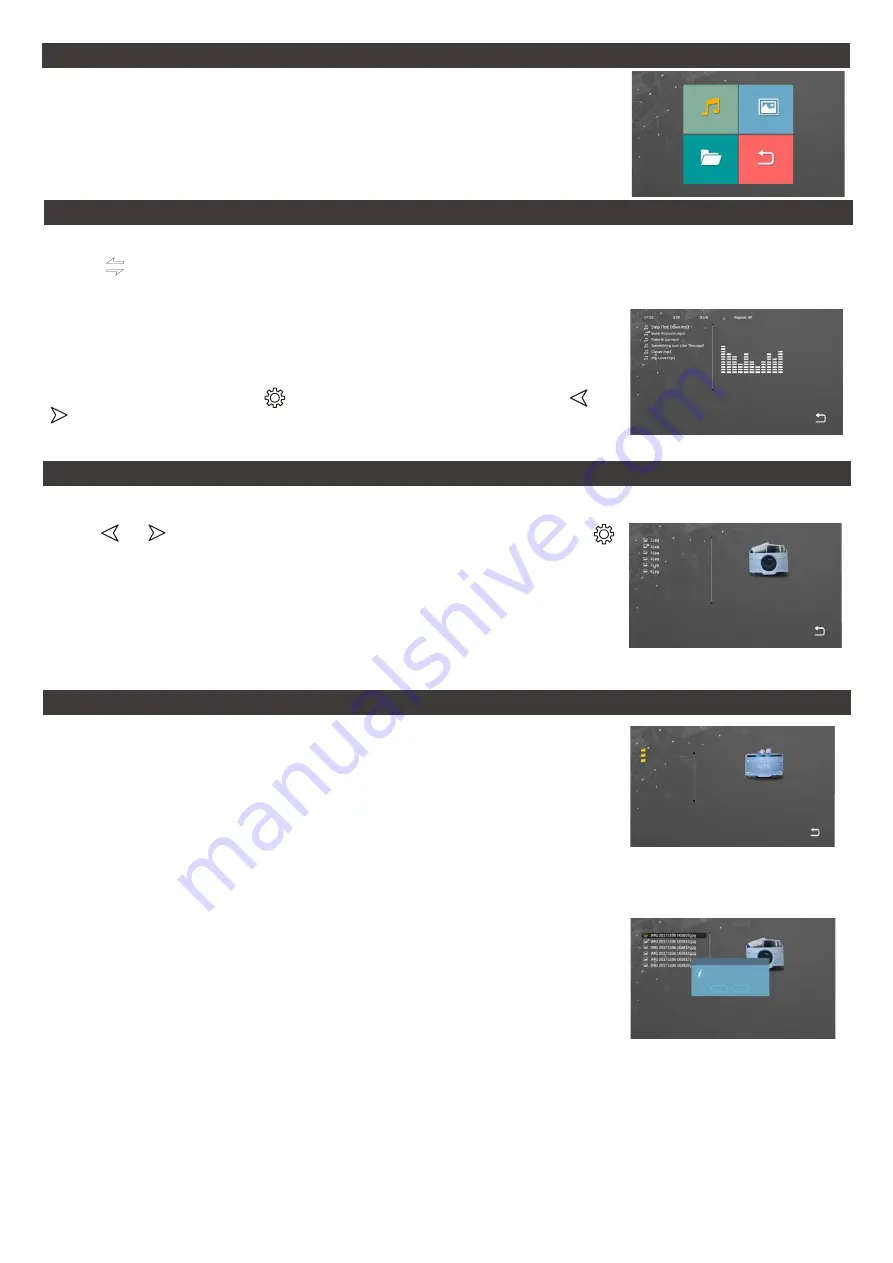
Navigate to “Media”. You can choose from within this menu the type of file you wish to view wether it 
be Music for audio files, photo for images or file for general navigation along with firmware upgrade 
files.

Note: ALWAYS disconnect the power to the indoor monitor whenever inserting or removing the 
micro SD card.

Navigate to “Media” then “Music”.

Using the           button music can be adjusted through the five different playing modes.

[Play In Sequence]:

 Play all songs from top to bottom of list. Stop playing after the last song is played.

[Single Play]: 

 Stop automatically after playing the current song.

[Single Cycle]: 

Play the same song repeatedly without stopping.

[List Cycle]: 

Repeat all songs in sequence. Restart playback from the first song after finishing the last.

[Random Play]: 

Play all songs in random order without stopping.

For volume adjustment hold down the          until the volume appears on the screen, then use         and     
         to lower and raise the volume.

For mp3 music file placement on the micro SD card the folder structure should be USER/Music.

Navigate to “Media” then “Photo”.

Using the        and         you can scroll up and down through the list to the file name then press the          
to view the photo. Note that it will automatically move to the next photo after two seconds.

For .jpg photo file placement on the micro SD card the folder structure should be USER/Photo.

Note: ALWAYS disconnect the power to the indoor monitor whenever inserting or removing the micro 
SD card.

Maximum photo is 1920x1080 resolution and 3MB or less.

Navigate to “Media” then “File Management”.

[Delete file]: 

Press the Arrow keys to highlight a file to delete. Then press  setting icon and hold until a 

pop-up window appears with the message “Delete File?” Use the Arrow keys to select “Yes” and press 
setting icon to delete file. Otherwise, press setting icon when “No” is selected to cancel.

[DCIM]:

 This DCIM folder is automatically created by the Monitor for saving files created for the Record 

Centre. It contains the “Photo” & “Video” folders. The “Photo” folder saves the automatic snapshots and 
manually captured photos. Similarly, the “Video” folder saves the automatic and manually recorded 
videos by the monitor.

[USER]:

 The USER directory contains the “Music, Photo, Ring, Update” folders. Note: These directory & 

names are case sensitive.
- “Music” folder stores the MP3 music files.
- “Photo” folder stores JPG pictures for the digital photo frame.
- “Ring” folder stores the custom ringtones.
- “Update” folder for upgrade files. USER folder stores “Music, Photo, Ring, Update” folders.

[Upgrade]: 

Put upgrade file (xxx.dd is the program file) in the Update folder, select upgrade file xxx.dd 

and press setting icon to pop up the window “Upgrade?” Select“Yes” and press setting icon to confirm 
upgrade and wait for the upgrade to succeed. “No” Press setting icon to close the window.

[MCU Upgrade]: 

Put MCU file (xxx.bin is the MCU file) in the update folder, select MCU file xxx.bin and 

press setting icon to pop up a window “Upgrade?” Select “Yes” and press setting icon to confirm to 
upgrade and wait for the upgrade to succeed. Select “No” Press setting icon to close the window.

Note:

 During system upgrading, do not remove SD card, power off, or disable indoor monitor. After 

the upgrade is complete, the device will restart.

Media Menu

Music

Photos

File Managment

Page 15

Summary of Contents for Intelli DS 21

Page 1: ...Third Generation 4 Wire Intercom Intelli Series Smart Intercom DS 21 KP 21 WF 7 S 7 REV 0 2 040221 ...

Page 2: ...If necessary please use a damp soft cloth to clean dust Ÿ Image distortion may occur if the video door phone is mounted too close to magnetic field e g Microwaves TV computer etc Ÿ Please keep the indoor monitor away from wet areas high temperature dust caustic and oxidation gas in order to avoid any unpredictable damage Precautions Quick Reference Diagram for Simple Installations Table of Content...

Page 3: ...5 7 9 8 6 2 3 4 Indoor Monitor Overview o 120 Outdoor Unit Specifications Outdoor Unit Overview Camera Sensor 1 3 CMOS Camera Viewing Angle 120 Definition 1 3MP Night Viewing IR LED Operating Temperature 0 C to 50 C Operating Voltage 12 15V DC Operating Current 30mA Standby 70mA Operational Card Type IC Card KP 21 Only IP Rating IP65 1 Speaker 2 Camera 3 Microphone 4 IR LED s 5 IC Tag Sensor KP 21 O...

Page 4: ...nection not recommended 50 meters 100 meters 80m 4 0 5mm Page 2 Indoor Monitor Outdoor Unit 15V 1A Power Adapter Max extendable distance is 3m Recommended cable to extend length is 14 020 pair Only one unit per power supply 50m 4 0 2mm DC AC OUT OUT 15V DC 1 5A Power Supply Max distance is 5m Recommended cable to is 14 020 pair or greater Max one unit per power supply ...

Page 5: ...dressed 06 Cabling Topology 2C 4C 4C RG 59 2C RG 59 2C 2C Automatic Gate OR Electric Striker See pages 5 6 Automatic Gate OR Electric Striker See pages 5 6 2C 2C 2C 2C 2C 2C COMMON Automatic Gate OR Electric Striker See page 7 Page 3 Power Adapter for KP 21 Model Only Power Adapter for KP 21 Model Only See Page 7 See Page 7 See Page 7 NOTE The monitor with the alarm sensor connected is the only mo...

Page 6: ...ck Page 4 Power Adapter for KP 21 Model Only Power Adapter for KP 21 Model Only See Page 7 See Page 7 RED VCC RED VCC CHIME CHIME External Chime System N O Relay voltage free Latches for 5 seconds upon doorbell ring NOTE The monitor with the alarm sensor connected is the only monitor that alarm in the system that will alarm and record this should typically be Device 01 CCTV cameras must be connect...

Page 7: ...il Secure Electric Striker Connection Power ON to Unlock KP 21 Outdoor Station Fail Safe Electric Striker Connection Power OFF to Unlock Automatic Gate Connection Exit Button Connection Door Station LED Wiring Overview White LED Standby Without Motion Detection Green LED Unlocking Outdoor Station Electric Striker or Automatic Gate RED LED Standby With Motion Detection In a Video Monitoring Communi...

Page 8: ...d for Push Button OSC Input Fail Secure Electric Striker Connection Power ON to Unlock Fail Safe Electric Striker Connection Power OFF to Unlock Automatic Gate Connection Door Station LED Wiring Overview White LED Standby Without Motion Detection Green LED Unlocking Outdoor Station Electric Striker or Automatic Gate RED LED Standby With Motion Detection In a Video Monitoring Communication State Gr...

Page 9: ...ntercom the maximum draw is 50mA in working state on 12V DC NOTE The monitor with the alarm sensor connected is the only monitor that alarm in the system that will alarm and record this should typically be Device 01 CCTV cameras must be connected to the same monitor Acceptable cameras to connect into the system are CVBS CVI TVI and AHD with a max of 1 3MP If the camera does not show on the CAM1 CA...

Page 10: ...s 6 Digits Repeat the new PIN and press 9 9 9 9 9 9 Entering and Exiting Admin Buzzer Alerts Default PIN is 999999 if the PIN has been changed in the past then use the current PIN 4 4 4 4 4 4 0 4 4 0 0 0 Providing a User with a Tag or changing there PIN number 9 9 1 SWIPE SWIPE 1 9 9 1 1 9 9 1 1 1 1 1 0 1 1 0 1 0 Changing the Common Unlock PIN Adding a User Tag Bi Bi Bi Bi Bi Bi Bi Bi Bi Swipe the...

Page 11: ...e setting menu Type the amount of seconds 00 99 then press Press then to exit Setting the Unlock Time for PIN number and Tag Users Note for the monitor its unlocking time can be set via the monitor itself 9 9 9 Default PIN is 999999 if the PIN has been changed in the past then use the current PIN Type 2 to enter into deleting state Type in the used user ID to be deleted between 001 and 200 Press t...

Page 12: ...ndby mode long press the button start internal intercom 2 During monitor and door station on conversation long press the button transfer call to slave monitor 3 During conversation or monitoring short press the button start Colour Contrast Monitor Door 1 Cam 1 Door 2 Cam 2 1 Start conversation with door station 2 Monitor monitoring door station press the button start conversation with door station...

Page 13: ... the Alarm menu 10 50 Monday 07 08 2020 System 2019 04 03 2019 04 03 23 59 58 23 59 58 Sunday Alarm Photo Frame Record Mode Media There are three different modes of standby that can be used option 1 and 2 are activated by pressing Option 1 which is when the indoor monitor is in an idle state if you press it will display only a message indicator if there are any messages See clock switch settings an...

Page 14: ...o one is at home could you please leave a message Note that a micro SD card must be installed to use this feature Setting Indoor Monitor Number Device ID Enabling Disabling a Second Outdoor Station Door 1 and Door 2 Unlock Time Room Unlock Time Record Mode Motion Detection Message Eingestellte Apparat ID 01 Bewegungserkennung Kamera 1 Aufnahmemodus Schnappschuss Tür2 Entsperrzeit 05 Tür1 Entsperrz...

Page 15: ...een will display Firmware and MCU version Mac address and ID number It will also display the micro SD card capacity used space and allow formatting of the micro SD Furthermore GET ID can be used for an address ID Update Change Reboot can be used to restart the monitor without disconnecting the power supply Clock Switch on Format YY MM DD Date 2019 01 04 38 07 43 Time Ring vol1 Start Time End Time ...

Page 16: ...cameras must be connected to the same monitor Navigate to Alarm then CAM1 CAM2 you can set each individual camera to be ON OFF This should only be set on the first monitor in the line DEVICE 01 Navigate to Alarm then Sensor Type 1 Sensor Type 2 you can set the type of sensor that is being used for the detection of each camera You can choose NO normally Open NC Normally Closed or OFF to Disable NOTE...

Page 17: ...ion and 3MB or less Navigate to Media then File Management Delete file Press the Arrow keys to highlight a file to delete Then press setting icon and hold until a pop up window appears with the message Delete File Use the Arrow keys to select Yes and press setting icon to delete file Otherwise press setting icon when No is selected to cancel DCIM This DCIM folder is automatically created by the Monit...

Page 18: ... you can scroll up and down through the list to the file name then press the to view the recording To delete this can be done through the Media File menu Navigate to Record Centre then Picture From within this menu you can scroll through the list of recorded photos using the and you can scroll up and down through the list to the file name then press the to view the recording To delete this can be do...

Page 19: ...nitor will restart and create a hotspot Video WiFi Set Server Set Select Mode AP MODE Snapshot Unlock Play back Mute Switch Channel Albums Recording Common Hang up Exit Unlock Connected to outdoor station Switch camera image During talking monitoring press the button view door1 door2 camera1 camera2 Playback Make sure monitor insert MicroSD card and support playback calling monitoring video record...

Page 20: ...en to edit the name ENSURE you are connected to your home Wi Fi 2 4GHZ network If at anytime you are prompted to accept permission including location please accept 4 Select the home WiFi network 2 4GHZ and input the password 1 In a case where the phone tries to reconnect to SmarLife xxx hotspot then from your Wi Fi settings choose to forget this network 2 After successfully completing the Tuya Sma...

Page 21: ...Users role Administrator Total Control over intercom communication including unlocking and adding deleting users 5 Enter the users Tuya account email address then press Done an invitation will be sent to the user My Home My Home Home User user gmail com Press SAVE an invitation will be sent to the user Common Member Total Control over intercom communication including unlocking only Important for r...

Reviews: