Eyevis omniSHAPE Manual Download Page 22


Document Nr.: 

Version: 

1.Vers. from date:  

1.Version from: 

Modified from: 

Modified at: 

Page Nr. 

OSH-Manual-EN 

1.3 

28.02.2012 

A. Schutz 

 
A. Schutz 
 

11.05.2012 

22 von 
33 


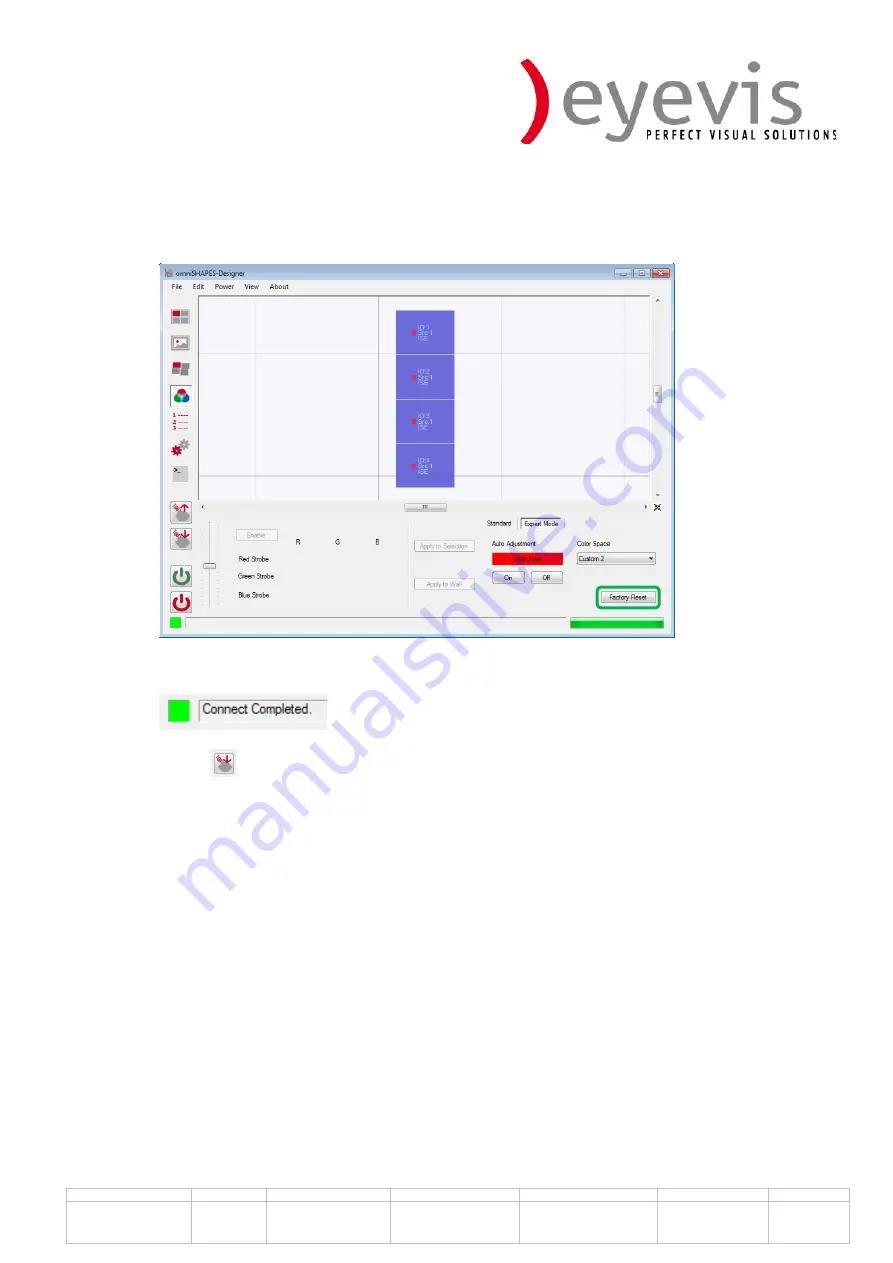
Choose all omniSHAPES (Strg+A) and press the button “

Factory Reset

” to reset the color 

calibration to the factory values. It will take a few minutes until all the omniSHAPES are reset 
to the factory values.  


After it’s done there will be information in the lower side of the window 


Then you have to save the settings, therefore choose the omniSHAPES and press the save 

button 

  . Otherwise they will be lost after power down. 


Summary of Contents for omniSHAPE

Page 1: ...he Screen 9 6 Plugging the cables 10 7 omniSHAPE Configuration Software 12 7 1 Start Up of the Software 12 7 2 Designing a wall 13 7 3 Connecting to the omniSHAPE 15 7 3 1 Network connection Settings...

Page 2: ...usgesteckt sind Risque de choc lectrique Ne jamais ouvrir le bo tier ou d effectuer un nettoyage avant que l appareil est teint et tous les c bles sont d branch s Ne jamais ouvrir le bo tier ou effect...

Page 3: ...on 33 NOTICE ACHTUNG ATTENTION Do not cover the fan area of the OSH E 01 Otherwise it may result that the device overheats Verschlie en sie niemals die L fter Bereiche Andernfalls kann das Ger t berhi...

Page 4: ...the omniSHAPE Before starting to build a wall you have to loosen the screws in the corners If this isn t done the accuracy of the screens flatness won t be very good To build a tower of some omniSHAP...

Page 5: ...A Schutz A Schutz 11 05 2012 5 von 33 Now you have to lock the latches with a soft head hammer After this you can stack the omniSHAPES You have to pull the latch of the next omniSHAPE to the front si...

Page 6: ...012 A Schutz A Schutz 11 05 2012 6 von 33 For safety as shown in the picture pull the cotter pin into the guiderail 3 Building a concave or convex wall You can use the connection plate to build walls...

Page 7: ...12 7 von 33 For example a wall composed of two omniSHAPES in a 12 angle The connection bars on the left and the right side are needed to get the same height when stacking the next omniSHAPES on top 4...

Page 8: ...ified at Page Nr OSH Manual EN 1 3 28 02 2012 A Schutz A Schutz 11 05 2012 8 von 33 Now you have to put your fingers into the handhold pull to remove the OSH E 01 Now you can haul the engine out and i...

Page 9: ...Screen The OSH CS 480 has an upper and a lower side The lower side is marked by the serial number The upper side is market by a label Oben Top On the backside of the Screen there are 4 screws You hav...

Page 10: ...EY SCHUKO VDE 1 8m or to connect some omniSHAPES together with the Y cables Connecting the power supply is shown by using the Y cables Do only use Y cables at up to 10 omniSHAPES in one line It s not...

Page 11: ...e RS232 In slot If you don t have this cable look at the pin configuration below Connector Description Configuration RJ45 male connector for LAN cables 1_RJ45 3_Sub D 2_RJ45 5_Sub D 3_RJ45 2_Sub D Sub...

Page 12: ...he Software Copy the folder omniSHAPES Designer Release to a chosen directory of your computer Run the executable file The main window opens Description of symbols Wall To design a wall with the diffe...

Page 13: ...To set up the connection settings Service Service console for maintenance Connect To connect to the omniSHAPES Save To save the configured settings on the omniSHAPES Power On To power on the chosen o...

Page 14: ...ate 1 Version from Modified from Modified at Page Nr OSH Manual EN 1 3 28 02 2012 A Schutz A Schutz 11 05 2012 14 von 33 Also you have to choose the Screentype in the drop down list beneath Press the...

Page 15: ...o on with the cabling as seen at point 6 plugging the cables First you have to configure the network settings of your network adapter Go to the preferences of internet protocol version 4 TCP IPv4 as s...

Page 16: ...the IP address Gateway or Subnet Mask and set it to the values you want by pressing the button Set to Device 7 3 2 Serial connection Settings Press the button Preferences for the connection settings Y...

Page 17: ...ate 1 Version from Modified from Modified at Page Nr OSH Manual EN 1 3 28 02 2012 A Schutz A Schutz 11 05 2012 17 von 33 After being connected to the wall without chosen any omniSHAPE all will have da...

Page 18: ...s a content of the main folder of omniSHAPES Designer Set it as the background picture of the source desktop On the picture beside you can see the background grid which is seen on the screens of each...

Page 19: ...hen use the arrow keys to move the whole picture To move the picture faster hold the shift button on the keyboard while using the arrow keys Click inside the rectangles in the corners or the other ext...

Page 20: ...a source press after choosing the resolution Now you can move the Source over the omniSHAPE in any position you want to have By pressing the Apply Mapping button the pictures on the chosen omniSHAPE...

Page 21: ...ess Send Now the Shading image will be loaded This will need 30 to 40 seconds After it s completely loaded you have to save by pressing the save button To deactivate the Shading correction press the b...

Page 22: ...and press the button Factory Reset to reset the color calibration to the factory values It will take a few minutes until all the omniSHAPES are reset to the factory values After it s done there will b...

Page 23: ...button Apply to Wall to send the values of this one unit to the whole wall After the one omniSHAPE has sent it to all the other omniSHAPES you will see a in the lower side of the window Now the Autom...

Page 24: ...rsion 1 Vers from date 1 Version from Modified from Modified at Page Nr OSH Manual EN 1 3 28 02 2012 A Schutz A Schutz 11 05 2012 24 von 33 After pressing the Enable button the Auto Adjustment switche...

Page 25: ...below After you have done the readjust press Apply to Selection to set it After pressing the button the Auto Adjustment will switch back to Active Repeat it again with the other units you want to read...

Page 26: ...hange the color temperatures You can set them in typing the following commands into the command line Sequence Index Colortemperature K Command 1 approx 6200 set 1 led_seq_index 1 2 approx 5700 set 1 l...

Page 27: ...File Save Adjustment as as seen below Then choose a filename and save it to the directory you want It could be that the omniSHAPE wall looks misaligned after you did some adjustments Now you can load...

Page 28: ...3 28 02 2012 A Schutz A Schutz 11 05 2012 28 von 33 10 Packaging of omniSHAPE 10 1 Packaging of the screen Screw the screws of the screen into the screen frame Pack the Screen into the screen protecti...

Page 29: ...r OSH Manual EN 1 3 28 02 2012 A Schutz A Schutz 11 05 2012 29 von 33 10 2 Packaging of the Base Frame Fix the lens protection cover in front of the lens Place the connection plate on the omniSHAPE Us...

Page 30: ...Modified from Modified at Page Nr OSH Manual EN 1 3 28 02 2012 A Schutz A Schutz 11 05 2012 30 von 33 Put the rubber foam bars on the bolts Put it into the foil bag Put it into the Base Frame cardboa...

Page 31: ...5 2012 31 von 33 Close the Base Frame cardboard box with some Scotch Tape 10 3 Packaging of the accessories Pack all the accessories into the accessories cardboard box 10 4 Packing all together Put on...

Page 32: ...from Modified at Page Nr OSH Manual EN 1 3 28 02 2012 A Schutz A Schutz 11 05 2012 32 von 33 Put the second rubber foam on the Base Frame cardboard box Put the rubber foam for screen cardboard box on...

Page 33: ...Modified from Modified at Page Nr OSH Manual EN 1 3 28 02 2012 A Schutz A Schutz 11 05 2012 33 von 33 Put the accessories cardboard box into the outer cardboard box as seen in the picture Close the ou...

Reviews: