background image

Operating Manual 


16 


2.7  Voice record function 

1.  This feature allows a message to be associated with a picture. Press the record 

button – the blue LED should illuminate, indicating the feature is enabled. Take a 
picture in the usual way but CONTINUE to hold the picture button. 

2.  When the blue LED flashes, record your message and release picture button when 

finished.  


Note: The optimum distance is 10cm from the mouth which ensures that not too much 
background noise is picked up. Once the audio recording is finished simply release the 
button and the recording will be saved to the flash memory as a *.wav file with the same 
filename as the image file. 

Record 
Button 


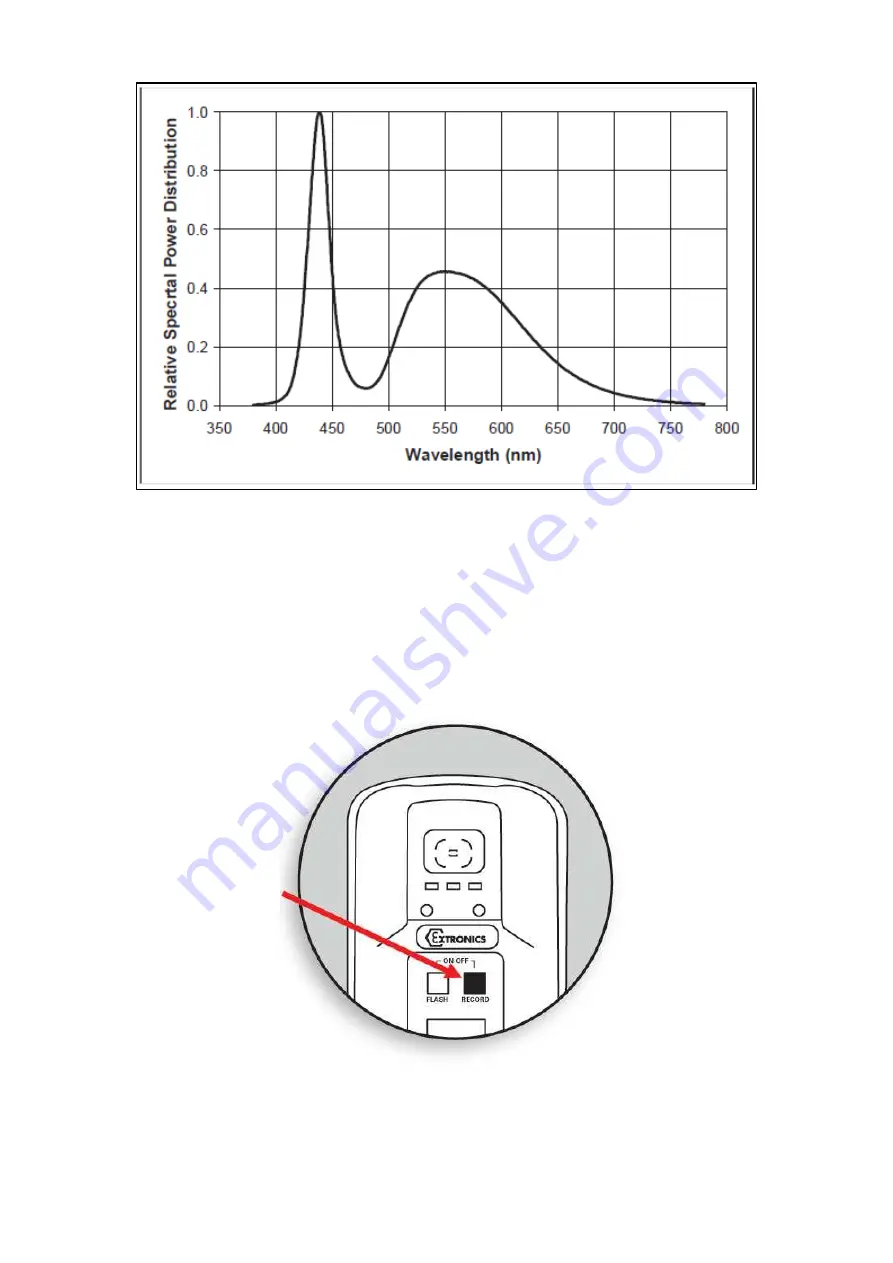
iCAM50x LED Flash Spectral Response 


Summary of Contents for iCAM50

Page 1: ...m This device complies with part 15 of the FCC Rules Operation is subject to the following two conditions 1 This device may not cause harmful interference and 2 this device must accept any interferenc...

Page 2: ...s intentionally left blank Document Number 334392_02 2013 Extronics Limited This document is Copyright Extronics limited Extronics reserve the right to change this manual and its contents without noti...

Page 3: ...10 Setting Time and Date of the iCAM50x 20 2 10 1 Setting Time and Date in Windows XP 20 2 10 2 Setting Time and Date in Windows Vista Windows 7 21 2 10 3 Using Windows XP Microsoft Scanner and Camer...

Page 4: ...Operating Manual 4...

Page 5: ...and the transportation of spare batteries into the hazardous area is not permitted The USB port shall only be connected in the non hazardous area If the camera is damaged in any way it shall be remove...

Page 6: ...nt o Possible damage to enclosure device or associated equipment Information o Notes on the optimum use of the device 1 3 1 iCAM501U Warning For ATEX applications ONLY Duracell Plus MN1500 or Duracell...

Page 7: ...r GROUP I applications ONLY the rated ambient temperature range of the equipment is from 0o C to 60o C Warning For Class 1 Division 1 applications ONLY the rated ambient temperature range of the equip...

Page 8: ...e hazardous area or the transportation of spare cells into the hazardous area is NOT PERMITTED Warning The user shall NOT mix different cells in ANY application Note Duracell Plus MN1500 and Duracell...

Page 9: ...Plus MN1500 Duracell Procell MN1500 Duracell Procell PC1500 Energizer E91 Panasonic LR6XWA iCAM502 ATEX IECEx GROUP II OK T4 at 60o C OK T4 at 60o C OK T3 at 60o C OK T3 at 60o C OK T3 at 60o C iCAM50...

Page 10: ...protective film fitted to the front and rear windows This should be removed carefully before use The iCAM50x may be used with the protective rubber over boot supplied Only the rubber over boot suppli...

Page 11: ...tted cells Warning For iCAM502 refer to notes in section 1 3 2 and refer to Table 2 for permitted cells To change or install the batteries in the iCAM50x turn the screw as indicated below to remove th...

Page 12: ...stopped flashing rapidly The Green LED will flash rapidly for 10 seconds the Blue and Red LED will flash briefly The Green LED then goes solid when ready The Green LED flashing slowly approximately 1...

Page 13: ...he picture button until the Green LED starts flashing rapidly 2 Wait for the Green LED to stop flashing before moving the camera 2 5 Picture Quality To indicate a good picture has been taken all three...

Page 14: ...urn compared with a threshold based on the average light level in the image Good or bad images are indicated using the LED sequence previously described However the reliability of the image analysis f...

Page 15: ...to photograph text close up on a reflective rating plate for example it is strongly recommended to use ambient lighting where possible 2 6 2 Compatibility of the iCAM50x LED flash with optical flame d...

Page 16: ...o hold the picture button 2 When the blue LED flashes record your message and release picture button when finished Note The optimum distance is 10cm from the mouth which ensures that not too much back...

Page 17: ...ng systems without having to install drivers This is supported by Windows XP and above and also by most versions of Linux The iCAM50x images are stored with the time and date shown in the filename and...

Page 18: ...the green status LED must be solid before connecting to a host operating system otherwise the operating system will not establish communication with the camera Once the green LED has become solid conn...

Page 19: ...e established A balloon icon will show up like the one pictured below If the Windows Autoplay feature is enabled it is enabled by default a window like the one below will be shown By clicking on any o...

Page 20: ...amera is first used or when the batteries have been removed for an extended period of time If the time and date is not set the JPEG files will have an incorrect time code embedded into the file and th...

Page 21: ...n the iCAM50x will synchronize with the current Windows system time you must therefore ensure that the Windows system time is set correctly 2 10 2 Setting Time and Date in Windows Vista Windows 7 For...

Page 22: ...Time Setting Tool exe file to your windows desktop or other convenient location Usage To use the iCAM501 Time Setting Tool simply follow these instructions 1 Switch on your iCAM501 in the normal mann...

Page 23: ...tructions in the user manual 2 10 3 Using Windows XP Microsoft Scanner and Camera Wizard If the Microsoft Scanner and Camera Wizard is chosen to automatically start when the camera is plugged in a win...

Page 24: ...linked to If you do not have any audio to download you can use the PTP feature to quickly move pictures to a folder of your choice To do this click the next button and the windows below will appear he...

Page 25: ...ting the transfer of the pictures Then select nothing I m finished working with these pictures and click next and then the screen below will appear This gives you the option to open the folder where t...

Page 26: ...be in an individual folder If a file with the same file name is already in the download folder Windows will prompt if you wish to replace these files 2 10 5 Using Windows Vista Windows 7 Import Pictu...

Page 27: ...import the pictures Here you can select you preferences for downloading pictures You can choose the folder where all pictures should be imported to by clicking the browse button Select the option for...

Page 28: ...files to the tag plus a number Select original file name if you wish to preserve the filename created by the iCAM50x as described in section 2 9 If prompt for tag on import is not selected the picture...

Page 29: ...ring the upgrade Important Do not remove the USB cable from the iCAM50x until the upgrade has completed or you may render the iCAM50x unusable Information The iCAM50x can only be upgraded under Window...

Page 30: ...o upgrade mode power the camera down and then press and hold the trigger and flash enable buttons until the blue LED begins flashing this should be the only LED lit Next plug a USB cable into the iCAM...

Page 31: ...ing the unit to work read the technical documentation carefully Important The latest version of the technical documentation or the corresponding technical supplements is valid in each case The iCAM50x...

Page 32: ...nits it is absolutely necessary to observe the applicable regulations and provisions concerned with explosion protection EN 60079 0 EN 60079 14 as well as the Accident Prevention Regulations 3 6 Clean...

Page 33: ...ional 960Kbytes per min for audio Image 3 1 Mega Pixel 2048 x 1536 resolution Lens Fixed focus 1 4 format lens in plastic holder Focal Distance 30 cm to infinity View Finder Two element optical view f...

Page 34: ...1 Mega Pixel 2048 x 1536 resolution Lens Autofocus lens effective focal length 3 39mm F2 8 68o diagonal field of view Focal Distance 5cm to infinity View Finder Two element optical view finder Power M...

Page 35: ...you allege that goods are totally unfit for their purpose they must be returned within 7 days of receipt Site Warranty is expressly excluded from these terms and conditions unless agreement is made i...

Page 36: ...Operating Manual 36 6 Certification 6 1 iCAM501U EC Declaration of Conformity...

Page 37: ...Operating Manual 37 6 2 iCAM502 EC Declaration of Conformity...

Page 38: ...Operating Manual 38 6 3 iCAM501U Class 1 Division 1 Certificate of Compliance...

Page 39: ...Operating Manual 39...

Page 40: ...Operating Manual 40...

Page 41: ...Operating Manual 41...

Page 42: ...Operating Manual 42 6 4 ATEX IECEx Certificates Please refer to Extronics website for all current product approval certificates or email info extronics com...

Page 43: ...ption Initial Release Updated iCAM502 D of C Date 31 01 2012 02 04 13 Author B Seaby B Seaby Checked Approved Ben Seaby Digitally signed by Ben Seaby DN CN Ben Seaby C GB O Extronics Ltd OU R D Reason...

Reviews: