background image

SMX System MultiMatrix Switchers

 • Front Panel Operation

Front Panel Operation, cont’d

3-8

Also refer to the 

SMX System MultiMatrix Switchers User’s Manual

 at www.extron.com.

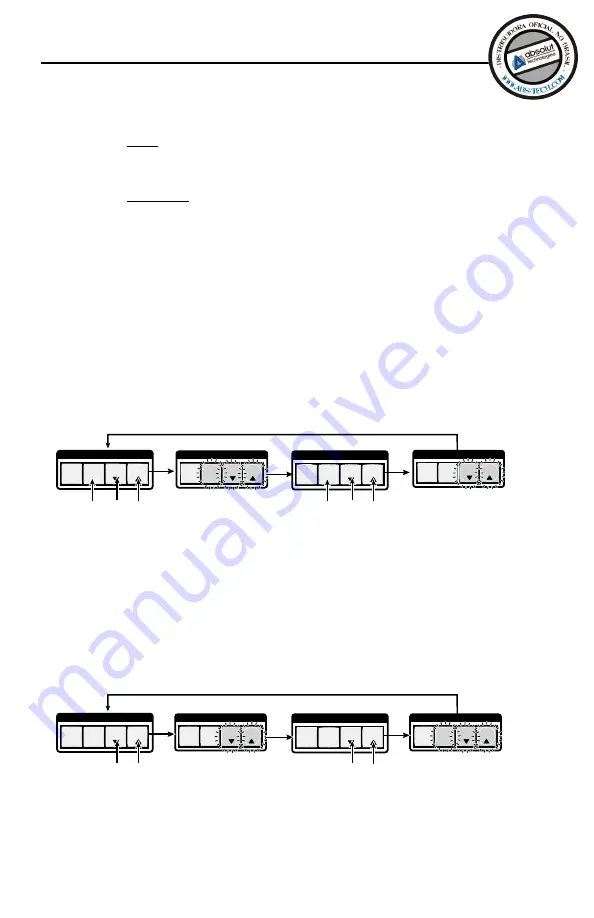
Lock mode 2  (Advanced Executive mode) —

 Basic functions 

are unlocked.  Advanced features are locked and can be 

viewed only (default mode).

Basic features consist of:
Making ties, saving and recalling presets, setting input audio 

gain and attenuation, and changing lock modes.
Advanced features consist of:
Setting video and audio output mutes, setting audio output 

volume, setting RGB delay (VGA, RGBHV boards), setting the 

rear panel remote port protocol and baud rate.

N

  The switcher is shipped from the factory in Lock mode 2.

Selecting Lock mode 2 or toggling between 

mode 2 and mode 0

N

  If the switcher is in Lock mode 0, this procedure selects 

mode 2.  Preset, View, and Esc buttons flash green twice.


If it is in Lock mode 2, this procedure selects mode 0 

(unlocks the switcher).  View and Esc flash green twice.

Press and hold for
about 2 seconds.

C O N T R O L

ESC

VIEW

PRESET

ENTER

Lock mode 2:
Preset, View, and
Esc flash.

C O N T R O L

ESC

VIEW

PRESET

ENTER

Lock mode 0:
View and Esc flash.

Press and hold for
2 seconds.

C O N T R O L

ESC

VIEW

PRESET

ENTER

C O N T R O L

ESC

VIEW

PRESET

ENTER

To toggle between lock mode 2 and lock mode 0

Selecting Lock mode 1 or toggling between 

mode 2 and mode 1

N

  If the switcher is in Lock mode 1, this procedure selects 

mode 2.  Preset, View, and Esc buttons flash green twice.


If the switcher is in Lock mode 2, this selects mode 1. 

View and Esc buttons flash green twice.

Press and hold for
about 2 seconds.

C O N T R O L

ESC

VIEW

PRESET

ENTER

Lock mode 2:
Preset, View, and
Esc flash.

C O N T R O L

ESC

VIEW

PRESET

ENTER

Lock mode 1:
View and Esc flash.

Press and hold for
2 seconds.

C O N T R O L

ESC

VIEW

PRESET

ENTER

C O N T R O L

ESC

VIEW

PRESET

ENTER

To toggle between lock mode 1 and lock mode 2

Summary of Contents for SMX System

Page 1: ...Setup Guide 68 1452 50 Rev A 02 09 SMX System MultiMatrix Switchers ...

Page 2: ...1 OUT IN 2 OUT IN 3 OUT IN 4 FIBER OPTIC OUT IN 1 OUT IN 2 OUT IN 3 OUT IN 4 FIBER OPTIC HD Camera ISS 506 Integration Seamless Switcher VOLUME ADJUST ADJUST TRANSITION PICTURE ADJUSTMENTS CONFIG PROGRAM PREVIEW EFFECTS MENU NEXT DETAIL ZOOM BRIGHT CONT COLOR TINT SIZE CENTER TAKE CUT PIP TITLE WIPE DISSOLVE LOGO 2 BLACK LOGO 1 BLACK 1 2 3 4 5 6 1 2 3 4 5 6 LOGO 2 BLACK LOGO 1 BLACK FREEZE FREEZE ...

Page 3: ...t Panel Overview 2 4 Chapter Three Front Panel Operation 3 1 Creating Ties 3 2 Viewing Ties 3 3 Muting or Unmuting Outputs 3 4 Removing Ties 3 4 I O Presets 3 5 Saving or recalling a global preset 3 6 Saving or recalling a plane preset 3 7 Setting the Front Panel Locks Executive Modes 3 7 Selecting Lock mode 2 or toggling between mode 2 and mode 0 3 8 Selecting Lock mode 1 or toggling between mode...

Page 4: ...s 4 3 Error messages 4 3 EDID Extended Display Identification Data 4 3 SIS Command Tables 4 4 Chapter Five Configuration and Control 5 1 Installing and Starting the SMX Control Program 5 2 Installing the program 5 2 Starting the program 5 3 Accessing the HTML Pages 5 4 Using the Web Pages to Configure the SMX 5 5 Status Page 5 5 Configuration Page 5 6 File Management Page 5 6 Control Page 5 6 Appe...

Page 5: ...SMX System MultiMatrix Switchers 1 Chapter One Introduction About this Manual About the SMX System MultiMatrix Switchers ...

Page 6: ... s Manual also referred to as the SMX User s Manual available at www extron com or the Extron CD About the SMX System MultiMatrix Switchers The Extron SMX System MultiMatrix Switcher is a rack mountable modular configurable multi format system available in 3U 4U or 5U frames Each frame has horizontal rear panel slots into which optional I O boards can be inserted in any configuration and signal ty...

Page 7: ...SMX System MultiMatrix Switchers 2 Chapter Two Installation Rear Panel Front Panel Overview ...

Page 8: ...R L 5 R L 6 R L 7 R L 8 R OUTPUTS L 1 R L 2 R L 3 R L 4 R L 5 R L 6 R L 7 R L 8 R 1 2 3 4 FIBER OPTIC OUT IN OUT IN OUT IN OUT IN ADDRESS 5 6 7 8 FIBER OPTIC OUT IN OUT IN OUT IN OUT IN 2 7 8 9 10 11 1 4 5 3 12 6 13 Figure 2 1 An example of a 5U SMX rear panel SMX Rear panel features a AC power connector b LAN Ethernet port c Reset button and LED d Remote serial port e l I O boards optional m Plan...

Page 9: ...ould occur Remote port For serial RS 232 or RS 422 control connect a host computer or control system via this 9 pin D connector d RS 232 protocol default values 9600 baud 1 stop bit no parity 8 data bits no flow control N See chapter 4 SIS Programming and Control in the SMX User s Manual for definitions of the SIS commands See chapter 5 SMX Software to install and use the control software Step 5 C...

Page 10: ...eates and removes ties sets background illumination press hold inputs 0 and 1 or indicates output audio volume c Output selection buttons Select switch outputs creates and removes ties and indicates input audio gain attenuation N Input and output buttons are also used to save and recall global and plane addresses d Control buttons Enter Preset View and Esc Used to configure unit save recall preset...

Page 11: ...apter Three Front Panel Operation Creating Ties Viewing Ties Muting or Unmuting Outputs Removing Ties I O Presets Setting the Front Panel Locks Executive Modes Adjusting the Input Audio Level Adjusting the Output Audio Volume Reset Levels ...

Page 12: ...9 10 11 12 13 14 15 16 OUTPUTS 1 2 3 4 5 6 7 8 9 10 11 12 13 14 15 16 Step 3 Press desired Input button Currently tied outputs light Input 1 turns off Step 4 Press and release desired output button s INPUTS 1 2 3 4 5 6 7 8 9 10 11 12 13 14 15 16 OUTPUTS 1 2 3 4 5 6 7 8 9 10 11 12 13 14 15 16 Output button blinks Enter button also blinks green ENTER Step 5 Press and release Enter Button lights turn...

Page 13: ...13 14 15 16 Step 3 To view inputs tied to an output press a tied output button I O PLANE SELECT 1 2 3 4 5 6 7 8 9 10 11 12 13 14 15 0 Step 2 To view ties for another plane press that plane button Untied output buttons light Muted outputs blink INPUTS 1 2 3 4 5 6 7 8 9 10 11 12 13 14 15 16 OUTPUTS 1 2 3 4 5 6 7 8 9 10 11 12 13 14 15 16 Tied outputs and associated input light Untied output buttons t...

Page 14: ... those outputs are now unmuted INPUTS 1 2 3 4 5 6 7 8 9 10 11 12 13 14 15 16 OUTPUTS 1 2 3 4 5 6 7 8 9 10 11 12 13 14 15 16 ENTER Step 5 Press and release the View button All buttons turn off C O N T R O L PRESET ESC VIEW N For video only RGB is muted Sync is not muted For RGBHV systems only the R G and B boards are muted and the H and V boards remain active All tied and untied outputs can be mute...

Page 15: ...et 31 Preset 18 Preset 24 Preset 25 Preset 19 Preset 20 Preset 27 Preset 28 Preset 32 1 2 3 4 5 6 7 8 9 10 11 12 13 14 15 16 INPUTS 1 2 3 4 5 6 7 8 9 10 11 12 13 14 15 16 OUTPUTS Preset 1 Preset 5 Preset 6 Preset 10 Preset 7 Preset 2 Preset 8 Preset 9 Preset 3 Preset 4 PLANE GLOBAL GLOBAL Global and plane preset addresses Read all the notes below N Presets cannot be viewed from the front panel unl...

Page 16: ...7 8 9 10 11 12 13 14 15 16 OUTPUTS 1 2 3 4 5 6 7 8 9 10 11 12 13 14 15 16 Buttons for any previously saved global presets light red here presets 8 18 and 32 Any lit or unlit button can be saved to C O N T R O L PRESET ESC VIEW INPUTS 1 2 3 4 5 6 7 8 9 10 11 12 13 14 15 16 OUTPUTS 1 2 3 4 5 6 7 8 9 10 11 12 13 14 15 16 ENTER Step 4 Press the Enter button to save or recall preset Current configurati...

Page 17: ...1 12 13 14 15 0 Step 3 Press the desired plane button here plane 0 Plane button lights amber ENTER Step 2 To save a plane preset press and hold the Preset button for 2 seconds To recall a plane preset press and release the Preset button C O N T R O L PRESET ESC VIEW N Saving a preset Preset button flashes red shown here Recalling a preset Preset button lights red N At this time all lit presets are...

Page 18: ...flash green twice If it is in Lock mode 2 this procedure selects mode 0 unlocks the switcher View and Esc flash green twice Press and hold for about 2 seconds C O N T R O L ESC VIEW PRESET ENTER Lock mode 2 Preset View and Esc flash C O N T R O L ESC VIEW PRESET ENTER Lock mode 0 View and Esc flash Press and hold for 2 seconds C O N T R O L ESC VIEW PRESET ENTER C O N T R O L ESC VIEW PRESET ENTER...

Page 19: ...3 4 5 6 7 8 9 10 11 12 13 14 15 16 OUTPUTS 1 2 3 4 5 6 7 8 9 10 11 12 13 14 15 16 I O button 1 lights red Step 3 Press and hold any I O plane button until audio plane button flashes Selected audio plane button flashes red and I O button turns off I O PLANE SELECT 1 2 3 4 5 6 7 8 9 10 11 12 13 14 15 0 INPUTS 1 2 3 4 5 6 7 8 9 10 11 12 13 14 15 16 OUTPUTS 1 2 3 4 5 6 7 8 9 10 11 12 13 14 15 16 I O b...

Page 20: ...7 green 4 flash 18 red 9 6 green 3 5 green 3 flash 4 green 2 3 green 2 flash 2 green 1 1 green 1 flash 0 INPUTS 1 2 3 4 5 6 7 8 9 10 11 12 13 14 15 16 OUTPUTS 1 2 3 4 5 6 7 8 9 10 11 12 13 14 15 16 See Input Audio Level Table for button lighting and dB levels ENTER Step 5 Press and hold View to decrease or Esc to increase audio level here Esc Selected control button lights red C O N T R O L PRESET...

Page 21: ...unit is in Lock mode 0 Using the front panel Example Reduce output 3 s on plane 4 audio volume to 65 5 Follow steps 1 2 and 3 as shown in the previous section Adjusting the Input Audio Level page 3 9 INPUTS 1 2 3 4 5 6 7 8 9 10 11 12 13 14 15 16 OUTPUTS 1 2 3 4 5 6 7 8 9 10 11 12 13 14 15 16 INPUTS 1 2 3 4 5 6 7 8 9 10 11 12 13 14 15 16 OUTPUTS 1 2 3 4 5 6 7 8 9 10 11 12 13 14 15 16 Step 4 Press t...

Page 22: ... 41 5 39 slow 25 88 0 8 14 56 40 0 40 6 24 86 5 9 14 55 38 5 41 6 23 85 0 10 slow 54 37 0 42 slow 22 83 5 11 slow 53 35 5 43 slow 21 82 0 12 13 52 34 0 44 5 20 80 5 13 13 51 32 5 45 5 19 79 0 14 slow 50 31 0 46 slow 18 77 5 15 slow 49 29 5 47 slow 17 76 0 16 12 48 28 0 48 4 16 74 5 17 12 47 26 5 49 4 15 73 0 18 slow 46 25 0 50 slow 14 71 5 19 slow 45 23 5 51 slow 13 70 0 20 11 44 22 0 52 3 12 68 5...

Page 23: ...tinuously held down the I O lights blink every 3 seconds and enter a different reset level corresponding to modes 3 4 and 5 Reset mode uses Use mode 1 to revert to the factory default firmware version if incompatibility issues arise with user loaded firmware See notes on next page Use mode 3 to restart the communication and control events Use mode 4 to reset most IP protocols to their default sett...

Page 24: ...ns events off The Reset LED flashes four times in quick succession confirming the reset 5 Hold down the Reset button for 9 seconds until the Reset LED blinks three times once at 3 seconds again at 6 seconds and then again at 9 seconds Then press Reset momentarily 1 second within 1 second Mode 5 performs a complete reset to factory defaults with the exception of the firmware Does everything mode 4 ...

Page 25: ...SMX System MultiMatrix Switchers 4 Chapter Four SIS Programmer s Guide Selected SIS Commands SIS Command Tables ...

Page 26: ...s If the switcher is password protected enter the appropriate password If accepted the switcher responds with Login User or Login Administrator If the password is not accepted the Password prompt reappears Connection time outs The Ethernet link times out and disconnects after a designated period of time of no communications By default this time out value is set to five minutes but the value can be...

Page 27: ...t 5 26 1366x768 75 6 Output 6 27 1400x1050 60 7 Output 7 28 1600x1200 60 8 Output 8 29 480p 60 9 640x480 60 30 576p 50 10 640x480 75 31 720p 50 11 800x600 60 32 720p 60 12 800x600 75 33 1080i 50 13 852x480 60 34 1080i 60 14 852x480 75 35 1080p 50 15 1024x768 default 60 36 1080p 60 16 1024x768 75 37 User assigned 17 1024x852 60 38 User assigned 18 1024x852 75 39 User assigned 19 1280x768 60 40 User...

Page 28: ...output X on plane X2 for video signals Tie input to an output audio X2 X X X2 OutX InX Aud Tie input X to output X on plane X2 for audio signals Tie input to an output all X2 X X X2 OutX InX All Tie input X to output X on plane X2 for all signals N Commands can be entered back to back in a string with no spaces For example 1 1 1 001 002 002 001 003 003 001 The SMX supports 1 2 and 3 digit numeric ...

Page 29: ...ommand activates all I O switches simultaneously View ties N If the view follow all tie command is used for an output with a break away tie the switcher responds with an error message E14 View video output tie X2 X X View video input tied to output X on plane X2 X2 OutX InX Vid in verbose mode View RGBHV output tie X2 X X View RGBHV input tied to output X on plane X2 View audio output tie X2 X X V...

Page 30: ...tX 0 Unmute audio for X Read audio mute X2 X Z z X Read audio output X Audio mute entire plane X2 1 Z z X2 Amt00 1 Mute audio Audio unmute entire plane X2 0 Z z X2 Amt00 0 Unmute audio View mute View output mutes per plane E X2 VM X1 1 X1 2 X1 n View output mute for plane X2 Mut X2 X1 1 X1 2 X1 n in verbose mode Global presets all planes Save current ties as a global preset X1 SprX1 Save the curre...

Page 31: ...2 X2 1 X2 2 X2 n MP MpvX2 X2 1 X2 2 X2 n Write virtual plane address 90 to 99 Read virtual plane address E X2 MP X2 1 X2 2 X2 n Read virtual plane address Front panel lockout executive mode Lock front panel advanced functions 2X x Exe2 Enable advanced executive mode Lock front panel advanced and basic functions 1X x Exe1 Enable executive mode Unlock front panel 0X x Exe0 Disable executive mode Vie...

Page 32: ...se response Query system status S X2 X2 X2 X2 X2 X2 X7 X7 Example S Sts0 3 31 4 98 24 22 100 40 03305 03308 1 0 verbose response 3 31 and 4 98 are power supply voltages 24 22 is fan voltage 100 40 degrees F is the temperature 03305 is fan 1 rpm 03308 is fan 2 rpm 1 is primary power supply OK Query switcher information general per plane 16 actual and 10 virtual plus board configuration I VX 0XX 0AX...

Page 33: ... VGA board G no board 0 n5 Slot 5 G00 Slot 5 is covered by VGA board G no board 0 n6 Slot 6 G15 VGA board G 1616 configuration 15 4 slots board n7 Slot 7 D00 Slot 7 is covered by S video BNC board top D no board 0 n8 Slot 8 D15 S video BNC top board D 1616 configuration 15 2 slots top of 4 n9 Slot 9 C00 Slot 9 is covered by S video BNC board bottom C no board 0 n10 Slot 10 C15 S video BNC top boar...

Page 34: ...X3 EdidSX3 Only applies where X3 37 to 40 View EDID data assigment EA X3 X0 EDID X3 X3 EdidAX0 X3 Verbose mode Export EDID file data EEX3 X3 EDID X6 X3 EdidEX3 X6 Verbose mode Import EDID file data to user file location EIX3 X3 EDID X6 X3 EdidIX3 Only applies where X3 37 to 40 PN For EDID table see page 4 3 in this guide or refer to the online SMX User s Manual N X0 Input number for tie 01 maximum...

Page 35: ...IP address E X3 CG Ipg X3 X3 gateway IP address in the format Leading zeros in all the four fields are optional View gateway IP address ECG X3 Set E mail events for recipient EX4 X4 X3 X4 X4 EM X3 IpeX4 X4 X4 X4 View E mail events for recipient E X4 X4 X3 X4 EM X4 X4 X4 X4 N X1 Subnet mask X3 Slot address 00 for F and P of X4 01 up to 10 for I of X4 X3 IP address X3 Gateway address X4 Notification...

Page 36: ...se mode is disabled by default in order to reduce the amount of communication traffic on the network To use verbose mode with a switcher connected via Ethernet you must set this mode to on each time you reconnect to the SMX View verbose mode E CV X3 Reset commands Reset all device settings to factory settings E ZXXX Zpx Clears all ties and presets audio gain and volume and resets unit to factory d...

Page 37: ...SMX System MultiMatrix Switchers 5 Chapter Five Configuration and Control Installing and Starting the SMX Control Program Accessing the HTML Pages Using the Web Pages to Configure the SMX ...

Page 38: ...information It cannot be run from the CD ROM N For full details on operating the program refer to the SMX User s Manual chapter 5 SMX Software Installing the program 1 Insert the CD ROM into the drive The CD self starts The Extron software CD window appears N If the CD does not self start run Launch exe from the CD 2 Click the Software tab 3 Scroll to the SMX Control Program and click Install SMX ...

Page 39: ...p 2 the SMX Control Program is ready for operation 3 If you selected IP LAN in step 2 the IP Connection window appears a Examine the Matrix IP Address field which displays the last Matrix IP address entered and a drop down box with a list of the most recently used IP addresses If listed select the applicable IP address or enter the correct IP address in the field N 192 168 254 254 is the factory s...

Page 40: ...ls on operating the switcher via HTML pages refer to the SMX Users Manual chapter 6 HTML Operation 1 Start the Web browser program 2 Click in the browser s Address field 3 Enter the matrix s IP address in the Address field N 192 168 254 254 is the factory specified address 4 Press the keyboard Enter key The switcher checks to see if it is password protected If the switcher is not password protecte...

Page 41: ...computer and in the address bar type the IP address for the SMX switcher N The default IP address is 192 168 254 254 Check with the administrator if the IP address has been changed The browser opens the SMX Matrix Switcher Series Default Web Page see screen shot at the System Status page SMX default Web page system status There are three other pages the Configuration page the File Management page ...

Page 42: ...SMX Control page This page has two sections User Control and Presets The User Control section allows for each plane the input to output ties to be set and viewed input audio gain attenuation and output audio volume settings to be adjusted Audio and video signals can be muted or unmuted per output from this section In addition where DVI boards are installed EDID configurations can be set from this ...

Page 43: ...SMX System MultiMatrix Switchers A Appendix A Reference Material Cable and Connector Wiring Installing the Input Output Boards ...

Page 44: ...cable Terminating the network cable Terminate as either a patch or a crossover cable see below Patch straight cable Connecting the SMX to an Ethernet hub router or switcher also hosting a controlling computer Crossover cable Direct connection between the SMX and a controlling computer 12345678 RJ 45 Connector Insert Twisted Pair Wires Pins Side View Straight through Cable for connection to a switc...

Page 45: ...e The tip ring and sleeve wires are also shown above balanced inputs See the SMX User s Manual chapter 3 Operation and Setup for details about setting up the audio Tip Sleeve Sleeve Ring Tip RCA Connector 3 5 mm Stereo Plug Connector balanced Audio connectors Audio output connectors Connect audio output devices to the 3 5 mm 5 pole captive screw connectors up to two groups of eight sets possible T...

Page 46: ...Remove any cables from the I O board being replaced 2 Loosen the two outer screws and remove the board 3 Slide the replacement board firmly into place 4 Tighten the screws 5 Set plane using plane address rotary switch 6 Repeat 1 5 for all boards to be replaced New output boards are autodetected initialized and then ready for cabling and configuration RESET RS 232 RS 422 RE MO TE LAN ACT LINK 50 60...

Page 47: ...ubai This Limited Warranty does not apply if the fault has been caused by misuse improper handling care electrical or mechanical abuse abnormal operating conditions or non Extron authorized modification to the product If it has been determined that the product is defective please call Extron and ask for an Applications Engineer at 714 491 1500 USA 31 33 453 4040 Europe 65 6383 4400 Asia or 81 3 35...

Page 48: ...7 FAX Extron Europe 800 3987 6673 Inside Europe Only 31 33 453 4040 31 33 453 4050 FAX Extron Asia 800 7339 8766 Inside Asia Only 65 6383 4400 65 6383 4664 FAX Extron Japan 81 3 3511 7655 81 3 3511 7656 FAX Extron China 400 883 1568 Inside China Only 86 21 3760 1568 86 21 3760 1566 FAX Extron Middle East 971 4 2991800 971 4 2991880 FAX 2009 Extron Electronics All rights reserved ...

Reviews: