background image

E


Input HDCP LED

 — Lights when the source requires HDCP encryption and it has 

been authenticated with the HDMI input (see 

figure 4

 on the previous page).

F


Output HDCP LEDs

 — Light when HDCP is authenticated between the 

distribution amplifier output and the corresponding sink device. This happens when 
the source device requires HDCP encryption and it has already been authenticated on 
the HDMI input.

• 

The LEDs do not light if the source does not require HDCP encryption or if the 
sink is not HDCP compliant.

• 

Each output signal has its own HDCP LED: two for the DA2 HD 4K PLUS, four 
for the DA4 HD 4K PLUS, and six for the DA6 HD 4K PLUS.

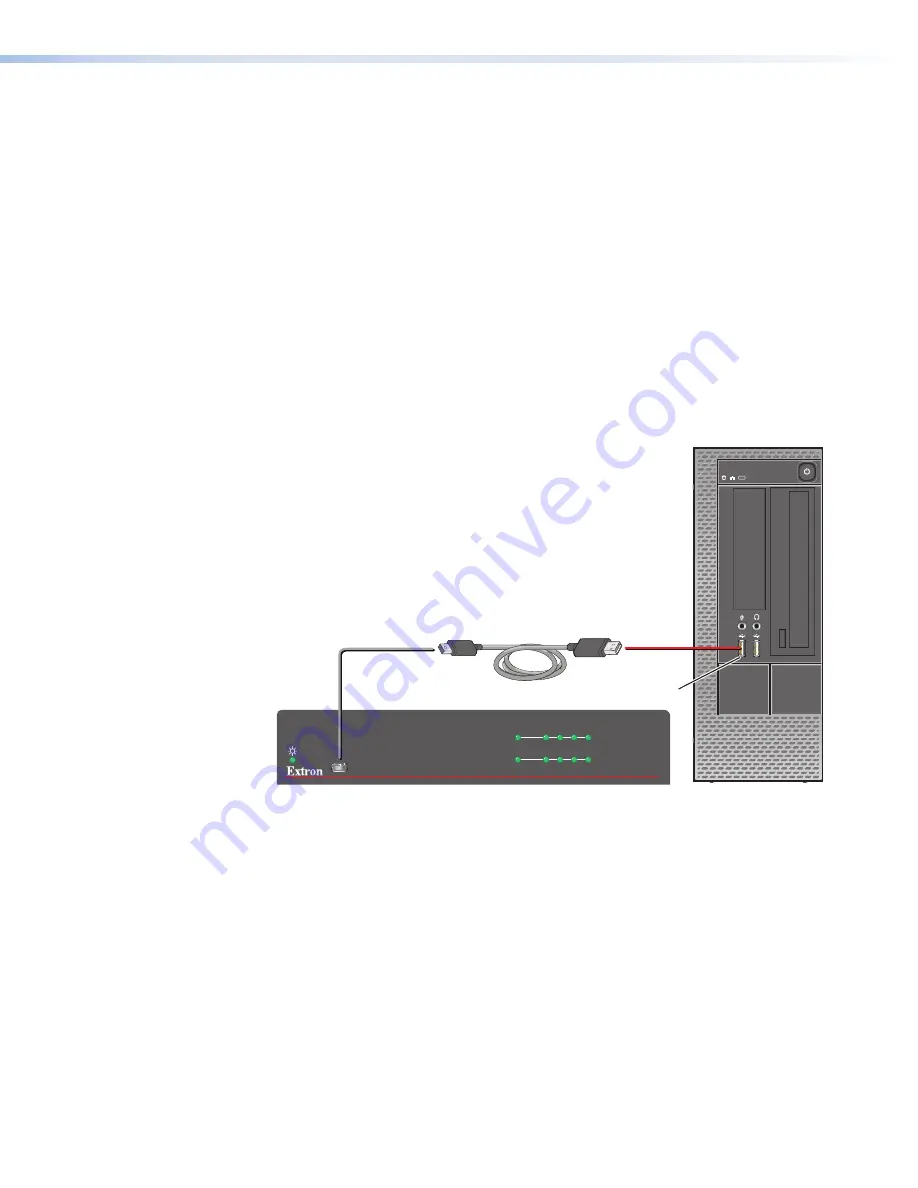
Connecting to Front Panel USB Port

Use the mini B USB port on the front panel (see figure 5 below) to connect the 
distribution amplifier to a host computer for updating firmware or to configure the unit with 
SIS commands or PCS.

1. 

Connect a USB A to mini B cable between the front panel USB Config port and a 
USB port of the PC.

WiFi

1 2 3 4

USB Cable

Type 

A

USB

Mini Type 

B

USB

USB

Ports

PC

DA4 HD 4K PLUS

DA4 HD 4K PLUS

HDMI DISTRIBUTION AMPLIFIER

CONFIG

HDCP

1

2

3

4

SIGNAL

INPUT

OUTPUTS

Figure 5. 

Connecting a PC to the DA4 HD 4K PLUS Front Panel USB Port

If this is the first time the distribution amplifier has been connected to the PC, the 

Found


New


Hardware


Wizard

 window opens (see 

figure 6

 on the next page).

figure 5 


DA HD 4K PLUS Series • Installation

12

Summary of Contents for DA 2HD 4K PLUS

Page 1: ...User Guide DA HD 4K PLUS Series Distribution Amplifiers 4K HDMI Distribution Amplifier 68 2880 01 Rev A 11 17 ...

Page 2: ...nance importantes qui se trouvent dans la documentation fournie avec le matériel Pour en savoir PLUS sur les règles de sécurité la conformité à la réglementation la compatibilité EMI EMF l accessibilité et autres sujets connexes lisez les informations de sécurité et de conformité Extron réf 68 290 01 sur le site Extron www extron com Istruzioni di sicurezza Italiano AVVISO Il simbolo se usato sul ...

Page 3: ...RGB Systems Inc or Extron Electronics see the current list of trademarks on the Terms of Use page at www extron com Registered Trademarks Extron Cable Cubby ControlScript CrossPoint DTP eBUS EDID Manager EDID Minder Flat Field FlexOS Global Configurator Global Scripter GlobalViewer Hideaway IP Intercom IP Link Key Minder LinkLicense LockIt MediaLink MediaPort NetPA PlenumVault PoleVault PowerCage ...

Page 4: ...uses and can radiate radio frequency energy and if not installed and used in accordance with the instruction manual may cause harmful interference to radio communications Operation of this equipment in a residential area is likely to cause interference This interference must be corrected at the expense of the user NOTE For more information on safety guidelines regulatory compliances EMI EMF compat...

Page 5: ...uide the character 0 is used for the number zero and O is the capital letter o Computer responses and directory paths that do not have variables are written in the font shown here Reply from 208 132 180 48 bytes 32 times 2ms TTL 32 C Program Files Extron Variables are written in slanted form as shown here ping xxx xxx xxx xxx t SOH R Data STX Command ETB ETX Selectable items such as menu names men...

Page 6: ......

Page 7: ...h and deep color support 16 Configuration Software 17 Downloading Software from the Extron Website 17 Using PCS Software 18 Input Output Configuration 19 EDID Minder 21 Device Menu 22 Extron PCS Help File 22 Updating Firmware 23 Downloading Firmware to a PC 23 Uploading Firmware to a DA HD 4K PLUS Device 23 SIS Commands 26 Introduction to SIS 26 Symbols Used in this Guide 27 Error Messages 28 Comm...

Page 8: ...DA HD 4K PLUS Series Contents viii ...

Page 9: ...h dynamic range and HD lossless audio formats NOTE Extron strongly recommends compatibility testing while designing and before installing any 3D or HDR system There are several unique 3D and HDR formats in use by source devices and display manufacturers The level of 3D and HDR product support is governed by pixel clock signal format and communication between source and sink devices Please contact ...

Page 10: ... passed in non HDCP mode HDCP Visual Confirmation A full screen green signal is sent when HDCP encrypted content is transmitted to a non HDCP compliant display providing immediate visual confirmation that protected content cannot be viewed on the display HDCP authentication and signal presence LED indicators Front panel LED indicators for signal presence and HDCP authentication provide real time f...

Page 11: ...DA6 HD 4K PLUS feature a 1U high half rack width enclosure All three products can be conveniently mounted in standard racks or under furniture Includes LockIt HDMI cable lacing brackets LockIt lacing brackets are used to secure HDMI cables connected to the HDMI input and output connectors preventing accidental disconnection of the cables Provides 5 VDC 250 mA power on each output for external peri...

Page 12: ... IN PUT 1 3 1 4 2 3 1 4 2 3 1 4 2 2 3 100 LINK ACT COM IR INPUT RELAY TX RX R IPL 250 ON OFF DISPL AY MUTE SCREE N UP SCREE N DOWN VCR DVD DOC CAM LAPTO P PC Extron DA4 HD 4K PLUS Distribution Amplifier HDMI Cables RS 232 TCP IP TouchLink Control System 4K Displays 4K Media Player MO DE L 80 MO DE L 80 MO DE L 80 POWE R SD CARD USB PLAY STATU S MO DE L 80 Figure 1 DA4 HD 4K PLUS Application Diagra...

Page 13: ...arde sur la page 7 DA4 HD 4K PLUS and DA6 HD 4K PLUS Connect to a 100 240 VAC 50 60 Hz power source using the provided IEC power cord see IEC cable connector on page 8 3 Connect the output display devices and power them on see Connecting Output Displays on page 9 NOTES The distribution amplifier automatically reads and stores EDID from the selected display device By default 1080p 60 Hz with 2 Chan...

Page 14: ...MI outputs E RS 232 port Connecting Power DA2 HD 4K PLUS A Power inlet Connect the provided 12 VDC 5 A power supply to the rear panel power supply socket CAUTION The two power cord wires must be kept separate while the power supply is plugged in Remove power before wiring AVERTISSEMENT Les deux cordons d alimentation doivent rester séparés tant que l alimentation est branchée Coupez l alimentation...

Page 15: ...usieurs fois 3 Ensure the connections have the correct polarity as shown in the figure above The wire with ridges is the ground wire 4 Slide the exposed ends of the wire into the captive screw connector and secure by tightening the screws 5 Use the supplied tie wrap to strap the power cord to the extended tail of the connector ATTENTION Always use a power supply provided by or specified by Extron ...

Page 16: ...tif du cordon d alimentation voir l illustration sur la page précédente To verify the polarity before connection plug in the power supply with no load and check the output with a voltmeter Pour vérifier la polarité avant la connexion brancher l alimentation hors charge et mesurer sa sortie avec un voltmètre DA4 HD 4K PLUS and DA6 HD 4K PLUS B IEC power inlet Use the provided female IEC cable to co...

Page 17: ... D on page 6 NOTE Secure the input and output connectors to the distribution amplifier with the provided LockIt HDMI lacing bracket see Securing the HDMI Connector By default the EDID is set to 1080p 60 Hz with 2 channel audio However EDID can be changed by using PCS see EDID Minder on page 21 There are two four or six slots that are automatically populated by EDID from connected sink devices The ...

Page 18: ...Tx Pin 5 G Computer DA HD 4K PLUS Figure 3 Wiring for Rear Panel RS 232 Control NOTES The wiring in the RS 232 cable crosses over so that the Tx on the distribution amplifier connects to the Rx of the control device and vice versa Ground always connects to ground If you use cable that has a drain wire tie the drain wire to the ground at both ends To connect the distribution amplifier to a computer...

Page 19: ...are updates This port can be used as an alternative to the rear panel RS 232 captive screw connector NOTE Extron recommends using the USB port for temporary connections If a permanent connection is required the RS 232 port should be used When a connection is made to the USB Config Port on the distribution amplifier for the first time the Found New Hardware Wizard window opens to install the correc...

Page 20: ...D 4K PLUS and six for the DA6 HD 4K PLUS Connecting to Front Panel USB Port Use the mini B USB port on the front panel see figure 5 below to connect the distribution amplifier to a host computer for updating firmware or to configure the unit with SIS commands or PCS 1 Connect a USB A to mini B cable between the front panel USB Config port and a USB port of the PC WiFi 1 2 3 4 USB Cable Type A USB ...

Page 21: ...nnect to Windows Update only this one time Select Yes now and every time I connect a device 2 if you want the computer to automatically connect to Windows Update to search the Web every time the switcher is connected to this USB port Select No not this time 3 if you do not want the computer to connect to Windows Update to search the web at this time for example if the driver is already on your com...

Page 22: ...ive 6 When the Completed screen appears click Finish to close the wizard NOTE The wizard opens only on the first occasion you connect the distribution amplifier to that USB port The wizard reappears if you connect the unit to a different USB port or if you connect a different piece of equipment requiring a different driver to the same USB port 7 Configure the distribution amplifier as required usi...

Page 23: ...to 4K 60 Hz 4 4 4 EDID Memory Retention The assigned EDID is stored to an EEPROM which is located at the HDMI input The stored EDID is retained until a reset is initiated Hot Plug Detect HPD HPD remains high on the input while the unit is powered on The HPD drops low only while EDID is updated HDCP Input The HDMI input negotiates and authenticates HDCP with the source device if the source requires...

Page 24: ... three components Video format either DVI or HDMI Color space RGB YCbCr 4 2 2 or YUV 4 4 4 Quantization range either full 0 255 or limited 16 235 By default the input format is configured for Auto which automatically forces RGB 4 4 4 Full with the video format dependent on the source signal and the sink capabilities This can be forced using SIS commands see TMDS Output Format on page 30 or PCS see...

Page 25: ...load and install Firmware loader 1 Click the Download link at the top of the page figure 8 1 2 Click the appropriate link on the left sidebar menu 2 1 1 2 2 Figure 8 Software and Firmware Links on the Download Tab For software either click the Software link at the top of the sidebar or if the software is listed in the sidebar click directly on that link for example see the PCS link in figure 8 2 3...

Page 26: ...om the PCS icon loaded on the desktop optional see image on the right or from the Start menu Start Programs Extron Electronics Extron Product Configuration Software Extron Product Configuration Software The Product Configuration Software opens to the Device Discovery screen 1 2 DA4 HD 4K PLUS Figure 10 PCS Device Discovery Screen 4 Select the DA HD 4K PLUS distribution amplifier by clicking on it ...

Page 27: ...1 2 3 Figure 12 Input Configuration Panel The Input Configuration panel allows the user to view the Signal Presence and HDCP Status of the input and select HDCP Authorized for the input see figure 12 1 Signal Presence Signal status icon shows green when an active HDMI signal is present 2 HDCP Status The HDMI input negotiates and authenticates HDCP with the source device if the source requires HDCP...

Page 28: ...lected input source default Always Encrypt Output Always encrypts the output regardless of the HDCP status of the input source Follow Input Encrypts the output only when required by the input source Use this setting when DVI sink devices initially pass HDCP encrypted content but intermittently display a green HDCP notification screen after a power cycle or resuming from sleep mode Always Encrypt O...

Page 29: ...ts and Available EDID panels 1 From the Resolution drop down menu 3 select a specific resolution or Any 2 From the Refresh Rate drop down menu 4 select a specific refresh rate or Any 3 From the Video Format drop down menu 5 select HDMI or Any 4 From the Audio Format drop down menu 6 select LPCM 2Ch None or Any Assigning EDID To assign EDID to the input 1 From the Input box on the right 7 select th...

Page 30: ...enu see image on the right allows the user to 1 Disconnect the device from PCS 2 View the hardware Settings 3 Reset Device to factory default 4 Update Firmware see Updating Firmware on the next page 5 Access the DA HD 4K PLUS Help File 6 View information About this Module 1 2 3 4 5 6 Extron PCS Help File For assistance Extron PCS Help contains complete information about using the program to config...

Page 31: ...3 5 Scroll down the page until you find the firmware for your unit 6 Click Release Notes 4 for more information about the program optional 7 Click Download 5 8 Enter the required information and click Download An executable exe file is downloaded to your computer Run this program to place the firmware on your computer for future use Make a note of the folder where the firmware is saved Uploading F...

Page 32: ...The Product Configuration Software opens to the Device Discovery screen 1 2 DA4 HD 4K PLUS Figure 17 PCS Device Discovery Screen 5 Select the appropriate DA HD 4K PLUS device by clicking on it to highlight it in the list see figure 17 1 6 Click Connect 2 The Product Configuration Software opens to the device page see figure 18 1 Figure 18 DA HD 4K PLUS device Page 7 Click the Device Menu arrow nex...

Page 33: ...n du fichier firmware doit être eff Si un fichier est ouvert avec une mauvaise extension l appareil peut arrêter de fonctionner 12 Click Open or double click on the firmware file 13 Click Update on the Update Firmware dialog box This uploads and verifies the new firmware onto your connected device The Installing Firmware progress field shows the progress of the upload After the upload is complete ...

Page 34: ...le crosses over so that the distribution amplifier transmit Tx wire connects with the control device receive Rx and vice versa The protocol for the remote port is 9600 baud 8 data bits 1 stop bit and no parity SIS commands consist of strings of one or more characters per command field Unless otherwise stated upper and lower case characters can be used interchangeably Commands do not require any sp...

Page 35: ...bled on or detected X Video color bit depth default 0 0 Auto based on EDID of sink 1 Force 8 bit X EDID data as 256 bytes of Hex data text representation X Native resolution and refresh rate translated from Hex for example 1600x1200 60 Hz X Firmware version to the second decimal place X Text string of up to 24 characters default DAx HD 4K PLUS Alphanumeric characters and hyphens only No distinctio...

Page 36: ... mute X1 Input HDCP status 0 No source detected 1 Source detected with HDCP 2 Source detected without HDCP Active source detection based on PLL clock or TMDS lock not solely based on 5VDC presence X1 Output HDCP Status 0 No active sink connected 1 HDCP sink detected 2 Sink detected without HDCP For active sink it needs to have hotplug detect and TMDS termination monitor sense X1 5V output hot plug...

Page 37: ...ponse in verbose mode 2 or 3 Audio mute status of outputs 1 through 2 DA2 HD 4K PLUS 1 through 4 DA4 HD 4K PLUS 1 through 6 DA6 HD 4K PLUS Video Color Bit Depth Set video color bit depth for a specific output EVX X BITD BitdVX X Set video color bit depth X for output X Set video color bit depth for all outputs EVX BITD BitdVX View video color bit depth status for all outputs EVBITD X X X BitdVX X ...

Page 38: ... HDCP mode X for all outputs View the output HDCP mode for all outputs ESHDCP X X X HdcpSX X X Response in verbose mode 2 or 3 Output HDCP status of outputs 1 through 2 DA2 HD 4K PLUS 1 through 4 DA4 HD 4K PLUS 1 through 6 DA6 HD 4K PLUS NOTES X Output 1 through 2 DA2 HD 4K PLUS 1 through 4 DA4 HD 4K PLUS 1 through 6 DA6 HD 4K PLUS X Status 0 Disabled or undetected 1 Enabled or detected X Output H...

Page 39: ...D Response in verbose mode 2 or 3 Verbose Mode Set verbose mode EX1 CV VrbX1 Sets verbose mode X1 View verbose mode ECV X1 NOTES X Output 1 through 2 DA2 HD 4K PLUS 1 through 4 DA4 HD 4K PLUS 1 through 6 DA6 HD 4K PLUS X Status 0 Disabled or signal undetected 1 Enabled or signal detected default X EDID data as 256 bytes of Hex data text representation X Native resolution and refresh rate translate...

Page 40: ...e ECN X Others View unit part number N 60 1607 01 60 1608 01 60 1609 01 DA2 HD 4K PLUS DA4 HD 4K PLUS DA6 HD 4K PLUS View firmware version Q X Firmware build X Reset EZXXX Zpx NOTES X Firmware build to two decimal places x xx X Unit name a text string of up to 24 characters Alphanumeric characters and hyphens only No distinction between upper and lower case No spaces First character must be a lett...

Page 41: ...t temperature Therefore install the equipment in an environment compatible with the maximum ambient temperature Tma 122 F 50 C specified by Extron Reduced air flow Install the equipment in the rack so that the equipment gets adequate air flow for safe operation Mechanical loading Mount the equipment in the rack so that uneven mechanical loading does not create a hazardous condition Circuit overloa...

Page 42: ... ask for an Application Engineer to receive an RA Return Authorization number This will begin the repair process USA 714 491 1500 or 800 633 9876 Europe 31 33 453 4040 Asia 65 6383 4400 Japan 81 3 3511 7655 Units must be returned insured with shipping charges prepaid If not insured you assume the risk of loss or damage during shipment Returned units must include the serial number and a description...

Reviews: