background image

25 

INSTALLATION INSTRUCTIONS 

The installation comes under the exclusive responsibility of specialists.  
The installer is held to respect the legislation and the standards enforce in his home country. 

How to stick the gasket: 

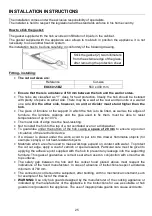
The gasket supplied with the hob avoids all infiltration of liquids in the cabinet. 
The  gasket  supplied  with  the  appliance  also  allows  to  maintain  in  position  the  appliance,  it  is  not 
necessary to use another fixation system. 
His installation has to be done carefully, in conformity of the following drawing. 


Fitting - installing: 

  The cut out sizes are:  

Reference 

Cut-size 

EKC601-5BZ 

560 x 490 mm 


  Ensure that there is a distance of 50 mm between the hob and the wall or sides. 

  The  hobs  are  classified  as  “Y”  class  for  heat  protection.  Ideally  the  hob  should  be  installed 

with plenty of space on either side. There may be a wall at the rear and tall units or a wall at 
one  side.  On  the  other  side,  however,  no  unit  or  divider  must  stand  higher  than  the 
hob.
 

  The piece of furniture or the support in which the hob is to be fitted, as well as the edges of 

furniture,  the  laminate  coatings  and  the  glue  used  to  fix  them,  must  be  able  to  resist 
temperatures of up to 100 °C. 

  The mural rods of edge must be heat-resisting. 

  Not to install the hob to the top of a not ventilated oven or a dishwasher. 

  To  guarantee  under  the  bottom  of the hob  casing  a  space  of  20 mm  to  ensure a  good  air 

circulation of the electronic device. 

  If  a  drawer  is  placed  under  the  work,  avoid  to  put  into  this  drawer  flammable  objects  (for 

example: sprays) or not heat-resistant objects. 

  Materials  which  are often  used  to make  worktops  expand on  contact  with  water.  To  protect 

the cut out edge, apply a coat of varnish or special sealant. Particular care must be given to 
applying the adhesive joint supplied with the hob to prevent any leakage into the supporting 
furniture. This gasket guaranties a correct seal when used in conjunction with smooth work 
top surfaces. 

  The  safety  gap  between  the  hob  and  the  cooker  hood  placed  above  must  respect  the 

indications of  the  hood  manufacturer. In  case  of  absence  of  instructions  respect a  distance 
minimum of 760 mm. 

  The connection cord should be subjected, after building, with no mechanical constraint, such 

for example of the fact of the drawer. 

  WARNING: Use only hob guards designed by the manufacturer of the cooking appliance or 

indicated by the manufacturer of the appliance in the instructions for use as suitable or hob 
guards incorporated in the appliance. The use of inappropriate guards can cause accidents. 

Stick the gasket (2) two millimeters 

from the external edge of the glass, 

after removing the protection sheet 

Summary of Contents for EKC601-5BZ

Page 1: ...Bedienungsanweisung mit Montageanweisungen Instructions for use and installation Instructions d utilisation et d installation EKC601 5BZ ...

Page 2: ...CHREIBUNG 7 BEDIENFELD 7 BEDIENUNG DES KOCHFELDES 8 ANZEIGE 8 INBETRIEBNAHME DES KOCHFELDES 8 VOR DEM ERSTEN AUFHEIZEN 8 FUNKTION DER SENSORSCHALTFELDER 8 KOCHFELD EIN UND AUSSCHALTEN 8 RESTWÄRMEANZEIGE 8 ZWEIKREIS KOCHZONE 9 KINDERSICHERUNG VERRIEGELUNG DES KOCHFELDES 9 ANKOCHAUTOMATIK 9 TIMER 10 KOCHEMPFEHLUNGEN 11 AUSWAHL DER LEISTUNGSSTUFEN 11 REINIGUNG UND PFLEGE 11 WAS TUN WENN 11 UMWELTSCHU...

Page 3: ...haushaltübliche Kochen und Braten von Speisen verwendet werden und ist nicht für gewerbliche Zwecke bestimmt Alle Etiketten und Aufkleber des Glases wegnehmen Das Gerät darf nicht abgeändert werden Verwenden Sie das Kochfeld nicht als Arbeits oder Abstellfläche Die Sicherheit ist nur gewährleistet wenn das Gerät mit einem Schutzleiter verbunden ist der den gültigen Vorschriften entspricht Der Ansc...

Page 4: ...trächtigt werden Legen Sie keine metallischen Gegenstände z B Löffel Topfdeckel usw auf die Induktionsfläche da sich diese bei Betrieb unter Umständen erwärmen können Bedecken Sie nie die Kochfläche mit einem Lappen oder einer Schutzfolie diese könnten sehr heiß werden und Feuer fangen Dieses Gerät kann von Kindern ab 8 Jahren und darüber sowie von Personen mit verringerten physischen sensorischen...

Page 5: ...Abkühlen Risse Brüche oder andere bleibende Veränderungen in der Scheibe verursachen Falls Sie trotzdem auf die heißen Kochzonen gelangen schalten Sie das Gerät bitte aus und entfernen Sie diese Stoffe noch im heißen Zustand Da die Kochzonen heiß sind besteht Verbrennungsgefahr Stellen Sie in keinem Fall heißes Kochgeschirr auf der Steuerung ab Die Elektronik unter dem Glas könnte beschädigt werde...

Page 6: ...enn die Glasoberfläche gesprungen ist ist das Gerät auszuschalten um die Gefahr eines elektrischen Schlages zu vermeiden Schutz vor weiteren Gefahren Achten Sie darauf dass das Kochgeschirr immer zentriert auf der Kochzone plaziert ist Der Pfannenboden muss möglichst viel von der Kochzone abdecken Für Personen mit einem Herzschrittmacher in der Nähe des eingeschalteten Gerätes entsteht ein elektro...

Page 7: ...ndardisiertes Kochgeschirr Kategorie A Energieverbrauch ECcw 173 8 Wh kg Kochzone hinten rechts Ø 270 X 175 mm Nominal Leistung 1500 2400 W Standardisiertes Kochgeschirr Kategorie D Energieverbrauch ECcw 181 3 Wh kg Kochzone vorne rechts Ø 150 mm Nominal Leistung 1200 W Standardisiertes Kochgeschirr Kategorie A Energieverbrauch ECcw 173 8 Wh kg nach der Methode zur Messung der Gebrauchseigenschaft...

Page 8: ...geführt Jede Reaktion der Schaltfelder wird mit einem akustischen und oder visuellen Signal quittiert Im Falle eines allgemeinen Gebrauchs drücken Sie nur eine Taste zur gleichen Zeit Kochfeld ein und ausschalten Kochfeld einschalten ausschalten Betätigung Bedienfeld Anzeige Einschalten Auf drücken 0 Ausschalten Auf drücken Keine oder H Kochzone einschalten ausschalten Betätigung Bedienfeld Anzeig...

Page 9: ... einschalten Auf drücken L auf alle Anzeige Innerhalb von 5 Sekunden nach Einschalten der Mulde Gleichzeitig auf und rechts unten drücken 0 anschließend noch mal auf drücken Keine Anzeige Ankochautomatik Alle Kochzonen sind mit einer Ankochautomatik ausgestattet Bei aktivierter Ankochautomatik heizt die Kochzone automatisch mit höchster Leistung an und schaltet dann auf die von Ihnen gewählte Fort...

Page 10: ...mer auswählen Auf drücken Restlaufzeit Minuten abstellen Auf drücken 00 Bestätigung Auf drücken 00 Automatisches Ausschalten Nach Ablauf der programmierten Kochdauer wird die Kochzone ausgeschaltet ein Signalton ertönt und es blinkt 00 Um den Signalton und das Blinken abzuschalten brauchen Sie nur zu drücken Timer als Kurzzeitwecker Betätigung Bedienfeld Anzeige Einschalten der Kochmulde Auf drück...

Page 11: ... zu reinigen muss es ausgeschaltet sein Die Reinigung des Gerätes mit einem Dampfreiniger oder Hochdruckdruckreiniger ist aus Sicherheitsgründen nicht zugelassen Verwenden Sie in keinem Fall scheuernde oder aggressive Reinigungsmittel wie z B Grill und Backofensprays Fleck oder Rostentferner Scheuersande oder Schwämme mit kratzenden Oberflächen Danach reiben Sie das Kochfeld mit einem sauberen Tuc...

Page 12: ... Anzeige erscheint Er21 Das Kochfeld ist überhitzt lassen Sie es zuerst abkühlen und dann schalten Sie es wieder ein In der Anzeige erscheint U400 Er25 oder U4 Das Kochfeld ist nicht gut mit dem Netzwerk verbunden Überprüfen Sie die Verbindung und schalten Sie das Kochfeld ein Wenn eines der obengenannten Zeichen andauert rufen Sie den Kundendienst an UMWELTSCHUTZ Die Verpackungsmaterialen sind um...

Page 13: ...igem Kleber 100 C verarbeitet sein Die Wandabschlussleisten müssen hitzbeständig sein Das Kochfeld darf nicht über Herde ohne Lüfter Geschirrspülern Wasch oder Trockengeräten eingebaut werden Um eine ausreichende Belüftung der Elektronik im Kochfeld zu erzielen ist unter der Mulde ein Luftraum von 20 mm notwendig Befindet sich unter dem Kochfeld eine Schublade dürfen in der Schublade keine brennba...

Page 14: ... Hz ausgelegt Schließen Sie immer die Erde mit an Beachten Sie das Anschlussschema Der Anschlusskasten befindet sich auf der Unterseite des Gerätes Um das Gehäuse zu öffnen benutzen Sie einen Schraubenzieher und schieben Sie ihn in die vorgesehenen Schlitze laut EN 60 335 2 6 Norm Anschluss des Kochfelds Verwenden Sie für die verschiedenen Anschlussmöglichkeiten die Polbrücken aus Messing die sich...

Page 15: ...ANEL 19 USE OF THE APPLIANCE 20 DISPLAY 20 STARTING UP AND APPLIANCE MANAGEMENT 20 BEFORE THE FIRST USE 20 SENSITIVE TOUCH 20 STARTING UP 20 RESIDUAL HEAT INDICATION 20 EXTENSION ZONE 21 CONTROL PANEL LOCKING 21 AUTOMATIC COOKING GO AND STOP 21 TIMER 22 COOKING ADVICES 23 EXAMPLES OF COOKING POWER SETTING 23 MAINTENANCE AND CLEANING 23 WHAT TO DO IN CASE OF A PROBLEM 24 ENVIRONMENT PROTECTION 24 I...

Page 16: ...oking plate cannot be used as freestanding or as working surface The appliance must be grounded and connected conforming to local standards Do not use any extension cable to connect it The appliance cannot be used above a dishwasher or a tumble dryer as steam may cause damage The appliance is not intended to be operated by means of external timer or separate remote control system Using the applian...

Page 17: ...oons and lids should not be placed on the hob surface since they can get hot Precautions not to damage the appliance Raw pan bottoms or damaged saucepans not enamelled cast iron pots may damage the ceramic glass Sand or other abrasive materials may damage ceramic glass Avoid dropping objects even little ones on the vitroceramic Do not hit the edges of the glass with saucepans Make sure that the ve...

Page 18: ...iance and contact the after sales service Repairing has to be done by specialists Do not open the appliance by yourself WARNING If the surface is cracked switch off the appliance to avoid the possibility of electric shock Other protections Note sure that the container pan is always centred on the cooking zone The bottom of the pan must have to cover as much as possible the cooking zone For the use...

Page 19: ...r 1200 W Standardised cookware category A Energy consumption ECcw 173 8 Wh kg Rear right heating zone Ø 270 X 175 mm Nominal power 1500 2400 W Standardised cookware category D Energy consumption ECcw 181 3 Wh kg Front right heating zone Ø 150 mm Nominal power 1200 W Standardised cookware category A Energy consumption ECcw 173 8 Wh kg calculated according to the method of measuring performance EN 6...

Page 20: ...ing command is activated This activation is validated by a control light a letter or a number in the display and or a beep sound Touch only one key on the same time Starting up Start up switch off the hob Action Control panel Display To start touch key 0 To stop touch key nothing or H Start up switch off a heating zone Action Control panel Display Increase power touch key 4 to 9 Decrease power tou...

Page 21: ...ontrol panel Display Unlocking the hob Touch simultaneous and 0 or H on 4 displays from the front right zone Touch key No light on the displays Automatic cooking go and stop All the cooking zones are equipped with an automatic go and stop cooking device The cooking zone starts at full power during a certain time then reduces automatically its power on the preselected level Start up Action Control ...

Page 22: ...on Press key from the zone 0 To select Timer Press key The remaining time To stop the Timer Press key and 00 then stops simultaneously If several timers are activated repeat the process Automatic stop at the end of the cooking time As soon as the selected cooking time is finished the timer displays blinking 00 and a sound rings To stop the sound and the blinking it is enough to press the key Egg t...

Page 23: ... AND CLEANING Switch off the appliance before cleaning Do not clean the hob if the glass is too hot risk of burn Remove light marks with a damp cloth with washing up liquid diluted in a little water Then rinse with cold water and dry the surface thoroughly Highly corrosive or abrasive detergents and cleaning equipment likely to cause scratches must be absolutely avoided Do not ever use any steam c...

Page 24: ...king zone is still hot H The highest power level is set 9 The cooking level was engaged with The control panel displays L Refer to the chapter control panel locking The control panel displays Er03 An object or liquid covers the control keys The symbol disappear as soon as the key is released or cleaned The control panel displays ER21 The hob is overheated let it cool and then turnit on again The c...

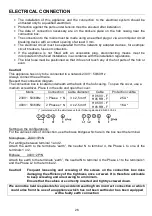
Page 25: ...isting Not to install the hob to the top of a not ventilated oven or a dishwasher To guarantee under the bottom of the hob casing a space of 20 mm to ensure a good air circulation of the electronic device If a drawer is placed under the work avoid to put into this drawer flammable objects for example sprays or not heat resistant objects Materials which are often used to make worktops expand on con...

Page 26: ... casing To open the cover use a medium screwdriver Place it in the slits and open the cover calculated with the simultaneous factor following standard EN 60 335 2 6 Setting up the configurations For the various kinds of connection use the brass bridges which are in the box next the terminal Monophase 230V 1P N Put a bridge between terminal 1 and 2 Attach the earth to the terminate earth the neutra...

Page 27: ...DE L APPAREIL 32 AFFICHAGE 33 MISE EN ROUTE ET GESTION DE L APPAREIL 33 AVANT LA PREMIÈRE UTILISATION 33 TOUCHES SENSITIVES 33 MISE EN ROUTE 33 INDICATEUR DE CHALEUR RÉSIDUELLE 33 DOUBLE ZONES 34 VERROUILLAGE DU BANDEAU DE COMMANDE 34 PROGRAMMATION D AUTOMATISME DE CUISSON 34 FONCTION MINUTERIE 35 CONSEILS DE CUISSON 36 EXEMPLES DE RÉGLAGE DES PUISSANCES DE CUISSON 36 ENTRETIEN ET NETTOYAGE 36 QUE...

Page 28: ...es aliments à l exclusion de toute autre utilisation domestique commerciale ou industrielle Enlevez toutes les étiquettes et autocollants du verre vitrocéramique Ne pas transformer ou modifier l appareil La table de cuisson ne doit pas servir de support ou de plan de travail La sécurité n est assurée que si l appareil est raccordé à une terre de protection conforme aux prescriptions en vigueur Pou...

Page 29: ... celui ci risquerait selon le matériau de chauffer de fondre ou de commencer à brûler Ne jamais couvrir l appareil d un chiffon ou d une feuille de protection Il pourrait devenir très chaud et prendre feu Cet appareil peut être utilisé par des enfants âgés de 8 ans et plus et des personnes dont les capacités physiques sensorielles ou mentales sont réduites ou dont les expériences et les connaissan...

Page 30: ... d aluminium ne touchent les zones chaudes Ces substances peuvent au refroidissement provoquer des cassures ou d autres modifications de la surface vitrocéramique Etendre l appareil et enlevez les immédiatement de la zone de cuisson encore chaude attention risque de brûlures MISE EN GARDE Risque d incendie ne pas entreposer d objets sur la surface de cuisson Ne placez jamais de récipients chauds a...

Page 31: ...pareil pour éviter une éventuelle décharge électrique Autres protections Assurez vous que le récipient de cuisson soit toujours centré sur la zone de cuisson Le fond de la casserole doit autant que possible couvrir la zone de cuisson Pour les utilisateurs portant un régulateur de rythme cardiaque le champ magnétique pourrait influencer son fonctionnement Nous recommandons de se renseigner auprès d...

Page 32: ...atégorie de la casserole standard A Consommation d énergie ECcw 173 8 Wh kg Foyer arrière droit Ø 270 X 175 mm Puissance nominale 1500 2400 W Catégorie de la casserole standard D Consommation d énergie ECcw 181 3 Wh kg Foyer avant droit Ø 150 mm Puissance nominale 1200 W Catégorie de la casserole standard A Consommation d énergie ECcw 173 8 Wh kg calculé selon la méthode de mesure de l aptitude à ...

Page 33: ... que sur une seule touche à la fois Mise en route Vous devez d abord enclencher la table de cuisson puis la zone de chauffe Enclencher arrêter la table de cuisson Action Bandeau de commande Afficheur Enclencher appuyer sur 0 Arrêter appuyer sur aucun ou H Enclencher arrêter une zone de chauffe Action Bandeau de commande Afficheur Sélectionner appuyer sur de la zone 0 Augmenter appuyer sur de la zo...

Page 34: ... sur L sur les 4 afficheurs Dans les 5 secondes après la mise en route Déverrouiller Appuyer simultanément sur le du foyer avant droit et sur le central 0 ou H sur 4 afficheurs Puis appuyer sur seul Afficheurs éteints Programmation d automatisme de cuisson Toutes les zones de cuisson sont équipées d un dispositif de cuisson automatique La zone de cuisson se met en marche à pleine puissance pendant...

Page 35: ...r de la sélection de la zone zone s allume Sélectionner Minuterie Appuyer sur Temps restant Désactiver Minuterie Appuyer sur Passe à 00 puis s éteint Lorsque plusieurs minuteries sont activées il suffit de répéter l opération Arrêt automatique en fin de cuisson Dès que le temps de cuisson sélectionné est écoulé la minuterie affiche en clignotant 00 et un signal sonore retentit Pour stopper le son ...

Page 36: ...it vaisselle ou un produit du commerce conseillé pour la vitrocéramique N utilisez en aucun cas d appareils à vapeur ou à pression Ne pas utiliser d objets qui risqueraient de rayer la vitrocéramique tel que tampon abrasifs ou pointe de couteau N utilisez pas de produits de nettoyage abrasifs qui pourraient endommager l appareil Séchez l appareil avec un chiffon propre Enlevez immédiatement le suc...

Page 37: ...e Un objet ou un liquide recouvre les touches de la commande Le symbole disparaît une fois les touches libérées ou nettoyées Le symbole Er21 s affiche La table est en surchauffe laissez la refroidir puis rallumez la Le symbole U400 Er25 ou U4 clignotant s affiche La table est mal connectée au réseau Vérifiez le branchement et rebranchez la table Si un des symboles ci dessus persiste appelez le SAV...

Page 38: ...l humidité Pour protéger le chant de la découpe appliquer un vernis ou une colle spéciale Garantir entre le fond du caisson de l appareil un espace de 20 mm pour assurer une bonne circulation de l air N installer pas la table au dessus d un four non ventilé ou d un lave vaisselle Si un tiroir se trouve sous le plan de cuisson éviter d y ranger des objets inflammables par exemple spray et des objet...

Page 39: ...ment Le boîtier de raccordement se situe sous la plaque de cuisson Pour ouvrir le capot servez vous d un tournevis moyen Placez le dans les 2 fentes situées à l avant des 2 flèches Réseau Raccordement Diamètre câble Câble Calibre de protection 230V 50 60Hz 1 Phase N 3 x 2 5 mm H 05 VV F H 05 RR F 25 A 400V 50 60Hz 2 Phases N 4 x 1 5 mm H 05 VV F H 05 RR F 16 A calculé avec le coefficient de simult...

Page 40: ...enlos ist Folgende Angaben werden benötigt um Ihren Auftrag bearbeiten zu können 1 Modell 2 Version 3 Batch 4 EAN Typenschild Das Typenschild ist im Innenraum des Gerätes oder auf der Rückseite die vollständige Anschrift und Telefon Nr die Fehlerbeschreibung Zuständige Kundendienstadresse EGS GmbH Dieselstraße 1 33397 Rietberg DEUTSCHLAND Kundentelefon für Deutschland 49 0 2944 9716765 Kundentelef...

Reviews: