background image

Copyright © 2014 EXOR International S.p.A. All Rights Reserved.

38

Chapter 4: Adjusting the Display

eTOP-MON 1200T/1205T/1500T/1700T/1900T User Manual 

1024x768  59  . 9 Hz

OSD

EXIT

ther

H . Position

V . Position

Clock

Sharpness

Exit

Colour

Picture

Function

OSD Menu

Misc

Exit

50 -

50 - 

50 -  

+

+

+

1         2         3         4         5

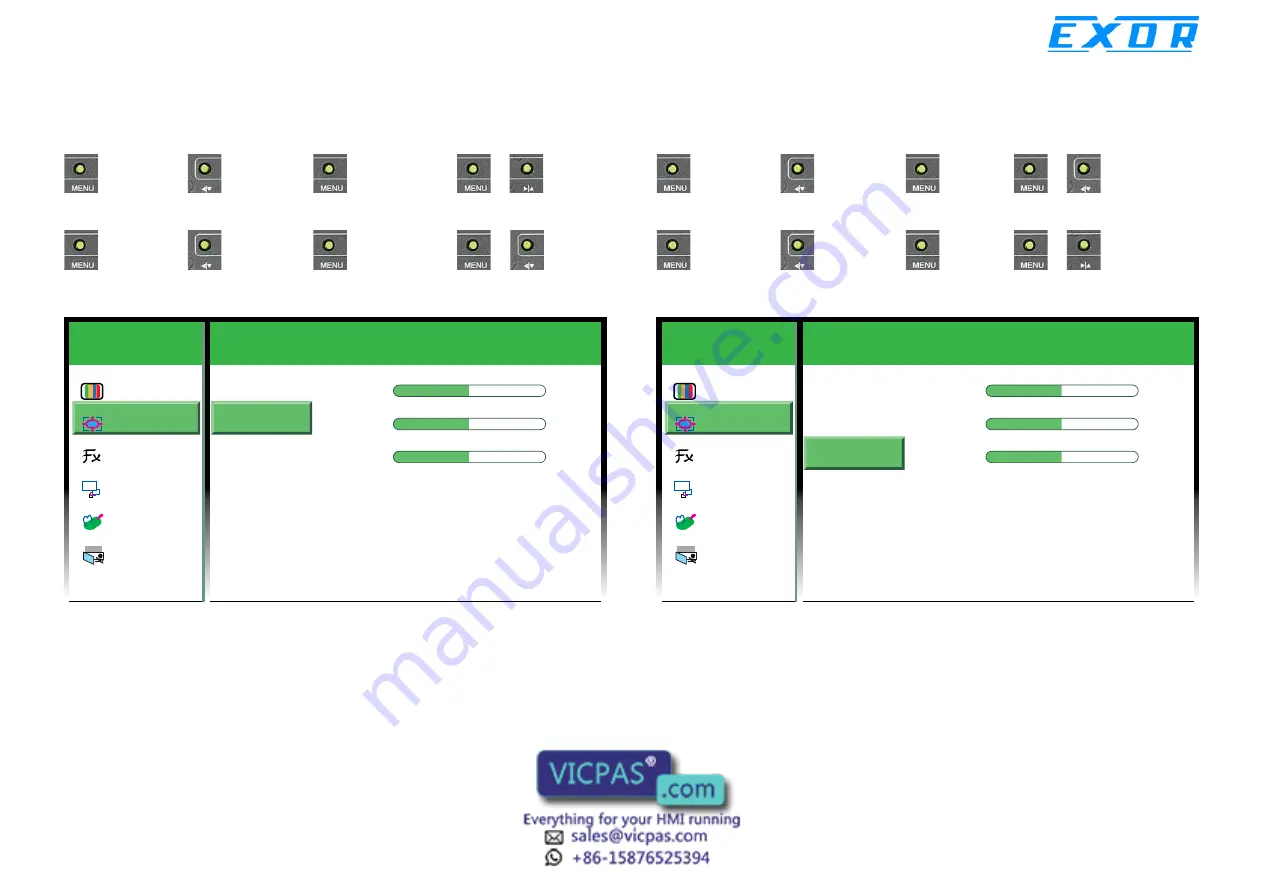
V. Position

ġġġġġġġġġɦġ

colour


ɦġġġġġġġġġɦġ

picture


ɦġġġġġġġġġɦ

V.position


ɦġġġġġġġġġɦġġġġġġġġġġ

to move 

the screen down.

ġġġġġġġġġɦġ

colour


ɦġġġġġġġġġɦġ

picture


ɦġġġġġġġġġɦ

V.position


ɦġġġġġġġġġɦġġġġġġġġġġ

to move 

the screen up.

1024x768  59  . 9 Hz

OSD

EXIT

ther

H . Position

V . Position

Clock

Sharpness

Exit

Colour

Picture

Function

OSD Menu

Misc

Exit

50 -

50 - 

50 -  

+

+

+

1         2         3         4         5

Clock

ġġġġġġġġġɦġ

colour


ɦġġġġġġġġġɦġ

picture


ɦġġġġġġġġġɦ

Clock


ɦġġġġġġġġġɦġġġġġġġġġġ

stretch the 

screen towards right.

ġġġġġġġġġɦġ

colour


ɦġġġġġġġġġɦġ

picture


ɦġġġġġġġġġɦ

Clock


ɦġġġġġġġġġɦġġġġġġġġġġ

stretch the 

screen towards right.

Summary of Contents for eTOP-MON 1200T

Page 1: ...EXOR International www exorint net Industrial Computing Solutions eTOP MON eTOP MON 1200T 1205T 1500T 1700T 1900T User Manual...

Page 2: ...tures 2 Overview eTOP MON 1700T 3 Key Features 3 Overview eTOP MON 1900T 4 Key Features 4 Specifications 5 eTOP MON 1200T 5 Specifications 6 eTOP MON 1205T 6 Specifications 7 eTOP MON 1500T 7 Specific...

Page 3: ...nector Pin Definitions External I O Interfaces 22 USB Port 22 COM Port 22 DVI Port DVI D 23 VGA Port 23 12 24V DC Input 24 Chapter 3 System Setup Panel Mounting 25 Installing the Power Adapter Bracket...

Page 4: ...www exorint it EXOR shall not be liable for direct indirect special incidental or consequential damages arising out of the use of any product nor for any infringements upon the rights of third partie...

Page 5: ...pm Hexavalent Chromium Cr6 0 1 or 1 000ppm Polybrominated biphenyls PBB 0 1 or 1 000ppm and Polybrominated diphenyl Ethers PBDE 0 1 or 1 000ppm In order to meet the RoHS compliant directives EXOR has...

Page 6: ...kaging of defective products making sure it is durable enough to be resistant against further damage and deterioration during transportation In case of damages occurred during transportation the repai...

Page 7: ...the chassis and power supply are inconsistent with these instructions or the instructions for accessory modules contact the supplier to find out how you can ensure that your computer meets safety and...

Page 8: ...your fingers can disconnect most of the connections It is recommended that you do not use needle nose pliers to disconnect connections as these can damage the soft metal or plastic parts of the conne...

Page 9: ...eater than the voltage and current rating marked on the product 10 All cautions and warnings on the equipment should be noted 11 If the equipment is not used for a long time disconnect it from the pow...

Page 10: ...wordings of the error messages Warning 1 Handling the unit carry the unit with both hands and handle it with care 2 Maintenance to keep the unit clean use only approved cleaning products or clean with...

Page 11: ...the table eTOP MON 1200T 1205T 1500T 1700T Item Description Qty 1 Panel Mount Kit 12 2 Touch Pen 1 3 VGA Cable 1 8m 1 4 USB Cable 1 8m 1 5 Serial Cable 1 8m 1 6 Terminal blocks 3 pin Phoenix Contact P...

Page 12: ...B Cable 1 8m 1 5 Serial Cable 1 8m 1 6 Terminal blocks 3 pin Phoenix Contact Plug 1 7 Panel Mount Hole Block 14 eTOP MON 1900T Panel Mount Kit Touch Pen Terminal blocks 3 pin Phoenix Contact Plug VGA...

Page 13: ...touch monitor with VGA and DVI D input 12 24VDC input RS 232 and USB touch screen interfaces eTOP MON 1500T 15 XGA industrial 4 3 LED Backlight flush touch monitor with VGA and DVI D input 12 24VDC in...

Page 14: ...anual CHAPTER 1 PRODUCT INTRODUCTION Key Features IP65 compliant plastic front bezel with flush panel by 5 wire touch screen Dual display input interface analog VGA and DVI D Shares identical appearan...

Page 15: ...1700T 1900T User Manual Key Features IP65 compliant plastic front bezel with flush panel by 5 wire touch screen Dual display input interface analog VGA and DVI D Shares identical appearance with APPC...

Page 16: ...1700T 1900T User Manual Key Features IP65 compliant plastic front bezel with flush panel by 5 wire touch screen Dual display input interface analog VGA and DVI D Shares identical appearance with APPC...

Page 17: ...1700T 1900T User Manual Key Features IP65 compliant plastic front bezel with flush panel by 5 wire touch screen Dual display input interface analog VGA and DVI D Shares identical appearance with APPC...

Page 18: ...ort VGA 1x DB15 DVI D 1x DVI I connector DC power input connector 3 Pin Phoenix terminal Blocks OSD Function OSD keypad Multilanguage OSD Mechanical Environment Color pantone black IP protection IP65...

Page 19: ...ort VGA 1x DB15 DVI D 1x DVI I connector DC power input connector 3 Pin Phoenix terminal Blocks OSD Function OSD keypad Multilanguage OSD Mechanical Environment Color pantone black IP protection IP65...

Page 20: ...VGA 1x DB15 DVI D 1x DVI I connector DC power input connector 3 Pin Phoenix terminal Blocks OSD Function OSD keypad Multilanguage OSD Mechanical Environment Color pantone black IP protection IP65 fron...

Page 21: ...1x DB15 DVI D 1x DVI I connector DC power input connector 3 Pin Phoenix terminal Blocks OSD Function OSD keypad Multilanguage OSD Mechanical Environment Color pantone black IP protection IP65 front M...

Page 22: ...x DB15 DVI D 1x DVI I connector DC power input connector 3 Pin Phoenix terminal Blocks OSD Function OSD keypad Multilanguage OSD Mechanical Environment Color pantone black IP protection IP65 front Mou...

Page 23: ...1200T 1205T 1500T 1700T 1900T User Manual Knowing Your eTOP MON Series Front Top View of eTOP MON 1700T Front Top View of eTOP MON 1900T Front Top View of eTOP MON 1200T 1205T Front Top View of eTOP...

Page 24: ...power on or power off the display No OSD menu Press to increase the brightness of the screen Inside OSD menu Press to move the selection down in OSD menu Configuring options Press to increase the val...

Page 25: ...ights Reserved 12 Chapter 1 Product Introduction eTOP MON 1200T 1205T 1500T 1700T 1900T User Manual Rear Bottom View of eTOP MON 1200T 1205T Rear Bottom View of eTOP MON 1500T Rear Bottom View of eTOP...

Page 26: ...chscreen Connector DB 9 Optional This RS 232 connector must be connected to the RS 232 port of the PC RS 232 USB touchscreen interface does not allow connection into the system at the same time DVI Po...

Page 27: ...Chapter 1 Product Introduction eTOP MON 1200T 1205T 1500T 1700T 1900T User Manual Rear View of eTOP MON 1200T 1205T VESA Mounting Hole VESA Mounting Hole VESA Mounting Hole VESA Mounting Hole VESA Mo...

Page 28: ...15 Chapter 1 Product Introduction eTOP MON 1200T 1205T 1500T 1700T 1900T User Manual Rear View of eTOP MON 1500T VESA Mounting Hole VESA Mounting Hole VESA Mounting Hole VESA Mounting Hole VESA Mount...

Page 29: ...16 Chapter 1 Product Introduction eTOP MON 1200T 1205T 1500T 1700T 1900T User Manual Rear View of eTOP MON 1700T VESA Mounting Hole VESA Mounting Hole VESA Mounting Hole VESA Mounting Hole VESA Mount...

Page 30: ...17 Chapter 1 Product Introduction eTOP MON 1200T 1205T 1500T 1700T 1900T User Manual Rear View of eTOP MON 1900T VESA Mounting Hole VESA Mounting Hole VESA Mounting Hole VESA Mounting Hole VESA Mount...

Page 31: ...Copyright 2014 EXOR International S p A All Rights Reserved 18 Chapter 1 Product Introduction eTOP MON 1200T 1205T 1500T 1700T 1900T User Manual Mechanical Dimensions eTOP MON 1200T 1205T...

Page 32: ...Copyright 2014 EXOR International S p A All Rights Reserved 19 Chapter 1 Product Introduction eTOP MON 1200T 1205T 1500T 1700T 1900T User Manual eTOP MON 1500T...

Page 33: ...EXOR International S p A All Rights Reserved 20 Chapter 1 Product Introduction eTOP MON 1200T 1205T 1500T 1700T 1900T User Manual 410 31 22 02 22 02 43 70 33 39 100 00 100 00 17 80 17 80 17 80 340 20...

Page 34: ...Copyright 2014 EXOR International S p A All Rights Reserved 21 Chapter 1 Product Introduction eTOP MON 1200T 1205T 1500T 1700T 1900T User Manual eTOP MON 1900T...

Page 35: ...T 1500T 1700T 1900T User Manual CHAPTER 2 CONNECTOR PIN DEFINITIONS External I O Interfaces USB Port Connector type USB port Pin Definition 1 VCC5 2 DATA_N 3 DATA_P 4 GND COM Port Connector type DB 9...

Page 36: ...5 11 Pin Definition Pin Definition 1 RED 2 GREEN 3 BLUE 4 ID2 5 GND 6 RGND 7 GGND 8 BGND 9 KEY 10 SGND 11 ID0 12 SDA 13 HSYNC or CSYNC 14 VSYNC 15 SCL Pin Definition Pin Definition 1 TMDS Data 2 2 TMD...

Page 37: ...EXOR International S p A All Rights Reserved 24 Chapter 2 Connector Pin Definitions eTOP MON 1200T 1205T 1500T 1700T 1900T User Manual 12 24V DC Input Connector type 3 pin Terminal Block 1 3 Pin Defin...

Page 38: ...on the panel that corresponds to the Industrial Touch Monitor s rear dimensions The thickness of the panel e g steel board plank acrylic board wall etc where you will mount the Industrial Touch Monito...

Page 39: ...N N N N N CAUTION CAUTION Do not overtighten the screws to prevent damaging the Panel PC 3 Slide the Industrial Touch Monitor through the hole until it is properly fitted against the panel 4 Position...

Page 40: ...Copyright 2014 EXOR International S p A All Rights Reserved 27 Chapter 3 System Setup eTOP MON 1200T 1205T 1500T 1700T 1900T User Manual 5 The illustration below shows all clamps properly mounted...

Page 41: ...p eTOP MON 1200T 1205T 1500T 1700T 1900T User Manual Installing the Power Adapter Bracket Optional accessory for eTOP MON 1900T only 1 Locate the mounting screws for the bracket on the back side of th...

Page 42: ...l Rights Reserved 29 Chapter 3 System Setup eTOP MON 1200T 1205T 1500T 1700T 1900T User Manual 3 Wire the power adapter cabling into the cable opening on the bracket then place the adapter inside the...

Page 43: ...hapter 3 System Setup eTOP MON 1200T 1205T 1500T 1700T 1900T User Manual 4 Turn the bracket over to the back side and place the cable tie into the two tie mounts 5 Wrap the power adapter cable then se...

Page 44: ...Setup eTOP MON 1200T 1205T 1500T 1700T 1900T User Manual 6 With the bracket still facing backwards align the mounting holes on the bracket to the mounting holes on the back of the chassis then tighten...

Page 45: ...he terminal blocks to secure the wires 9 Plug the AC power cord into the power adapter UT UT UT UTIO IO IO IO IO IO IO IO UT UTIO ION N N UT UTIO IO UT UT UT UT UT CAUT UT CA CA CA CAUT UT UT UTIO CA...

Page 46: ...the back of the display panel to open the OSD menu Refer to the images below for each OSD menu options 1 Colour 1024x768 59 9 Hz OSD EXIT ther Contrast Brightness Colour Temp 9300K 6500K User Colour A...

Page 47: ...e the brightness 1024x768 59 9 Hz OSD EXIT ther Contrast Brightness Colour Temp 9300K 6500K User Colour Adjust Exit Colour Picture Function OSD Menu Misc Exit 50 100 1024x768 59 9 Hz OSD EXIT ther Con...

Page 48: ...our Adjust colour red increase the value colour red decrease the value 1024x768 75 4 Hz OSD EXIT ther Red Green Blue Exit Colour Picture Function OSD Menu Misc Exit 100 100 100 1024x768 75 4 Hz OSD EX...

Page 49: ...TOP MON 1200T 1205T 1500T 1700T 1900T User Manual 1024x768 59 9 Hz OSD EXIT ther Contrast Brightness Colour Temp 9300K 6500K User Colour Adjust Exit Colour Picture Function OSD Menu Misc Exit 50 100 E...

Page 50: ...XIT ther H Position V Position Clock Sharpness Exit Colour Picture Function OSD Menu Misc Exit 50 50 50 1 2 3 4 5 1024x768 59 9 Hz OSD EXIT ther H Position V Position Clock Sharpness Exit Colour Pictu...

Page 51: ...Colour Picture Function OSD Menu Misc Exit 50 50 50 1 2 3 4 5 V Position colour picture V position to move the screen down colour picture V position to move the screen up 1024x768 59 9 Hz OSD EXIT the...

Page 52: ...Display eTOP MON 1200T 1205T 1500T 1700T 1900T User Manual 1024x768 59 9 Hz OSD EXIT ther H Position V Position Clock Sharpness Exit Colour Picture Function OSD Menu Misc Exit 50 50 50 1 2 3 4 5 Shar...

Page 53: ...1900T User Manual 3 Function 1024x768 59 9 Hz OSD EXIT ther Auto Adjust YES NO Exit Colour Picture Function OSD Menu Misc Exit 1024x768 59 9 Hz OSD EXIT ther Auto Adjust YES NO Exit Colour Picture Fu...

Page 54: ...usting the Display eTOP MON 1200T 1205T 1500T 1700T 1900T User Manual 1024x768 59 9 Hz OSD EXIT ther Auto Adjust YES NO Auto Colour YES NO Exit Colour Picture Function OSD Menu Misc Exit Exit Exits th...

Page 55: ...r Manual 4 OSD Menu 1024x768 59 9 Hz OSD EXIT ther Language OSD H Pos OSD V Pos OSD Timer ON OFF Exit Colour Picture Function OSD Menu Misc Exit 0 50 1024x768 59 9 Hz OSD EXIT ther Language OSD H Pos...

Page 56: ...ss the button to apply the language 1024x768 59 9 Hz OSD EXIT ther English Deutsch Francais Espa ol Italiano 1PSUVHVkT Colour Picture Function OSD Menu Misc Exit 1024x768 59 9 Hz OSD EXIT ther Languag...

Page 57: ...Press on the back of the display panel to move the OSD menu up or to move it down colour osd menu osd V pos move it down colour osd menu osd V pos move it up 1024x768 59 9 Hz OSD EXIT ther Language OS...

Page 58: ...r 4 Adjusting the Display eTOP MON 1200T 1205T 1500T 1700T 1900T User Manual 1024x768 59 9 Hz OSD EXIT ther Language OSD H Pos OSD V Pos OSD Timer ON OFF Exit Colour Picture Function OSD Menu Misc Exi...

Page 59: ...0T User Manual 5 Misc 1024x768 59 9 Hz OSD EXIT ther Reset YES NO Volume Input VGA DVI Exit Colour Picture Function OSD Menu Misc Exit 1024x768 59 9 Hz OSD EXIT ther Reset YES NO Volume Input VGA DVI...

Page 60: ...1024x768 59 9 Hz OSD EXIT ther Reset YES NO Volume Input VGA DVI Exit Colour Picture Function OSD Menu Misc Exit Input colour Misc Input Select VGA or DVI as the video input 1024x768 59 9 Hz OSD EXIT...

Page 61: ...48 Chapter 4 Adjusting the Display eTOP MON 1200T 1205T 1500T 1700T 1900T User Manual 1024x768 59 9 Hz OSD EXIT ther Reset YES NO Volume Input VGA DVI Exit Colour Picture Function OSD Menu Misc Exit...

Page 62: ...ocated under the following folder PenMount Windows Universal Driver V2 2 0 283 Win7_32_64bit_WHQL Driver 1 Open the Install ini file 2 Confirm if the Install ini file has the following settings if not...

Page 63: ...the power consumption and record it 3 Enter the standby mode Turn off display 4 Measure the power consumption and record it eTOP MON 1200T 12V 24V Full Loading Mode 0 73A 0 39A Total 8 76W 9 36W Stand...

Page 64: ...User Manual APPENDIX B EXTENDED DISPLAY IDENTIFICATION DATA TIMING SUPPORT eTOP MON 1200T Resolution Vertical Frequencies 60Hz 70Hz 72Hz 75Hz 640x480 720x400 800x600 eTOP MON 1205T Resolution Vertical...

Page 65: ...ication Data Timing Support eTOP MON 1200T 1205T 1500T 1700T 1900T User Manual eTOP MON 1700T Resolution Vertical Frequencies 60Hz 70Hz 72Hz 75Hz 640x480 720x400 800x600 1024x768 1280x1024 eTOP MON 19...

Reviews: