


6. ID Remote Controller (Optional)
(
The ID function is only applicable for some specific models )
c
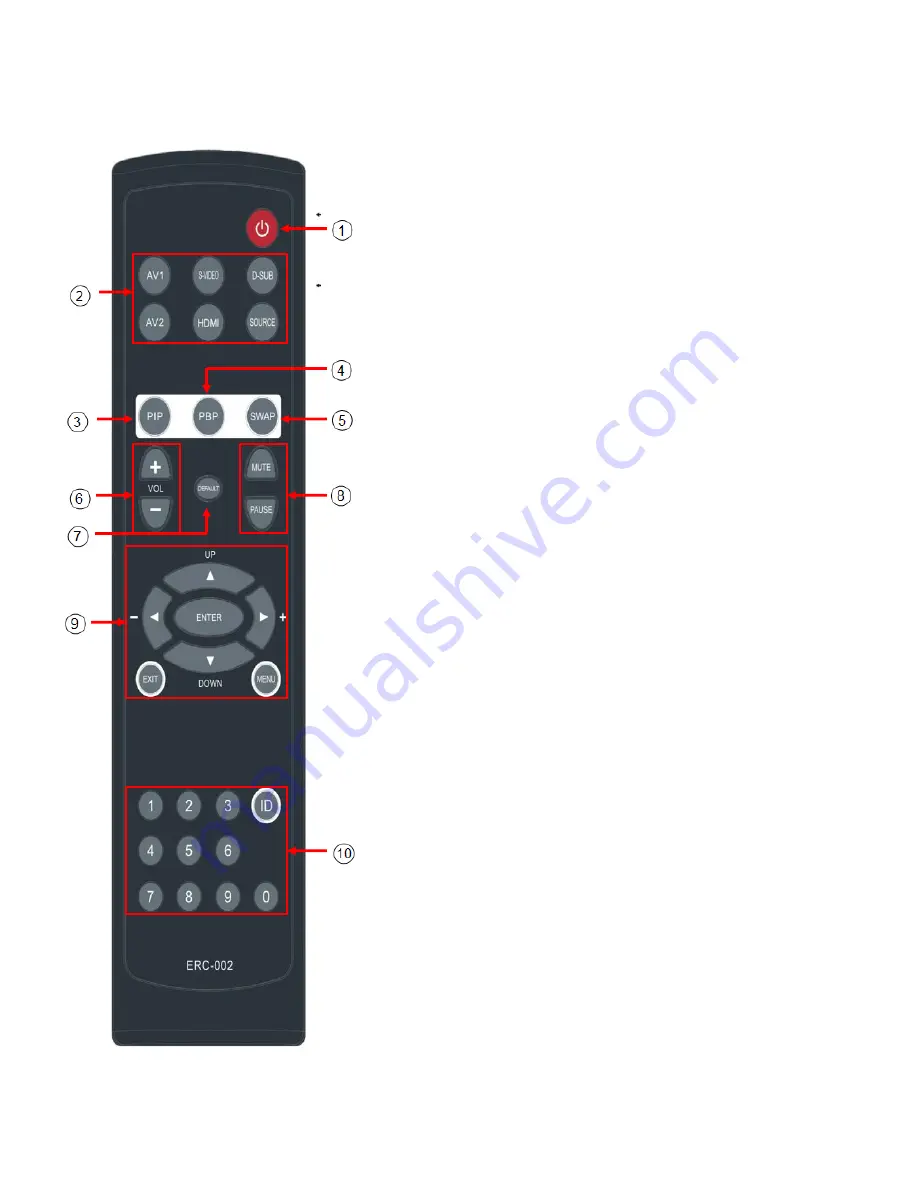
. POWER switch.
Press to turn ON or turn OFF the LCD Monitor.
d
.
VIDEO SIGNAL Selection:
Press the “AV1” ,“AV2”, “S-VIDEO”, “D-SUB”, “HDMI” button
to enter the selected video source or press the “SOURCE”
button to have the cycle video selection. (PS. AV2 and HDMI
buttons are only applicable for specific models with AV2 and
HDMI connector).
e
. PIP Hot Key:
Press PIP button to enter “PIP” setup .
f
.
PBP Hot Key
:
Press PBP button to enter the PBP setup
g
.
SWAP Hot Key
:
Press SWAP button to exchange the main and sub screen.
h
.
VOL:
Press “+” to increase volume and press “-“ to decrease volume.
i
. DEFAULT :
Press “Default” to clear all the setting and return to factory default.
j
. MUTE and PAUSE :
Press “MUTE” to mute the sound and press “PAUSE” to pause
the video.
k
.
OSD setup:
a. Press the “MENU” to enter the OSD menu and press “
▲
UP”
or “
▼
DOWN” to select setting item and press “
” RIGHT” to
increase or “
”
LEFT” to decrease the “blue bar” to adjust the
setting.
b. Press the “EXIT” to exit the menu and confirm the setting.
c. Press the “ENTER” to confirm the ID number setting.
l
.
ID and Number Key:
Step 1: Setup the Monitor ID No.
Press “MENU“ to enter the OSD menu and press “
/+
“ button to select the “Function“ menu and press “
▼
DOWN” to
choose “ID “ setup.
To press 4 digit (0001~9999) as the monitor ID No. and press
“ENTER” to confirm the input. When you press the “ID” button,
the screen will show “ ID : 0001 (when you input ” 0001”)
9


