background image

VEGA 3000C Quick Guide

3

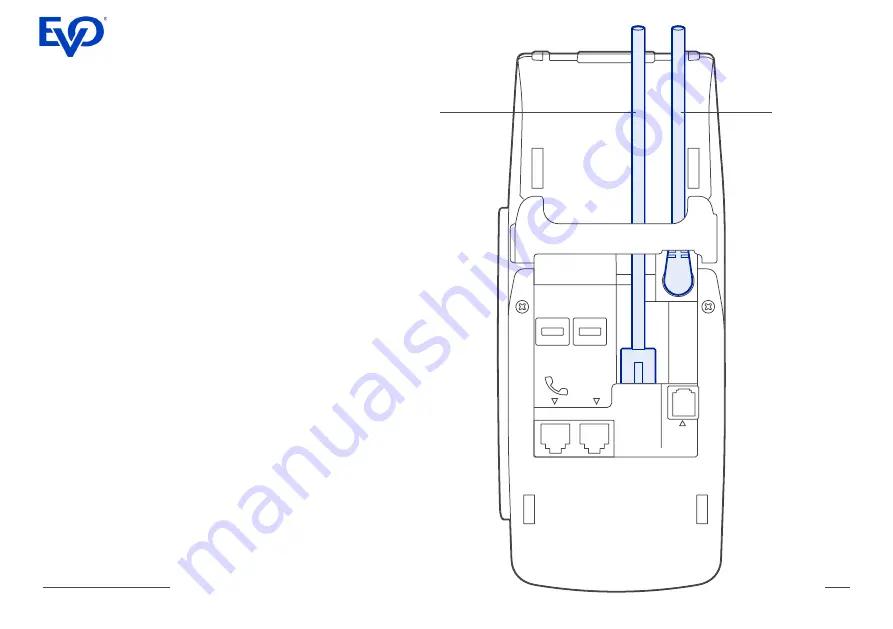
LAN and power connection

The terminal can connect to the internet via LAN or 
WiFi. If LAN connection is required, connect LAN 
cable as shown on the picture.

Vega 3000C does not contain a battery and must 
be connected to power all the time. Plug in the 
terminal to power using the enclosed DC adapter.

Power ON

The terminal is switched ON automatically 
after connection to power. The terminal takes 
approximately 1 minute to start.

USB1

USB2

COM2

COM1

LAN

Power

cable

LAN

cable

Summary of Contents for VEGA 3000C

Page 1: ...VEGA 3000C Quick Guide C less MSR ICC Touch screen Printer Payment Terminal Guide Version 3 0 2...

Page 2: ...s combining ergonomic design and the latest technologies This combination ensures quick transaction processing and superb user experience Cancel button Magnetic stripe card reader Colour touch screen...

Page 3: ...le as shown on the picture Vega 3000C does not contain a battery and must be connected to power all the time Plug in the terminal to power using the enclosed DC adapter Power ON The terminal is switch...

Page 4: ...ocated in the upper part above the display of the payment terminal Printer roll replacement open the lid of the terminal remove the rest of the old roll insert a new roll The free end of the tape is u...

Page 5: ...tus bar at the top of the screen The green flashing area indicates the ability to accept contactless transactions At the bottom of the screen there are virtual buttons that start a sale enter the term...

Page 6: ...mat dd mm yy 2 Time in format hh mm ss 3 ECRconnection anindicationofaconnection with ECR 4 WIFI signal on offindicationandinformation of signal strength 5 GPRS GSM connectionviaSIMcard network type a...

Page 7: ...functions of the terminal To enter this list use the virtual key Menu located in the middle at the bottom of the touch screen Selectthenecessaryfunction bytouchingtheitem on the display You can scroll...

Page 8: ...The keyboard is an alternative way to navigate throughtheterminalwithouthavingtouseavirtual keyboard on the touch screen The attached figure describes the function keys Keyboardsamongotherthingsisuse...

Page 9: ...is approved the internet connection is established WiFi connection setup To connect to a WiFi network switch connection to WiFi select Menu Administration enter admin PIN and Network settings or Quick...

Page 10: ...er islocatedonthebottomoftheterminalandisused for chip card acceptance For magnetic cards acceptance the magnetic card reader located on the right side of the terminal is used Thestandardpaymenttransa...

Page 11: ...rd Brand Card brand such as VISA MasterCard etc 8 PAN Uniquenumberofthecardcontains information about Card brand Issuer bank code and card number Since this is sensitive information it is masked 9 App...

Page 12: ......

Reviews: