37
evo HE H
-
Installation & Servicing
SERVICING
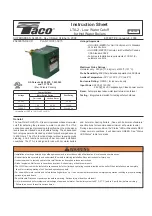
Gasket
Orifice plate
E
c
l
2336
5
3
7
4
55 BURNER REPLACEMENT
54 FAN REPLACEMENT
1.
Refer to Frame 52.
2.
Remove the boiler front and
sealing panels. Refer to Frames 45
& 46.
3.
Disconnect the electrical leads
from the fan.
4.
Unscrew the gas pipe union
connection to the injector housing.
5.
Unscrew and remove the screw
retaining the fan mounting bracket.
6.
Remove the fan and venturi
assembly.
7.
Remove the 3 screws and remove
the venturi assembly,
noting the
orientation of the venturi in relation
to the fan body.
8.
Transfer the venturi assembly to the
new fan, replacing the gasket if
evidence of damage or deterioration
is visible.
9.
Fit the new fan / venturi assembly.
10.
Reassemble the boiler in reverse order, taking care not
to overtighten the screw on the fan mounting bracket.
11.
Check the operation of the boiler. Refer to Frame 52.
1.
Refer to Frame 52.
2.
Remove the boiler front and sealing
panels. Refer to Frames 45 & 46.
3.
Remove the fan assembly. Refer to
Frame 54.
4.
Remove the 6 screws securing the
burner (the 3 screws at the rear are
extended to ease access).
5.
Lift off the burner from the combustion
chamber.
6.
Fit the new burner, replacing any
damaged or deteriorating sealing
gasket.
7.
Reassemble in reverse order.
8.
Check the operation of the boiler. Refer
to Frame 52.
Note.
Take care not to disturb the
ionisation probes at the front and
rear of the combustion chamber.
nm7402
Ionisation
Probes
4
5
6
SER
VICING
203323-2.pmd
21/09/2007, 11:27
37