background image

5

6

GETTING STARTED

GETTING STARTED

2

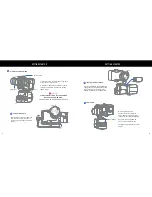
MOUNT ACTION CAMERA

3

CHARGING CABLE

Warning

Plug the camera charging cable into 

your camera and into the camera 

charging port at the base of the tilt 

motor.

ALWAYS MOUNT YOUR ACTION CAMERA 

BEFORE YOU POWER IT ON!


FAILURE TO DO SO CAN DAMAGE THE UNIT!

1. Unscrew to two thumb screws on the back 

of the action camera mount.

2. Slide the action camera all the way until it 

touches the Tilt Motor. Tighten the the two 

thumb screws.  

Thumb Screw

Tilt Motor

4

INSTALL THE BATTERIES

Carefully install both charged batteries 

noting the correct direction, then slide 

the battery cover plate in place and 

tighten the battery cover thumbscrew.

5

POWER ON

With the gimbal on a flat 

non-moving surface press the 

Power Button once and wait 4-5 

seconds for the gimbal to initialize.

Once powerd on, The EVO SS 

starts up in Pan Follow Mode.

See page 7 for details on the other 

modes.

Power Button

Summary of Contents for EVO SS

Page 1: ...20810 Sockeye Pl 200 Bend OR 97701 Support and Sales Questions Tel 866 977 6688 Monday to Friday 9AM to 5PM Pacific Time or email support evogimbals com EVOGimbals com English Manual V2 0 ...

Page 2: ...TS Important Message 1 Overview 3 Getting Started 4 Operating Modes 7 Camera Charging Video Out 8 Micro USB Connection 9 Startup Calibration 10 App Operation 12 Wireless remote 13 Specifications 14 Warranty 15 ...

Page 3: ...and cold stress the batteries Always charge and use your batteries at room temperature If the battery has been exposed to extreme temperatures allow the battery to return to room temperature before charging it or using it Battery Safety Warning Important For the latest user manuals tutorial videos firmware and calibration instructions please visit our official wepage at EVOGimbals com Your new gimbal...

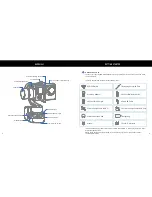
Page 4: ...es Video Out Port Please check that all items are included if you are missing any items or components please contact EVO Gimbals 1 Manual 1 Year U S Warranty UNPACK THE EVO SS Thank you for choosing EVO Gimbals Before you begin please be sure to unpack your SS and review your contents list Your EVO SS should be packed with the following items Action Camera not included Power Button Power Indicator...

Page 5: ...ount 2 Slide the action camera all the way until it touches the Tilt Motor Tighten the the two thumb screws Thumb Screw Tilt Motor 4 INSTALL THE BATTERIES Carefully install both charged batteries noting the correct direction then slide the battery cover plate in place and tighten the battery cover thumbscrew 5 POWER ON With the gimbal on a flat non moving surface press the Power Button once and wai...

Page 6: ...Double press the Mode Button to enter Full Follow Mode FF Triple press the Mode Button to enter Turn Back Mode TB 180º rotation on Pan axis Single press the Mode Button while in Lock Mode Full Follow Mode or Turn Back Mode will return to the Pan Follow Mode Roll Axis Tilt Axis Pan Axis Roll Axis Tilt Axis Pan Axis Roll Axis Tilt Axis Pan Axis Choose the appropriate cable for your application Keep ...

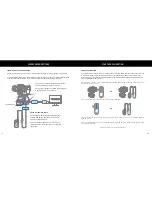
Page 7: ...ation sequence can be initiated through the EVO Remote APP or through either the wired or wireless remote accessories Connect Remote Extension Cable sold separatley to Micro USB port to remotely control operating modes and gimbal functions Remote extension cable can be very useful when shooting with the carbon fiber extension poles sold separatley 2 Connect the computer and the EVO SS together usin...

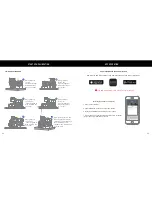
Page 8: ... Store or Google Play The EVO Gimbals Remote App is subject to regular updates 1 2 3 5 6 4 Place gimbal as shown The indicator light will flash 2 times when successful Place gimbal as shown The indicator light will flash 3 times when successful Place gimbal as shown The indicator light will flash 4 times when successful Place gimbal as shown The indicator light will flash 5 times when successful P...

Page 9: ...the multifunction button while switching on the power switch 3 Bluetooth Indicator light will rapidly flash while connecting Bluetooth Indicator light will turn solid when connected successfully Note Wireless remote sold separately Battery Indicator Bluetooth Status Indicator Joystick Charging Indicator Power Switch Multifunction Botton Device Switch Stabilization Accuracy 0 01 Follow Accuracy 0 2 ...

Page 10: ...ite EVOGimbals com Or email EVO Gimbals Customer Support support evogimbals com For an accessory or part not available from your authorized dealer please visit our website Repair Replacement Warranty This Limited Warranty shall apply to any repair replacement part or replacement product for the remainder of the original Limited Warranty period or for ninety 90 days whichever is longer Any parts or...

Reviews: