User Manual of Network Video Recorder
153
You can change the server and HTTP ports in the Network Settings menu. The default server port is 8000 and the
default HTTP port is 80.
Steps:
1.
Enter the Network Settings interface.
Menu >Configuration> Network
2.
Select the
More Settings
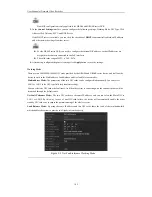
tab to enter the More Settings interface, as shown in Figure 9. 15.
3.
Enter new
Server Port
and
HTTP Port
.
Figure 9. 18
Host/Others Settings Menu
4.
Enter the Server Port and HTTP Port in the text fields. The default Server Port is 8000 and the HTTP Port is
80, and you can change them according to different requirements.
5.
Click the
Apply
button to save and exit the interface.
The Server Port should be set to the range of 2000-65535 and it is used for remote client software access.
The HTTP port is used for remote web browser access.
9.2.9
Configuring HTTPS Port
Purpose:
HTTPS provides authentication of the web site and associated web server that one is communicating with, which
protects against Man-in-the-middle attacks. Perform the following steps to set the port number of https.
Example:
If you set the port number as 443 and the IP address is 192.0.0.64, you may access the device by inputting
https://192.0.0.64:443
via the web browser.
The HTTPS port can be only configured through the web browser.
Steps:
1.
Open web browser, input the IP address of device, and the web server will select the language automatically
according to the system language and maximize the web browser.
2.
Input the correct user name and password, and click
Login
button to log in the device.
3.
Enter the HTTPS settings interface.
Configuration > Remote Configuration > Network Settings > HTTPS
4.
Create the self-signed certificate or authorized certificate.
Summary of Contents for Diamon Series
Page 1: ...Network Video Recorder User Manual ...
Page 12: ...User Manual of Network Video Recorder 11 Chapter 1 Introduction ...
Page 24: ...User Manual of Network Video Recorder 23 Chapter 2 Getting Started ...
Page 40: ...User Manual of Network Video Recorder 39 Figure 2 24 Edit IP Camera Interface Manual ...
Page 41: ...User Manual of Network Video Recorder 40 Chapter 3 Live View ...
Page 52: ...User Manual of Network Video Recorder 51 Chapter 4 PTZ Controls ...
Page 61: ...User Manual of Network Video Recorder 60 Chapter 5 Recording and Capture Settings ...
Page 84: ...User Manual of Network Video Recorder 83 Chapter 6 Playback ...
Page 104: ...User Manual of Network Video Recorder 103 Chapter 7 Backup ...
Page 126: ...User Manual of Network Video Recorder 125 Figure 7 44 Synchronizing ...
Page 127: ...User Manual of Network Video Recorder 126 Chapter 8 Alarm Settings ...
Page 144: ...User Manual of Network Video Recorder 143 Chapter 9 Network Settings ...
Page 168: ...User Manual of Network Video Recorder 167 Chapter 10 RAID Only for NRA0R series NVR ...
Page 183: ...User Manual of Network Video Recorder 182 Figure 10 28 Upgrade the Firmware ...
Page 184: ...User Manual of Network Video Recorder 183 Chapter 11 HDD Management ...
Page 198: ...User Manual of Network Video Recorder 197 Figure 11 26 View HDD Status 2 ...
Page 202: ...User Manual of Network Video Recorder 201 Chapter 12 Camera Settings ...
Page 206: ...User Manual of Network Video Recorder 205 Chapter 13 NVR Management and Maintenance ...
Page 218: ...User Manual of Network Video Recorder 217 Chapter 14 Others ...
Page 227: ...User Manual of Network Video Recorder 226 Appendix ...

