- 6 -
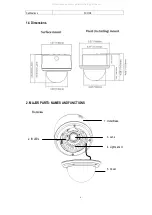
2. IR LEDs
3. Lens
The included vari-focal, DC iris lens allows manual adjustment of the field of view (zoom &
focus).
4. Light Sensor
Light sensor is used to detect the lighting level the environment. (The light sensor is “down”
when the internal camera module is properly positioned).
5. Camera Cover
This cover will protect the camera from dust and damage.
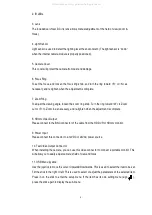
6. Focus Ring
To set the focus, and loosen the focus ring knob, and turn the ring toward <F> or <N> as
necessary, and re-tighten when the adjustment is complete.
7. Zoom Ring
To adjust the viewing angle, loosen the zoom ring knob. Turn the ring toward <W> to Zoom
out or <T> to Zoom in as necessary, and re-tighten when the adjustment is complete.
8. HDcctv Video Output
Please connect to the BNC connector of the cable from the
HD DVR or HDcctv monitor.
9. Power Input
Please connect this connector to a
12VDC or 24VAC power source.
10. Test Video Output Connector
When installing the camera, you can use this video connector to connect a portable monitor. This
will allow you to easily adjust camera’s field of view and focus.
11. OSD Menu joystick:
Use the joystick to move the cursor Upwards/Downwards. This is used to select the item to be set.
Tilt the stick to the right or left. This is used to select or adjust the parameters of the selected item.
Press in on the stick to enter the setup menu. If the item has its own setting menu (sign ),
press the stick again to display the sub- menu.
All manuals and user guides at all-guides.com


