59
Installation
Installing the Outboard
IMPORTANT: Follow all directions carefully.
The outboard’s warranty will not cover prod-
uct damage or failure that results from incor-
rect outboard installation.
Refer to Priming the Oil System on page 17.
Boat-Mounted Fuel Filters
Boat-mounted fuel filters and water-separat-
ing fuel filter assemblies must meet the follow-
ing requirements:
• Fuel flow – 0.4 in. Hg maximum pressure
drop at 20 gph (76 l/hr) flow.
• Filter area – 150 in.
2
(1290 cm
2
) of filter
area.
The filter must be mounted to a rigid surface
above the full level of the fuel tank and acces-
sible for servicing.
Fuel Filter Assembly, P/N 174176, meets all
requirements for a water-separating fuel filter.
If equipped, replace the boat-mounted fuel fil-
ter annually. See your dealer for replacement
Fuel Filter (25 micron), P/N 502905.
Battery
Requirements
• 12-volt, heavy-duty, designated for "marine"
use;
• Vented/refillable or maintenance-free; and
• Rated according to the minimum require-
ments in Specifications on page 69.
Deep-cycle batteries are suitable IF they
meet or exceed the minimum CCA require-
ments.
Ask your Dealer about your outboard’s re-
quirements before installing longer battery ca-
bles or a battery switch.
Installation
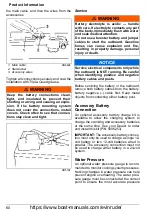
If you have marine battery posts, install each
main cable on the clamp adapter with a star-
washer below it. Install all wires from acces-
sories on the threaded portion of the post.
If you have automotive battery posts, place a
starwasher on the clamp adapter first, then
WARNING
The outboard must be correctly installed.
Failure to correctly install the outboard
could result in serious injury, death or
property damage. We strongly recom-
mend that your Dealer install your out-
board to ensure proper installation.
WARNING
Read and understand the safety informa-
tion supplied with your battery BEFORE
you begin installation.
NOTICE
Make sure all components are clean and
free of corrosion. Connect the RED (+)
cable to the positive (+) battery post first.
Connect the BLACK (–) cable to the neg-
ative (–) battery post last.
NOTICE
DO NOT use wing nuts on battery con-
nections even if they came with the bat-
tery. Wing nuts can loosen and cause
errant warning signals or electrical sys-
tem damage.
1. Main cable
2. Starwasher
3. Accessory wires
DR6495
https://www.boat-manuals.com/evinrude/
Summary of Contents for E-TEC 115 H.P.
Page 2: ...https www boat manuals com evinrude ...
Page 4: ...https www boat manuals com evinrude ...
Page 13: ...9 Using Your Evinrude E TEC Outboard https www boat manuals com evinrude ...
Page 26: ...22 https www boat manuals com evinrude ...
Page 46: ...42 https www boat manuals com evinrude ...
Page 47: ...43 Maintenance https www boat manuals com evinrude ...
Page 60: ...56 https www boat manuals com evinrude ...
Page 61: ...57 Product Information https www boat manuals com evinrude ...
Page 74: ...70 https www boat manuals com evinrude ...
Page 88: ...84 https www boat manuals com evinrude ...
Page 90: ...86 https www boat manuals com evinrude ...
Page 92: ...88 https www boat manuals com evinrude ...
Page 94: ...90 https www boat manuals com evinrude ...

