background image

Page 99/131

July 2021

HE18 | User manual

5.9

Checking and cleaning the water separator

NOTE

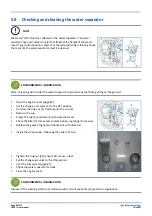
Water and dirt in fuel are collected in the water separator. The water 
separator has a red plastic ring (

4

) that floats at the height of the water 

level. If any contamination is present or the red plastic ring is floating above 
the mark (

5

), the water separator must be cleaned.

ENVIRONMENTAL INFORMATION

Place a cleaning cloth under the water separator to prevent any fuel from getting on the ground.

Open the engine cover (

page 87

).

Set the change-over valve (

3

) to the OFF position.

Unscrew the ring nut (

1

), holding onto the cup (

2

).

Remove the cup.

Empty the cup (

5

) and clean it with clean diesel oil.

Check the filters (

1

) for excess contamination, replacing if necessary.

Replace the gasket ring (

4

) and lubricate it with diesel oil.

Install the components, following the order of 

1 to 6.

Tighten the ring nut (

6

) by hand; do not use a tool.

Set the changeover valve to the ON position.

Vent the fuel system (

page 87

).

Check the water separator for leak.

Close the engine cover.

ENVIRONMENTAL INFORMATION

Dispose of the cleaning cloths in accordance with current environment protection regulations.

Summary of Contents for HE18

Page 1: ...Eurotrac Construc on Machinery Stougjesdijk 153 3271 KB Mijnsheerenland The Netherlands Tel 31 0 18 66 12 333 E mail info eurotrac nl MINI EXCAVATOR HE18 HE18 C USER MANUAL ...

Page 2: ... 12 7 Safety Symbols on the Excavator 13 8 Safety Facilities 21 8 1 Securing the Control Elements 21 8 2 Protective Structure of the Protective Roof and Cab 22 8 3 Emergency Hammer 22 8 4 Locking the superstructure 23 9 Danger hydraulic system 23 10 Fire Safety 24 STORAGE LOADING AND TRANSPORT 25 1 Safety Provisions for Storage 25 2 Safety Provisions for Loading and Unloading with a Crane 25 3 Saf...

Page 3: ... 40 2 4 4 Funnel for diesel 40 2 5 Setting the Width of the Undercarriage 41 3 Other Equipment on the Machine 42 3 1 Vehicle battery 42 3 2 Battery separation switch 42 3 3 Direct return changeover valve 42 3 4 The fuel tank filler opening and level check 42 3 5 Exterior mirrors 43 4 Heating 43 5 Engine Area 44 6 Hydraulic System 45 7 Radiator and Oil Cooler 45 OPERATION 46 1 Safety Instructions f...

Page 4: ...ydraulic system 76 3 10 Putting out of operation 77 3 11 Heating 78 3 12 Operating the windshield cleaning system cab model 79 3 13 Operating the interior lighting cab model 80 3 14 Operating the flashing light accessories 80 3 15 Operating the 12 V power strip 80 3 16 Opening closing the cab door cab model 81 3 17 Opening closing the windows cab model 82 3 18 Operating the work lights 83 3 19 Usi...

Page 5: ...the battery 106 5 16 Lubrication 107 5 16 1 Greasing the swivel block 107 5 16 2 Greasing the swivel block bearing 108 5 16 3 Greasing the swivel block attachment 108 5 16 4 Other lubrication points 109 5 17 Checking and adjusting the rubber track tension 110 5 17 1 Checking the tension of the rubber track 110 5 17 2 Adjusting the rubber track tension 111 5 18 Changing the oil of the final drives ...

Page 6: ...um lift capacity when rotating 360 124 ACCESSORIES 125 1 Flashing light 125 2 Line rupture protection 125 3 Stone Damage Protection 126 4 Quick Change Systems and Attachments 126 5 Bucket Accessories 126 6 Foot Pedals Kit 127 ELECTRICAL DIAGRAMS 128 1 Electrical diagram 1 128 2 Electrical diagram 2 129 3 Electrical diagram 3 130 4 Electrical diagram 4 131 ...

Page 7: ...s listed in these operating instructions laws regulations guidelines etc for safe use are observed Make sure the operating instructions are available to the personnel of the operator and that the data listed such as instructions warnings as well as the safety provisions is followed down to the last detail The data listed in these operating instructions applies to all models Data about a specific m...

Page 8: ...ing to the definition given by Annex I item 37 of Noise Directive Conformity assessment procedure followed Annex VI of Noise Directive Notified body European Certifying Organization S p A No 0714 Via Mengolina 33 Faenza RA Italy Measured sound power level G Guaranteed sound power level G Holder of the technical documentation Manufacturer COMPLIES WITH THE PROVISIONS OF THE FOLLOWING HARMONIZED STA...

Page 9: ...ed worker training who is capable of ascertaining damage to the excavator and carrying out repair work in his her field of specialization e g hydraulics electricity Authorized Personnel On the basis of his her vocational training and experience the authorized personnel must have adequate knowledge in the area of excavating and with the applicable national work protection standards safety regulatio...

Page 10: ...ranty and Liability The scope duration and form of the warranty are listed in the manufacturer s terms and conditions of sale and delivery For warranty claims that arise from inadequate documentation the operating instructions valid at the time of delivery are always normative see the Issue Date of the operating instructions Except for the terms and conditions of sale and delivery no warranty is a...

Page 11: ... Part of the Operator In these operating instructions the operator of the excavator is any natural person or legal entity that uses the excavator himself or herself or gives another person the order to use the excavator In special cases e g with leasing or renting the operator is the person who according to the existing contractual agreements between the owner and user of the excavator must take c...

Page 12: ...e emissions must if necessary be determined at the work places under the influences actually present other sources of noise special operating conditions noise reflection Depending on the actual noise emissions the operator must make the required personal protective equipment available for the user hearing protection WARNING Noises with a noise level above 85 dB LpA A could result in hearing damage...

Page 13: ...nd an excavator that drives away unexpectedly involves a risk of being run over by the excavator Only start the machine when in the driver s seat Do not start the machine by bypassing the starter motor poles 4 Danger of death possible entrapment A small safety distance with respect to the excavator and obstacles could block the escape route out of the danger zone Becoming trapped by the excavator ...

Page 14: ...anger rotating parts can cut The rotating fan can inflict cuts to body parts Danger of becoming trapped by rotating parts The rotating belt drive can pull in body parts and trap them Never grab rotating parts 3 Fire hazard hot parts Leaking liquids can land on hot parts and ignite Read the operating instructions BEFORE working on the engine 4 Danger hot parts can burn Surfaces can be hot and infli...

Page 15: ...hat there is an adequate freedom of movement 3 Risk of injury parts under pressure Improper operation of the track tensioning device may cause grease or a pressure valve under high pressure to fly off and cause injury Read the operating instructions BEFORE working on the track tensioning device 4 Danger entrapment or cuts due to rotating parts The rotating fan can cause cuts to body parts and the ...

Page 16: ...Page 16 131 July 2021 HE18 User manual 1 No Attachment Point for Item of Lifting Gear 2 Maximum lift capacity when rotating 360 HE18 cab ...

Page 17: ...Page 17 131 July 2021 HE18 User manual 1 Maximum lift capacity when rotating 360 HE18 protective roof ...

Page 18: ...ment 3 Danger of death possible entrapment A small safety distance with respect to the excavator and obstacles could block the escape route out of the danger zone Becoming trapped by the excavator could result in serious injury or death Before you exit the machine lower the bucket to the ground Activate the control lever put the starter switch in the STOP position and remove the key 4 Mortal dange...

Page 19: ...ot have a secure hold Do not jump onto or off of the excavator Always grip the hold with one hand Get in safely 2 Danger of injury if the windshield falls down If the windshield has been pushed upwards and not secured properly there is the danger that the windshield will close and hit the user s head The windshield must always be secured ...

Page 20: ...ent 2 Danger electricity When working on the electrical system there is a danger of injury as a result of electric shock The electrical installation must be switched off BEFORE working on it Wear personal protective equipment Read the operating instructions BEFORE working on the electrical installation 3 Danger rotating parts can cut The rotating fan can inflict cuts to body parts Danger of becomi...

Page 21: ...topping and switching the excavator off 2 Securing the machine against being switched on put the starter switch in the STOP position and remove the key 8 1 Securing the Control Elements The right and left control lever the drive levers the boom swing pedal as well as the dozer blade lever are put out of operation when the console is raised This guarantees safe entry and exit Disengaging and raisin...

Page 22: ... must be put on when using the excavator Not structural modifications must be made to the protective structure If damage has occurred go to your EUROTRAC dealer Do not repair yourself Do not use the excavator without a protective structure The use of stone damage protection is recommended as protection against danger when using a hydraulic hammer or another attachment for demolition work where the...

Page 23: ...ct with hydraulic oil Wash skin parts that come into contact with hydraulic oil thoroughly with soap and water as soon as possible to prevent the danger of skin injuries Clothing contaminated or soaked with hydraulic oil must be removed immediately Bring persons who have inhaled hydraulic oil vapors mist to a physician immediately If a hydraulic system leak has occurred the excavator may not be op...

Page 24: ...e and undercarriage and on the boom Check that all fuel lines and hydraulic lines are in good condition and for wear If there are any defects they must be replaced immediately to prevent leaks Electrical cables and connections must be inspected regularly for damage Damaged parts and lines must be replaced or repaired BEFORE commissioning the machine All electrical connections must be kept clean an...

Page 25: ...putting into storage the admissible values for the traction load and tow bar load must be observed see section Technical data page 32 2 Safety Provisions for Loading and Unloading with a Crane The crane and the lifting equipment must be suitable and approved for the load that must be lifted Before using the crane and the lifting equipment care must be taken that the recommended periodic technical ...

Page 26: ...edges must be secured to the rubber track of the excavator and to the transport vehicle with suitable materials The driver of the transport vehicle is responsible for the safe fastening of the excavator on the vehicle An assistant must be assigned to drive on and off the transport vehicle This assistant is responsible for safe loading and unloading The excavator may only be moved with directions f...

Page 27: ... way that the dozer blade is located at the back Close and lock the door and the covers CAUTION When lifting the excavator only the attachment points intended for this must be used Fastening using other fastening eyes or points is prohibited and can result is serious damage Fasten lifting equipment at the fastening eyes 1 with shackles on both sides of the dozer blade Fasten lifting equipment at t...

Page 28: ... and after realignment driving up the ramps must be tried again Align the excavator carefully on the loading platforms drive straight up and lower the dozer blade on the loading area WARNING When swerving make sure no persons are in the loading area due to the danger of entrapment NOTE Be careful when turning since the attachment could bump into the transport vehicle This could damage the transpor...

Page 29: ... lower the boom until the bucket connections touch the loading area Secure the rubber tracks and the dozer blade with wooden beams 2 Fasten the excavator to the transport vehicle with suitable straps or chains 1 while taking the weight of the vehicle into account After loading close the excavator ...

Page 30: ...Page 30 131 July 2021 HE18 User manual DESCRIPTION OF THE MACHINE 1 Overview of the models The diagrams show the models with a protective roof and dab ...

Page 31: ...021 HE18 User manual 2 Dimensions Arm model A B C D E F G H I J K L HE18 450 510 1300 990 1100 990 3620 2580 2560 2140 1520 2350 M N O P Q R S T U HE18 230 230 1230 1590 1080 100 3860 4070 4120 HE18 Arm 1190 mm A 1190 mm ...

Page 32: ... kW Nominal rpm Min 1 2200 Power Superstructure rotation speed Min 1 11 Driving speed Speed mode km h 3 6 km h Normal driving mode km h 2 km h Ground pressure without driver kPa kgf cm 28 9 0 27 Climb power degrees 27 15 Max inclination transversely degrees 18 10 Dozer blade Width x height mm 990 1300 x 230 Boom tilt angle Left Degrees 75 Right Degrees 60 Extra circuit con nection Max flow volume ...

Page 33: ...e page 1 CE identification 2 Serial number 3 Max towing capacity of the towing eyes 4 Max support load of the towing eyes 5 Identification number 6 Year of manufacture 7 Engine capacity 8 Working weight 9 Model 10 Manufacturer 4 1 Serial Number on the Machine The serial number 1 of the excavator has been imprinted on the undercarriage on the swivel block attachment 4 2 Engine number The engine num...

Page 34: ... 5 Basic Equipment The basic equipment of the models includes the following parts Parts manual Grease gun Spare fuse 50 A Certificate of guarantee There is a tool compartment under the seat where the grease gun and other tools can be stored ...

Page 35: ...age 14 Boom cylinder 3 Cab 15 Bucket 4 Driving position 16 Bucket connection 5 Cab door 17 Bucket cylinder 6 Side cover 18 Extra circuit connections 7 Drive wheel 19 Arm 8 Rubber track 20 Arm cylinder 9 Impeller 21 Boom 10 Dozer blade widening part 22 Working lights cab 11 Dozer blade 23 Exterior mirrors 12 Dozer blade cylinder ...

Page 36: ...evers To facilitate getting in and out of the cab the console is raised by pulling the locking mechanism of the control lever up The engine can only be started if the console is raised The control levers the drive levers the boom swing pedal and the dozer blade lever only work if the console is lowered and with the locking mechanism of the control lever in the down position 2 Wrist support The wri...

Page 37: ... the parts of the drive lever and the pedal mechanism 1 Left drive lever and right rubber track These drive levers allow the excavator to move forward reverse and take corners The left drive lever controls the left rubber track and the right drive lever controls the right rubber track 2 Boom swing pedal This pedal swings the boom to the right and to the left 3 Extra circuit pedal The extra pedal c...

Page 38: ... following parts 1 Extra circuit rocker switch 2 3 Fast driving position push button 4 Dozer blade lever 5 Starter switch 6 Engine speed lever 7 Windshield wiper spray switch cab model 8 Fan switch cab model 9 10 Flashing light switch 11 Working lights switch 12 Wrist support 13 Right control lever ...

Page 39: ... push button This push button switches the fast driving position on and off 3 Dozer blade lever The dozer blade lever raises the dozer blade by pulling the lever back and lowers it by pushing the lever forward 4 Starter switch The starter switch serves as a main switch of the entire excavator as well as a switch for pre heating and starting the engine 5 Throttle The engine speed lever allows the u...

Page 40: ...turned on and off with a switch 2 2 4 2 Fuse box The fuse box 1 is located under the driver s seat behind a protective plate 2 4 3 Tool compartment The tool compartment 1 is located under the driver s seat behind a protective plate 2 4 4 Funnel for diesel It is best to use a funnel 1 when filling with diesel The storage place for the funnel is the tool compartment under the driver s seat ...

Page 41: ...h narrow places The track widths are A Standard track width 1300 mm B Narrow track width 990 mm The track width is set with the control lever for the undercarriage 1 CAUTION There is a danger of tipping If excavating with the narrow track width stability is reduced The narrow track width should only be used to drive through narrow places In principle excavating is always done with the standard tra...

Page 42: ...aulic oil is returned via the valve block indirect return or directly to the hydraulic oil tank direct return Using the direct return changeover valve 3 it is possible to switch between indirect return and direct return The direct return changeover valve 3 is located in the foot space under the floor plate 1 directly on the hydraulic oil tank 2 3 4 The fuel tank filler opening and level check The ...

Page 43: ...e exterior mirrors can be set to view the desired zones optimally 4 Heating The cab is equipped with adjustable heating The lever for setting the heating is located on the right of the driver s seat The fan must be switched on To heat the right switch must be set at a minimum of 1 Switch A Fan setting Switch B Air flow ...

Page 44: ...ngine Area The engine area is locate at the back of the superstructure and is closed off by a lockable cover 1 Coolant reservoir 5 Oil fill opening 2 Water separator 6 Oil dipstick 3 Fuel filter 7 Diesel vent nipple 4 Fuel pump 8 Ground switch ...

Page 45: ...m to be lowered if the engine has stalled The hydraulic oil reservoir contains the intake filter and the return filter 7 Radiator and Oil Cooler The radiator and the oil cooler are located under the side cover 1 Radiator 2 Oil cooler 3 Tank vent filter NOTE Do not open the closing plug 4 on the tank vent filter No maintenance of the tank vent filter is necessary 1 Gauge glass for the level of the ...

Page 46: ...ving the cab In exceptional cases e g when troubleshooting the cab may be exited while the engine is running The user must always make sure the left control console remains raised The control elements may only be moved when the user is seated on the driver s seat While operating the user may not lean his arms legs or upper body out of the window or the cab door When the user leaves the excavator f...

Page 47: ...en may never operate the machine not even under the supervision of an adult Never let children play with the machine or the attachments Be very careful when shunting Look behind and under the machine and be sure that there are no children in the shunting area Before leaving the machine park it in such a way that it cannot roll away When leaving the machine for example during a break or at the end ...

Page 48: ...head cables to sway and thereby decrease the distance If there is a spark discharge if necessary use suitable measures to leave the danger zone with the excavator If this is not possible do not leave the driving position warn approaching persons of the danger and arrange to have the power switched off 1 4 Conduct when Working in the area of ground cables Before excavation is begun the contractor o...

Page 49: ...r a s a p NOTE If the battery is separated from the power circuit the clock data is erased After putting it into operation again the indicator light will flash Set clock and you will be asked to reset the clock 2 1 Breaking in the excavator For the first 50 operating hours at least the following points must be observed The excavator must be warmed up at medium high rpm and with small loads do not ...

Page 50: ...e excavator for visible damage loose bolt connections and leaks Checking the engine oil level Remove the oil dipstick 1 and wipe it off with a clean cloth Reinsert the oil dipstick all the way and remove it again The oil level must be in the range A If the engine oil level is too low add via the oil filler opening page 97 CAUTION Operating with an oil level that is too low or too high can result i...

Page 51: ...off page 94 Checking the V belt WARNING The engine must be turned off and the ignition key removed Do not reach for rotating or moving parts Press the V belt 1 at the A spot and the V belt must be able to be pressed in approximately 8 mm pressure 10 kg If necessary adjust the V belt page 94 Check the condition of the V belt The V belt may not have any cracks or damage If necessary replace the V be...

Page 52: ... hydraulic cylinders see Filling up changing the hydraulic oil page 103 Greasing the bucket pins and bucket connecting pins Start the engine page 58 Position the arm and bucket as shown in the diagram Switch the engine off page 59 Apply grease to all lubrication points adjacent diagram see section Maintenance products page 117 until new grease is discharged ENVIRONMENTAL INFORMATION Wipe off the g...

Page 53: ...ucts page 117 until new grease is discharged ENVIRONMENTAL INFORMATION Wipe off the grease that is discharged immediately storing the contaminated cleaning cloths in the appropriate crates until they are disposed of Checking the electrical cables and connections Check the condition of all accessible electrical cables plug connections and if they have been attached properly Damaged parts must be re...

Page 54: ...el there is in the fuel tank Check the fluid level of the windshield washer system cab model NOTE If the windshield washer reservoir 1 is empty do not operate the windshield washer system because the pump could run dry and be damaged If the fill quantity is too low fill the windshield washer reservoir page 86 Check whether the fluid reservoir is full enough ...

Page 55: ...o not have a secure hold Do not jump on or from the excavator Always grip the hold with one hand Be sure to get in safely Bring the left control console 2 into its final position by pulling the locking mechanism of control lever 1 up NOTE The control console must remain in this position after starting the engine because otherwise the engine cannot be started Get into the excavator using the rubber...

Page 56: ...or previous diagram 2 has been installed as an adjustment aid Sit down on the driver s seat Swing the clamp out 90 Change the spring tension with pumping movements up or down in such a way that your own weight is indicated on the weight indicator NOTE Adjust the seat so that the marking arrow is in the center of the weight indicator Adjusting the backrest Relieve the backrest somewhat and pull the...

Page 57: ...ust be performed before the daily putting into operation page 50 CAUTION The Safety Instructions for Use page 46 must definitely be observed CAUTION Make sure no persons are within the reach of the excavator If it is not possible to prevent this they must be warned by tapping the horn CAUTION Make sure all control elements are in neutral CAUTION Starting the excavator is only permitted if the user...

Page 58: ...tection If the excavator is started with the wrong key the indicator light remove key will light up next diagram 6 on the display and control unit NOTE Metal parts such as for example a key ring or other keys hanging from the key chain could cause starting problems If the lock of the control lever is not raised the warning light 5 will light up yellow and the engine cannot be started The indicator...

Page 59: ...llow the engine to warm up at a medium high rpm until operating temperature is reached After the engine has reached operating temperature set the rpm required for the work Pull the engine speed lever in the direction until the required rpm is reached The display selector switch allows the display to switch between time rpm and operating hours 3 6 Switching the engine off NOTE If the engine must be...

Page 60: ...ing by taking appropriate measures see MAINTENANCE page 88 If necessary inform the competent personnel If there is not enough engine oil pressure during use the engine must be turned off immediately The engine oil pressure indicator light will light up If a failure occurs in the loading system during use the engine must be turned off immediately The load indicator light will light up and the warni...

Page 61: ...nt temperature may rise somewhat higher than normal The coolant temperature indicator light will flash and a notification will show in the display as shown in the diagram The notification will disappear after a short period of time but the coolant temperature indicator light will continue to flash as long as the temperature is elevated Only use the machine for lighter loads until the operating tem...

Page 62: ...tank fill up the excavator page 86 NOTE The needle will indicate the relative quantity of fuel in the tank During the operation of the machine the needle will go down because fuel is being used NOTE When the excavator is used on a slope the quantity of fuel in the tank will be lower on one side With a small quantity of fuel in the tank the fuel pump may not be able to supply enough fuel and the en...

Page 63: ...narrow track width B NOTE To adjust the relevant track width both track width cylinders must either be pushed out completely standard track width A or pushed in narrow track width B Pull the lever of the undercarriage width 1 up The track width will go from the narrow track width B to the standard track width A Push the lever of the undercarriage width 1 downwards The track width will go from the ...

Page 64: ...his for both sides of the dozer blade Setting the dozer blade width to the standard track width Pull out the locking pin 1 Pull out the dozer blade widening part 2 to the front Replace the locking pin 1 NOTE Do this for both sides of the dozer blade ...

Page 65: ...60 Make sure the boom and the dozer blade are positioned in the direction of travel as shown in the diagram CAUTION Before driving the excavator at least the following safety instructions must be observed When working on a slope take the excavator s angle of inclination into account see diagram Climb power 27 or 15 Max inclination transversely 18 or 10 Keep the excavator bucket as low as possible ...

Page 66: ...the opposite Pushing the drive levers forward will cause the excavator to reverse To drive faster operate the fast driving position push button 1 CAUTION Driving at a fast speed on muddy or uneven ground is prohibited Nor is it permitted to operate another control element for example turning the superstructure at the same time Taking turns CAUTION Taking turns is described for the direction of tra...

Page 67: ...position push the left drive lever forward In this case the turning circle is determined by the right rubber track A The excavator will take a right turn Turning on the spot CAUTION Turning on the spot may not be performed quickly with an operated push button for the driving mode Turn both drive levers in opposite directions The rubber tracks will turn in opposite directions The turning axis is th...

Page 68: ...es or over bumps causes a strain on the rubber tracks and will cause the rubber tracks to tear or will cut into the tread of the rubber track as well as the steel frame Make sure no foreign objects get stuck in the rubber track Foreign objects strain the rubber track and it may tear Do not allow oil products near the rubber track If fuel or hydraulic oil is spilled on the rubber track it must be c...

Page 69: ...ucket The excavator may only be used in water up to the bottom of the superstructure After the machine has been used in water always grease the pin of the bucket and arm with lubricant until the old grease discharges When excavating in a reverse direction make sure the boom does not come into contact with the dozer blade Excavated material that sticks can be shaken off by swiveling the bucket to t...

Page 70: ...er blade lever forward A The dozer blade goes up B The dozer blade goes down 3 9 3 Overview of the functions of the control levers The diagram in combination with the following table shows the functions for the left and right control levers Control lever Movement Right control lever 1 Boom up 2 Boom down 3 Retracting the bucket 4 Swing bucket out Left control lever A Swing out the arm B Retracting...

Page 71: ...TE The boom has a hydraulic cylinder with damping that prevent the bucket contents from falling out of the bucket If the operating temperature of the hydraulic oil has not yet been reached the damping effect only takes place after a deceleration of about 3 to 5 seconds This is due to the viscosity of the hydraulic oil and is not a malfunction CAUTION When lowering the boom make sure the boom or th...

Page 72: ...he bucket Push the right control lever to the left to retract the bucket to excavate Push the right control lever to the right to swing the bucket out to empty it CAUTION While retracting the bucket make sure the teeth do not bump against the dozer blade The bucket moves as shown on the diagram ...

Page 73: ...rning takes place as shown on the diagram 3 9 8 Swiveling the boom CAUTION When swiveling make sure there are no persons in the swivel range CAUTION Be careful when swiveling so that the attachment does not bump against adjacent objects Press the boom swing pedal on the left to turn counterclockwise Diagram Press the boom swing pedal on the right to turn clockwise Diagram Swiveling takes place as ...

Page 74: ...xtra circuits can be found in section Technical data page 32 CAUTION Before working on the extra circuit connections make sure the pressure in the hydraulic system page 76 and the extra circuit connections page 75 has been released Depending on the operating settings the direct return changeover valve must be in the corresponding position page 76 CAUTION If no attachments have been installed the e...

Page 75: ...n B on the left side of the arm Direct return changeover valve The changeover valve 1 has two switch positions In the direct return position there is a return from the attachment directly via the return filter to the reservoir for hydraulic oil The return only takes place via the right extra circuit connection on the left side of the arm In the in direct return position the return is from the atta...

Page 76: ...ease the pressure in the hydraulic system Lower the attachment and dozer blade completely Put the starter switch in the STOP position Wait until the engine has come to a standstill Put the starter switch in the RUN position NOTE Do not start the engine ...

Page 77: ...Swivel setting lower attachments in the center and onto the ground Switch the engine off page 59 Remove the ignition key Remove the seatbelt and raise the left control console The excavator may need to be filled up page 86 Close all valves and lock them Check the excavator for external damage and leaks Defects must be repaired before the next putting into operation If there is a great deal of cont...

Page 78: ...Under dusty conditions the supply of fresh air must be switched to increase the air pressure in the cab This helps to prevent the dust from penetrating the cab WARNING Continuously circulating air operation contributes to the exhaustion of the user Circulating air operation for a longer period of time could result in a lack of oxygen and overheating in the cab No fresh air is coming in from outsid...

Page 79: ...efore using the windshield wiper check whether the windshield wiper blade has frozen to the window If so the windshield wiper blade or the windshield wiper motor could become damaged NOTE Only operate the windshield wiper if the window is wet enough If necessary switch the windshield washer system on beforehand Switching the windshield washer system on The windshield washer system can be operated ...

Page 80: ...3 14 Operating the flashing light accessories The starter switch is in the RUN position Press the flashing light switch 1 into the ON position The flashing light will stay on as long as the switch remains in this position To switch it off press the flashing light switch into the OFF position 3 15 Operating the 12 V power strip Open the cover 1 and plug an electrical device in the 12 V power strip ...

Page 81: ...pulling on the door handle 1 and secure the door in the holder on the cab wall with the hook 2 Closing the cab door Pull out the lock release handle 1 and pull the cab door into the locking mechanism Opening the cab door from the inside Pull out the lock release handle 1 and open the door If the cab door will not be locked immediately after the door must be secured to the cab wall ...

Page 82: ...uide rails to the end At the end secure the windshield CAUTION Do not release the handles while moving up The windshield could shoot up uncontrollably and bump against the head of the user Observe the safety instructions on the side window Closing the windshield Press both the right and left locking lever previous diagram 1 at the same time using the handles previous diagram 2 and push the windshi...

Page 83: ...rter switch is in the RUN position Press the work lights switch 1 into the ON position The work lights will light up on the cab To switch them off press the work lights switch into the OFF position NOTE When working on or next to a public road other road users may not be blinded ...

Page 84: ...hite grease Lubricate the hinges of the cab door Fill the windshield washer system with frost free windshield washer fluid page 86 Using in the winter After completing work the excavator must be cleaned page 92 special attention must be given to the rubber tracks the attachments and the piston rods of the hydraulic cylinders If the excavator is cleaned with a jet of water it must be parked in a dr...

Page 85: ...ehicle with the chassis of the excavator Do not use the negative terminal of the battery of the excavator The connection location of the chassis must be clear and clean Start the starting aid vehicle and let it run at an increased stationary speed Start the engine page 58 and keep it running Check whether the charging current indicator light has gone out Disconnect the starting aid cable from the ...

Page 86: ... other ignition sources are prohibited The danger zone must be indicated with signs The danger zone must have a fire extinguisher ENVIRONMENTAL INFORMATION Spilled fuel must be absorbed by an oil absorbing fabric immediately The contaminated oil binding agent must be disposed of in accordance with current environment protection regulations CAUTION Only if there is no gas pump present may diesel oi...

Page 87: ...e to close the tank cap Level check when filling up When filling up the actual fuel level can be determined by an acoustic signal Press the switch 1 and the level check is switched on the switch for the level check 1 is located above the fuel tank fill opening 2 Interrupted signal the tank is empty Periodic signal the tank is being filled Continuous signal the tank is full NOTE If the fuel flow is...

Page 88: ...The excavator must be protected against starting up again by removing the ignition key The bucket must always be located on the ground during the maintenance work If damage is observed during maintenance work the excavator may only be put into operation again after the defects have been resolved Repair work may only be carried out by qualified personnel When carrying out maintenance work the stabi...

Page 89: ...ment Check and adjust the valve clearance Rear plug gauge Tighten the cylinder head bolts Torque wrench Just this one time Check the compression pres sure of the cylinder Pressure gauge Regulator or jet pump Check the maximum speed in an idle state Tachometer Lubrication system Check whether the engine leaks oil Check the quantity of oil and its clarity Change the engine oil The first 50 hours Rep...

Page 90: ...ction item Action Tool Daily 8 hours Monthly 200 hours 3 months 600 hours 6 months 1200 hours Annually 2400 hours Hydraulic tank Check the quantity of oil and its clar ity Clean the intake filter Eliminate any foreign objects Oil return Replace the oil return Line connec tion Check for leak loose parts cracks distortion damage Replace the line 1 2 years ELECTRICITY Inspection item Action Tool Dail...

Page 91: ... suffer serious damage at high temperatures SAFETY FACILITIES AND ACCESSORIES Inspection item Action Tool Daily 8 hours Monthly 200 hours 3 months 600 hours 6 months 1200 hours Annually 2400 hours Cab and protective fence Check the mounting Detection hammer Check for distortion cracks and damage Horn Check the operation and at tachment Lamp and light bulb Check the operation and at tachment Rearvi...

Page 92: ... Do not place the water jet on the intake opening of the air filter Starting the excavator with flammable fluids is prohibited ENVIRONMENTAL INFORMATION Washing the excavator is only permitted at located intended for this purpose with oil and grease separators Cleaning the excavator may be done with water with a commercially available cleaning agent Make sure no water gets into the electrical inst...

Page 93: ... cap of the coolant expansion tank when the engine is cold and add mixed coolant until the FULL mark 1 Close the cap of the expansion tank If the coolant expansion tank has been drained completely check the fluid level in the radiator WARNING Do not open the radiator cap if the engine is hot there is a danger of being burnt Open the side cover Open the radiator cap 1 by turning it counterclockwise...

Page 94: ...ecking setting and replacing the V belt Setting the V belt Open the engine cover page 87 Check the V belt Loosen the fixing bolts 2 Tighten the V belt by turning the tension pulley 1 Press the V belt at the A spot and the V belt must be able to be pressed in approximately 8 mm pressure 10 kg Tighten the fixing bolts Check the V belt after adjusting it Close the engine cover 5 4 Checking the coolan...

Page 95: ...coolant must be caught and disposed of in accordance with the current environment protection provisions If heavily contaminated rinse the cooling system Using a hose through the opening of the radiator cap spray water without additives into the cooling system until clear water comes out of the drain Close the main coolant drain Remove and drain the coolant expansion tank 1 clean if necessary Repla...

Page 96: ...ace the oil drain pan with a capacity of about 15 l under the engine oil drain The engine oil must not get on the ground like the oil filter the oil must be disposed of in accordance with current environment protection regulations 5 6 1 Draining the engine oil Remove the oil drain plug 1 and drain the engine oil into the drain pan Put a new gasket on the oil drain plug and replace it 5 6 2 Replaci...

Page 97: ...e engine oil must be filled to the MAX mark Close the engine cover 5 7 Checking cleaning and replacing the air filter WARNING There is a danger of damaging the engine The innermost filter element 1 must remain in position while cleaning the air filter housing 6 Otherwise dirt particles could get into the air intake while cleaning and damage parts of the injection system and the engine Open the eng...

Page 98: ... replace the cover with the TOP mark at the top and close the clamps Close the engine cover 5 8 Replacing the fuel filter Open the engine cover page 87 Set the change over valve 1 on the water separator to the OFF position Unscrew the fuel filter 2 Moisten the rubber gasket ring on the new filter with diesel oil Screw the new filter on and tighten it by hand Set the changeover valve to the ON posi...

Page 99: ... ground Open the engine cover page 87 Set the change over valve 3 to the OFF position Unscrew the ring nut 1 holding onto the cup 2 Remove the cup Empty the cup 5 and clean it with clean diesel oil Check the filters 1 for excess contamination replacing if necessary Replace the gasket ring 4 and lubricate it with diesel oil Install the components following the order of 1 to 6 Tighten the ring nut 6...

Page 100: ... drain valve by turning it to position A Screw the drain plug back in ENVIRONMENTAL INFORMATION Dispose of the fluid in a container in accordance with current environment protection regulations 5 11 Checking the fuel lines and air intake hoses Open the engine cover page 87 Check the condition of all accessible fuel lines air intake hoses and clamps and check if they are attached properly Damaged p...

Page 101: ...ust be observed CAUTION Only work with cold hydraulic oil Remove the floor plate 1 Unscrew the cover 1 Remove the return filter 3 and replace it with a new one ENVIRONMENTAL INFORMATION Dispose of the return filter in accordance with current environment protection regulations Check the condition of the gasket ring 2 replacing it if necessary Replace and fasten the cover ...

Page 102: ...ination with changing the hydraulic oil Drain the hydraulic oil page 103 Remove the return filter in the hydraulic oil reservoir page 101 Unscrew the intake filter see diagram If necessary wipe any dirt off with a clean lint free cloth ENVIRONMENTAL INFORMATION Dispose of the intake filter and cleaning cloth in accordance with current environment protection regulations Screw on the new intake filt...

Page 103: ... in combination with replacing the intake filter Position the excavator on a level surface Lower the attachment and dozer blade to the ground as shown in the diagram Switch the engine off Open the floor plate 1 5 14 1 Draining the hydraulic oil Place a container with a capacity of at least 70 l under the drain for the hydraulic oil Unscrew the drain plug 1 and drain the hydraulic oil Put a new gas...

Page 104: ...a clean funnel with a fine sieve in the opening of the closing plug Add hydraulic oil up the center of the gauge glass 1 Screw the closing plug of the hydraulic oil tank back in Start the engine page 58 and go through all operations of the control elements Lower the attachment and dozer blade to the ground page 103 Switch the engine off Check the level of the hydraulic oil adding if necessary Repl...

Page 105: ...he side cover 5 15 2 Charging the battery Battery acid is very caustic Contact with battery acid must be avoided at all times If clothing skin or eyes nevertheless come in contact with battery acid rinse the parts in question with water immediately For contact with eyes consult a physician immediately Neutralize spilled battery acid immediately When working with batteries appropriate safety gloves...

Page 106: ... be done carefully After charging clean the battery and if necessary add fluid Check the acid density with a hydrometer The density must be between 1 24 and 1 28 lg l If the acid density between the individual cells of a battery deviate significantly the battery is most likely defective The battery in question must be checked with a battery tester Inform qualified personnel 5 15 3 Removing and ins...

Page 107: ... to the negative terminal of the battery and replace the negative terminal cover 5 16 Lubrication All necessary lubrication on the chassis is described below 5 16 1 Greasing the swivel block Grease the grease nipple 1 with the grease gun NOTE The swivel block must be lubricated every 90 About 50 g of grease about 20 turns with the grease gun must be applied see section Maintenance products page 11...

Page 108: ...t greasing service put the starter switch in the STOP position and remove the ignition key Start the excavator and rotate the superstructure 90 several times After greasing the superstructure rotate the superstructure 360 several times to spread the grease evenly 5 16 3 Greasing the swivel block attachment Apply grease to both lubrication points see diagram see section Maintenance products page 11...

Page 109: ...ne off and remove the ignition key See section Excavation using the control elements page 69 Apply grease to all lubrication points see section Maintenance products page 117 until new grease is discharged ENVIRONMENTAL INFORMATION Wipe off the grease that is discharged immediately storing the contaminated cleaning cloths in the appropriate crates until they are disposed of ...

Page 110: ...er the attachment to the ground and lift the excavator about 200 mm from the ground on one side CAUTION Have an assistant check this procedure Support the excavator with suitable bracing Take the weight of the vehicle into account 5 17 1 Checking the tension of the rubber track The joint 1 of the rubber track is located between the impeller and the drive sprocket Check the rubber track sagging as ...

Page 111: ...of the final drives NOTE Only change the oil when the final drive is lukewarm If necessary drive the excavator until it is warm Adjust the excavator on an even surface so that the drain plug 2 is in the lowest position Place a container with a capacity of at least 2 l under the drain plug Unscrew the drain plug and drain the oil CPL Put a new gasket ring on the drain plug and tighten it Unscrew th...

Page 112: ...of the cladding Checking Check the outside air filter for dirt and any damage If there is a lot of dirt or damage the outside air filter must be replaced Cleaning NOTE Clean using only purified compressed air with a max pressure of 2 bar WARNING Safety goggles must be used when working with compressed air Blow the filter 1 clean with compressed air in the direction A opposite the normal flow direc...

Page 113: ... this check Only qualified personnel may work on the heating Close the engine cover and the side cover 5 21 Replacing the line filter NOTE The replacement activities are described on the basis of the example of the left control lever replacing the right control lever is done in the same way Remove the pressure from the pilot circuit Fold up the left control console 1 Remove the lowest plate parts ...

Page 114: ... the extra circuit Remove the pressure from the pilot circuit Remove the floor mat Remove the right bottom plate 1 Unscrew the hydraulic line 2 Unscrew the line filter 3 Screw in a new filter Fasten the hydraulic line again Replace the right bottom plate Replace the floor mat ...

Page 115: ...ned with a max tightening torque of 21 Nm If the screws are tightened with a tightening torque greater than 21 NM the thread lining of the plastic cladding will let loose or be destroyed 4 T 4 6 7 T 8 8 9 T 9 8 10 9 M 6 7 8 9 3 0 8 0 95 9 8 11 3 1 0 1 15 12 3 14 2 1 25 1 45 M 8 17 7 20 6 1 8 2 1 23 5 27 5 2 4 2 8 29 4 34 3 3 0 3 5 M 10 39 2 45 1 4 0 4 6 48 1 55 9 4 9 5 7 60 8 70 6 6 2 7 2 M 12 62 ...

Page 116: ... Nm 2 5 Nm 40 60 69481 1518 0 4 0 Nm 4 5 Nm 2 5 Nm 32 50 69741 7283 0 4 0 Nm 4 5 Nm 2 5 Nm 50 70 69741 7285 0 4 0 Nm 4 5 Nm 2 5 Nm Key width Tightening torque Nm Hose size Thread 14 15 20 DN 4 1 8 M12 x 1 5 17 15 20 DN 6 1 4 M14 x 1 5 19 30 35 DN 8 5 16 M16 x 1 5 22 40 45 DN 10 3 8 M18 x 1 5 27 50 55 DN 13 1 2 M22 x 1 5 Key width Tightening torque Nm Line size Thread 17 30 35 6 x 1 M12 x 1 5 17 30...

Page 117: ...oil and the oil filter must be replaced at short er intervals Never use diesel oil with a sulfur content higher than 1 00 In the summer or at high environmental temperatures SAE 30 SAE 40 SAE 50 All weather conditions 15W 40 Shell Rimula R4L 15W40 API CJ 4 Coolant G048 SAE J1034 MB 325 0 ASTM D3306 D4985 ROWE Hightec Anti freeze AN 37 C Always used distilled water to mix with antifreeze When mixin...

Page 118: ...nnel may carry out repairs on the machine If repairs to supporting parts are done such as for example welding work on chassis parts these must be checked by an expert After the repairs the machine may only be put into operation if it can be guaranteed that it will run without failure ...

Page 119: ...ot be influenced by personal or economic interests or the interests of the company A visual check must be performed as well as a function check all parts must be checked for their condition and completeness as well as proper operation of the safety facilities Implementing this check must be documented as an inspection result at least the following must be listed Date and scope of the inspection li...

Page 120: ...store it in a dry and frost free area If necessary a loading device must be connected to preserve the charge Lubricate the swivel block page 107 Lubricate the swivel block bearing page 108 Lubricate other lubrication points page 109 Lubricate the swivel block attachment page 108 Greasing the bucket pins and bucket connecting pins page 52 Check the antifreeze level of the coolant adding if necessar...

Page 121: ...inder page 125 Overload warning system page 126 If the dozer blade is used for support an additional line rupture protection must be installed in accordance with EN 474 1 to increase the stability of the machine page 125 Excavators with a permitted lift capacity of 1 0 t or more may only be used in lifting operations if the overload warning system is activated page 126 The lifting device must be f...

Page 122: ...k done on a solid and horizontal surface When working on a soft surface the excavator may tilt because the load is applied unilaterally and the rubber track and the dozer blade could sink into the ground CAUTION The values given in the table are related to the load without a bucket when using the bucket the weight of the bucket must be detracted from the values The weight of the accessories instal...

Page 123: ...Page 123 131 July 2021 HE18 User manual Counterweight A B HE18 1 Protective roof cab 90 kg 1 81 m 1 19 m ...

Page 124: ...ax GL 4000 3500 3000 2500 2 1 2000 2 2 2 5 1500 2 4 2 6 2 6 1000 4 2 3 3 2 9 2 5 2 5 500 5 5 3 9 3 0 2 5 0 5 4 5 7 4 0 3 0 2 4 500 5 3 7 7 5 2 3 8 2 8 1000 7 8 6 8 4 5 3 3 2 4 1500 11 0 5 5 3 6 2 5 2000 2500 Unit kN t LIFT CAPACITY HEIGHT mm Turning radius of the lift capacity mm Min 1500 2000 2500 3000 3500 Max GL 4000 3500 3000 2500 2 2 2000 2 2 2 6 1500 2 5 2 8 2 6 1000 4 4 3 4 2 6 2 0 500 4 5 ...

Page 125: ...attachment from suddenly falling down or prevent the machine from tilting when using the dozer blade as support A line rupture protection is installed directly on the hydraulic connection of the boom cylinder 2 and the arm cylinder 1 In addition a line rupture protection valve can also be installed on the hydraulic connection of the dozer blade cylinder 3 For excavators with an authorized lift cap...

Page 126: ...r objects that are thrown upwards The stone damage protection is fastened to attachment points arrows on the protective roof respectively the cab 4 Quick Change Systems and Attachments The quick change system is fasted to the arm and to the bucket connection with bolts This is only for EUROTRAC bucket accessory attachment The accompanying operating instructions have been added to the operating ins...

Page 127: ...by the user s feet The functions of the left and right foot pedal correspond to the functions of the left and right drive levers NOTE To operate the foot pedals fold the pedal extensions 3 fold them towards the back After use and for optimum freedom of movement in the foot area fold the pedal extensions towards the front ...

Page 128: ...Page 128 131 July 2021 HE18 User manual ELECTRICAL DIAGRAMS 1 Electrical diagram 1 ...

Page 129: ...Page 129 131 July 2021 HE18 User manual 2 Electrical diagram 2 ...

Page 130: ...Page 130 131 July 2021 HE18 User manual 3 Electrical diagram 3 ...

Page 131: ...Page 131 131 July 2021 HE18 User manual 4 Electrical diagram 4 ...

Reviews: