background image


Document ID:06080001 

Rev: B 

Technical Support: 800-626-6912 

Page 13 of 24

Unpacking the Cushions 


Your cushion set is packaged in its own box within the pedicure spa shipping carton.  All needed parts 
are located inside of this box.  These include: 

  (1) Seat Back 

  (1) Seat Bottom 

  (2) Arm Cushions 

o


Altera Vibration Massage Only: 

The remote and junction box


Please make sure that all parts are removed from the box before discarding the box.  If any parts are 
missing, the customer must contact EUROPEAN TOUCH within 30 days of the delivery date for 
replacement at 800-626-6912. 

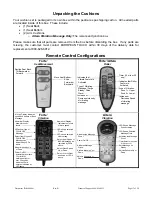
Remote Control Configurations 


Recline Seat Back: 

Tilt Backward or 
Forward. 

Forte’ 

Seat Movement 


Move Seat Bottom: 

Slide 
Forward or 
Backward.


Indicates that 

Vibrate Feature is 
Activated. 


Type of Vibrating 

Massage: (Surge, 
Steady, Pulse, 
Wave). 


Increase or 

Decrease Intensity 
of vibrating 
massage. 

Forte’/Altera 

Roller 


Timer (15 min or 30 

min). 


Indicates that Roller 

Feature is 
Activated. 


Area of Vibration: 

Zone 1 = Upper. 
Zone 2 = Lower. 


Increase or 

Decrease Speed 
of vibrating 
massage. 


Numerical Display 

shows intensity 
levels. 


LEDs show type of 

FULL-BODY 
Massage. 


Select from 5 types of 

FULL-BODY 
Massages as 
indicated by LEDs 
above. 


Adjust intensities Up 

or Down. 


Power On/Off: 

automatically selects 
15 min timer.  
Holding switch for 
over 3 seconds 
activates 30 min 
timer as indicated by 
LED above.


Forte’ 

Vibration 


Numerical Display 

indicates ten levels 
of wave speed. 


LED shows selected 

Timer. 


LED shows selected 

Heat setting. 


Select from 5 types of 

BACK Massages as 
indicated by LEDs 
above. 


Adjust Wave Speed 

Up or Down. 


Select Hi or Lo Heat 

as shown by LEDs 
above. 


Activates the Massage 

Zone 1. 


Power On/Off. 


Activates Massage 

Wave. 


Adjusts Intensity Up or 

Down. 


Adjusts Speed Up or 

Down.


Altera


Vibration 


LED Shows Massage 

Zone Activated. 


LED Shows Selected 

Massage Time. 


Activates the Massage 

Zone 2. 


Timer Selects 

(Indicated 

in LEDs Above). 


Sets Massage on 

Steady. 


Adjusts Sensate Up or 

Down.


Moving Display indicates 
speed and pattern of Back 
Massage. 

Summary of Contents for Solace ALTERA

Page 1: ...Document ID 06080001 Rev B Technical Support 800 626 6912 Page 1 of 24 FORTE ALTERA and PRIMA Solace Spas ...

Page 2: ...on or maintenance negligence improper cleaning or other circumstances beyond EUROPEAN TOUCH s control NOT COVERED 1 Damage to pump parts and or motor parts due to obstruction in plumbing lines etc 2 Staining fading or discoloration of plastic surfaces due to exposure and or the use of harmful cleaning agents or chemicals 3 Staining fading or discoloration caused by improper or poor water additives...

Page 3: ...912 Page 3 of 24 OWNERS MANUAL For Solace Whirlpool Pedicure Spa Models FORTE ALTERA PRIMA IMPORTANT INFORMATION Serial Number W O Number Installed by Installation Date Serial Number W O Number Note Vietnamese and Korean translations available upon request ...

Page 4: ...e Free 9 Traditional Whirlpool With Jets 10 Specifications 11 Attaching the Seat Back 12 Unpacking the Cushions 13 Remote Control Configurations 13 Attaching the Cushions 14 Component Reference 15 Pedicure Product Guidelines 15 Crystal Clean Pipe Free Spa Operating Instructions 16 Crystal Clean Pipe Free Spa Cleaning and Disinfecting Procedures 17 Traditional Whirlpool With Jets Operating Instruct...

Page 5: ...r information and local code compliance procedures that need to be followed when having your pedicure spa installed Subsequent inspections and approvals that may be required are the responsibility of the purchaser See limited warranty regarding incidental or consequential exclusions page 2 Precautions Do not stand in the basin of the pedicure spa Excessive water temperature is dangerous and should...

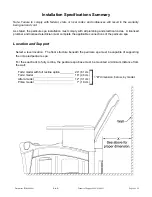
Page 6: ...ctrical codes A licensed plumber and licensed electrician must complete the applicable connections of the pedicure spa Location and Support Select a level location The floor structure beneath the pedicure spa must be capable of supporting the occupied pedicure spa For the seat back to fully recline the pedicure spa base must be mounted a minimum distance from the wall Forte model with full recline...

Page 7: ...ments for Backflow Protection Devices and Systems in Plumbing Fixture Fittings is applicable to plumbing fixture fittings with outlets not protected by an air gap Included in the possible range of applications are fittings with hose connected outlets fittings with pullout spout hand held showers shampoo fittings and deck mounted fittings ASME A112 18 3M is now referenced in ASME A112 18 1M Plumbin...

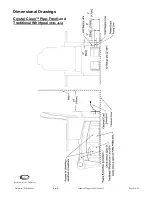
Page 8: ...Document ID 06080001 Rev B Technical Support 800 626 6912 Page 8 of 24 Dimensional Drawings Crystal Clean Pipe Free and Traditional Whirlpool With Jets ...

Page 9: ...Document ID 06080001 Rev B Technical Support 800 626 6912 Page 9 of 24 Crystal Clean Pipe Free ...

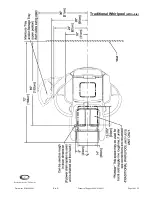
Page 10: ...Document ID 06080001 Rev B Technical Support 800 626 6912 Page 10 of 24 Traditional Whirlpool With Jets ...

Page 11: ...s 12 31cm of space between pedicure spa and wall in order for seat to recline to its fullest extent Massage motor 12V AC Adapter included alternate voltages available Power source 110V AC 5 Amp 60 Hz GFCI Protected Caution Pedicure spa must be installed by a licensed electrician and a licensed plumber conforming to all local and national electrical codes Construction Linear Low Density Polyethylen...

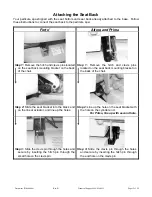
Page 12: ... of the chair Step 1 Remove the hitch and clevis pins located on the seat back mounting bracket on the back of the chair Step 2 Slide the seat bracket into the black end on the linear actuator and line up the holes Step 2 Line up the hole on the seat bracket with the hole on the cylinder end For Prima line up with second hole Step 3 Slide the clevis pin through the holes and secure by inserting th...

Page 13: ...n Indicates that Roller Feature is Activated Area of Vibration Zone 1 Upper Zone 2 Lower Increase or Decrease Speed of vibrating massage Numerical Display shows intensity levels LEDs show type of FULL BODY Massage Select from 5 types of FULL BODY Massages as indicated by LEDs above Adjust intensities Up or Down Power On Off automatically selects 15 min timer Holding switch for over 3 seconds activ...

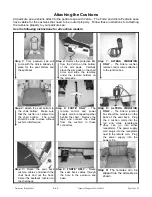
Page 14: ... attached to the junction box Step 2 Attach the seat bottom to the chair bottom Make sure that the cushion is centered on the chair bottom The arms should be able to close without cushion interference Step 5 FORTE ONLY The remote control and power supply cord are taped together behind the chair Remove the tape and connect the cords from the cushion to these connectors Step 8 ALTERA VIBRATION ONLY ...

Page 15: ... excessive foam It has been determined that products containing non dissolving abrasives such as sand and sea salts will not harm the internal component structure of your pedicure spa as long as the entire EUROPEAN TOUCH cleaning requirements are followed without deviation Oil based products may be used in your pedicure spa as long as the cleaning requirements are met Please use pedicure products ...

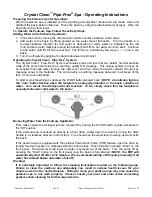
Page 16: ...k and bottom To start or stop the whirlpool depress the On Off button labeled Jets NOTE An indicator light on the Jets button flashes when the footplate is improperly installed or the basin contains no water As a result the whirlpool will not function To fix simply check that the footplate is securely fastened or add water to the basin Removing Water from the Pedicure Spa Basin First make certain ...

Page 17: ...OTE When replacing the footplate carefully align the mounting studs with the mounting holes Tighten each knob until snug Be careful not to over tighten as this can damage the Tee Knobs After Last Pedicure of the Day 1 Drain water from the pedicure spa by turning the drain handle to the Open position 2 Remove the drain cover as shown on page 21 Remove the impeller as shown on page 21 Remove all deb...

Page 18: ...he Jet heads should not be positioned directly at the suction cover Doing so will create a noisy gurgling sound as air is being forced directly into water pipes Turn off the whirlpool jets by turning the On Off switch counter clockwise to its original starting position Removing Water from the Pedicure Spa Basin First make certain the whirlpool jets are off by turning the On Off Switch counter cloc...

Page 19: ...mponent with low sudsing soap or detergent using a soft brush Disinfect the components as well as the areas behind them with an EPA registered disinfectant Follow your state board requirements for disinfecting Replace all components 4 Clean all the surfaces of the basin using low sudsing soap or detergent and a non abrasive brush Remove all visible residue from basin and then rinse with sprayer 5 ...

Page 20: ...n If the adjustment cover is hard to turn slightly loosen the jet nozzle nut Step 5 Reverse steps to reassemble Removal Replacing Suction Cover Tools required Philips head screwdriver Check your state and local regulations for cleaning procedures Links to your state boards can be found on our web site at www europeantouch com Refer to the cleaning procedure page headed Traditional Whirlpool With J...

Page 21: ... for cleaning reference Step 2 To remove the handle adapter place Phillips head screwdriver into upper slot to reach screw as shown in picture above Unscrew and then pull adapter forward Step 4 Picture with Drain Plunger removed shown for cleaning reference Removing Replacing Impeller Check your state and local regulations for cleaning procedures Links to your state boards can be found on our web ...

Page 22: ...Document ID 06080001 Rev B Technical Support 800 626 6912 Page 22 of 24 History and Notes ...

Page 23: ...Document ID 06080001 Rev B Technical Support 800 626 6912 Page 23 of 24 History and Notes ...

Page 24: ... Technical Support 800 626 6912 Page 24 of 24 EUROPEAN TOUCH 8301 W Parkland Court Milwaukee WI 53223 Phone Number 414 357 7016 Toll Free 800 626 6912 Fax 414 357 6360 Web Site www europeantouch com Email info europeantouch com ...

Reviews: