- 18 -
Preparing to sew - Preparación para coser - Préparation à la couture
Fig. 1
Fig. 2
Fig. 3
Fig. 4
Fig. 5
Fig. 6
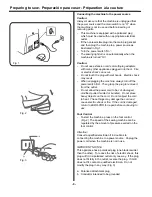
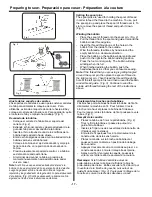
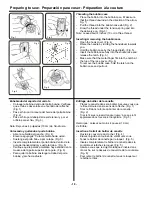
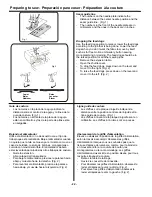
Threading the bobbin case
- Place the bobbin into the bobbin case. Make sure
that the thread unwinds in the direction of the arrow.
Fig. 1)
- Pull the thread into the bobbin case slot (Fig. 2)
- Draw the thread under the tension spring and into
the delivery eye. (Fig. 3)
Note
: Leave about 4 inches (10 cm) of free thread.
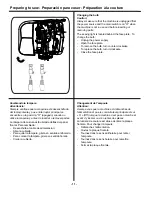
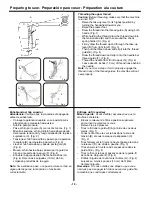
Inserting & removing the bobbin case
- Open the hook cover. (Fig. 4)
- Raise the needle by turning the handwheel towards
you.
- Hold the bobbin case by the hinged latch. (Fig. 5)
- Insert the bobbin case fully into the shuttle race and
release the latch. (Fig. 5)
- Make sure that the metal finger fits into the notch at
the top of the race cover. (Fig. 6)
- To remove the bobbin case, hold the latch on the
bobbin case and pull out.
Enfilage du boîtier de la canette
- Placez la canette dans son boîtier. Assurez-vous que
le fil se déroule dans le sens de la flèche. (Fig. 1)
- Tirez le fil dans la fente du boîtier de la canette.
(Fig. 2)
- Tirez le fil sous le ressort tendeur jusqu' à ce que le fil
apparaisse dans l'ouverture triangulaire. (Fig. 3)
Remarque
: Laissez au moins 4 pouces (10 cm)
de fil libre.
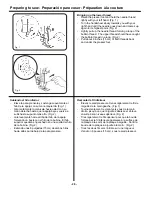
Insertion et retrait du boîtier de canette
- Ouvrez le couvercle du crochet. (Fig. 4)
- Élevez l’aiguille en tournant le volant vers vous.
- Tenez le boîtier de canette par le loquet. (Fig. 5)
- Insérez complètement le boîtier de canette dans la
coursière et relâchez le loquet. (Fig. 5)
- Assurez-vous que le doigt métallique s’insère dans
l’encoche, sur le dessus du couvercle de la coursière.
(Fig. 6)
- Pour retirer le boîtier de canette, tenez le loquet sur
le boîtier et tirez.
Enhebrado del soporte del carrete
- Coloque la bobina dentro del porta bobina. Verifique
que el hilo se desenrolle en el sentido de la flecha.
(Fig. 1)
- Pase el hilo por la ranura del borde del porta bobina
(Fig. 2)
- Pase el hilo por debajo del resorte tensor y por el
orificio para el hilo. (Fig. 3)
Nota
: Deje unas 4 pulgadas (10 cm) de hilo afuera.
Colocando y quitando el porta bobina
- Abra la cubierta del gancho. (Fig. 4)
- Eleve la aguja girando la manivela hacia usted.
- Sostenga el porta bobina por la tapa. (Fig. 5)
- Inserte completamente el porta bobina dentro de la
guía del transportador y suelte la traba. (Fig. 5)
- Verifique que la palanca metálica haya entrado en la
muesca de la parte superior de la guía. (Fig. 6)
- Para quitar la bobina, sostenga la traba del porta
bobina y jale hacia afuera.
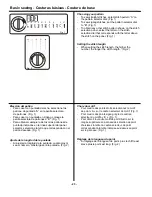
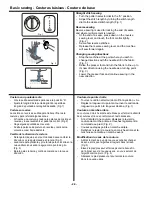
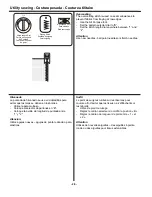
Summary of Contents for Shark 803XC
Page 4: ... 3 calibre de 15 watts ...

