background image

22

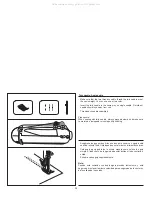
Prepare

Tips:

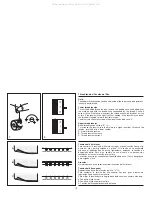
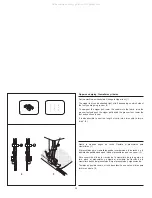
1. Take off the all purpose foot and attach the buttonhole foot.

2. Measure diameter and thickness of button and add 0.3 cm (1/8") for

bar tacks; mark buttonhole size on fabric.

3. Place fabric under the foot, so that mark on the buttonhole foot lines

up with the marking on the fabric. Lower the foot, so that the center

line of the fabric buttonhole comes to the center of the foot hole.

density varies according to the fabric. Always test sew a

buttonhole.
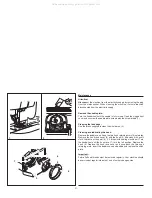
Follow the sequence. Take care not to sew too many stitches in stages 2

and 4. Use seam ripper and cut buttonhole open from both ends towards

the middle.

- Slightly reduce upper thread tension to produce better results.

- Use a backing for fine or stretchy fabrics.

- It is advisable to use heavy thread or cord for stretch or knit fabrics.

The zig-zag should sew over the gimp.

Note:

Buttonholes/ Coser ojales

1

3

2

4

2

4

Preparar

Consejos útiles:

1. Sacar el pié prensatelas universal y colocar el pié ojalador.

2. Midir el diámetro y el espesor del botón y agregar 0.3 cm (1/8") para

marcar los remates del ojal en la tela.

3. Colocar la tela bajo el pié de modo que la marca en el pié hojalador

coincida con la marca en la tela. Bajar el pié, de modo que la linea

central de la marca del ojal en la tela quede en el centro del pié.

La densidad varía según la tela. Pruebe siempre a coser un ojal

de práctica.
Seguir la secuencia. Tener cuidado de no coser demasiadas puntadas

en posiciones 2 y 4. Usar el abridor y cortar el ojal desde ambos

extremos hacia el centro.

- Reducir un poco la tensión superior produce buenos resultados.

- Usar un fondo para telas finas o elásticas.

- Es aconsejable usar cordón para telas strtch o tejidos de punto.

El zig-zag debe coser sobre el cordón.

Nota:

All manuals and user guides at all-guides.com

all-guides.com

Summary of Contents for 415QV

Page 1: ...del Modelo Mod le EURO PRO Operating LLC 4400 Bois Franc St Laurent Quebec H4S 1A7 Tel 1 800 361 4639 94 Main Mill Street Door 16 Plattsburgh New York 12901 Tel 1 800 361 4639 All manuals and user gui...

Page 2: ...free from accumulation of lint dust and loose cloth 5 Keep fingers away from all moving parts Special care is required around the sewing machine needle 6 Always use the proper needle plate The wrong p...

Page 3: ...del aire fuera de hilas pelo y ropa 5 Nunca caer o insertar alguno objeto en alguna obertura 6 No usar al aire libre 7 No operar a d nde el productos pulverulentos est n usados o oxigeno se administr...

Page 4: ...step while seated at your sewing machine Euro pro Euro pro Le felicitamos muy cordialmente por su nueva m quina de coser Vd acaba de comprar un producto de calidad que ha sido fabricado con el m ximo...

Page 5: ...cessories 4 Inserting and changing needle 13 Free motion darning 27 Detalles de la m quina 2 3 Accesorios 4 Ajusta la snap in mesa plana corrediza 5 Conecta la m quina al fuente el ctrico 7 Cambio de...

Page 6: ...selector dial Details of the machine Detalles de la m quina 1 T 2 Control 3 Pie 4 Place de la aguja 6 Palanca tensora del hilo 7 Guia de la devanadera 8 Devanadera 9 Tapon de bobina 10 Volante 11 12...

Page 7: ...esser foot lever 15 Presser foot holder 16 Power cord receptacle 17 Foot controller 13 14 Palanca alza prensatelas Portabobinas 15 Barra prensatelas 16 Enchufe de conexion al la red 17 Pedal de contro...

Page 8: ...pie universal b Pie para cremallera c Pie para bordar d Pie para ojales E Pie para puntada ciega F Pie para coser botones g Pincel corta ojales h Aceitera i Agujas 3x j Destornillador grande k Canill...

Page 9: ...t the point of the arrow 2 Fitting the snap in sewing table Ajusta la snap in mesa plana corrediza Mantenga horizontal la mesa de coser convertible y emp jela en la direcci n de la flecha 1 El interio...

Page 10: ...t control Consult a qualified electrician if in doubt as to connect machine to power source Unplug power cord when machine is not in use The appliance must be used with the foot controller 4C 316B 110...

Page 11: ...i tiene la duda cuando usted conecta la m quina al fuente el ctrico Desenchufe la m quina del toma corriente cuando no la use El pedal debe ser usado con el dispositivo de enchufe 4C 316B 110 120V rea...

Page 12: ...Should there be any problem Ask your local dealer for advice Desconecte la m quina de la alimentaci n principal retirando el conector desde la toma de corriente Afloje el tornillo A seg n se ilustra 1...

Page 13: ...the cut out c is directly above the pin d 2 Raise the lever e Lower the presser foot holder b and the presser foot f will engage automatically Raise the presser foot Release the pressure foot by raisi...

Page 14: ...jar la barra prensatelas a y el pie f se quedar enganchado al porta pie Levantar el pie 3 Apretar ligeramente la palanca e hacia adelante y entonces el pie quedar libre Montar la reglar de borde g con...

Page 15: ...ase Note Poner la canilla vacia en el eje de la devanadera Tirar el hilo de la bobina y hacerlo pasar por las guias 1 2 3 Envolver el hilo a mano en la canilla en el sentido contrario de las agujas de...

Page 16: ...atch 4 Insert the bobbin case fully into the shuttle race and release the latch Make sure that the metal finger fits into the notch at the top of the race cover 5 Attention La aguja tiene que estar si...

Page 17: ...ambiar la aguja regularmente especialmente si la aguja demuestra signos de desgaste y se causar problemas Inserta la aguja como ilustrado los siguientes A Flojar el tornillo del porta agujas y atiesar...

Page 18: ...to back Bring thread under foot and cut thread with cutter O Threading the upper thread Enhebrado del hilo superior 14 1 2 3 5 4 6 7 8 1 Atenci n El interruptor principal tiene que estar a Subir la pr...

Page 19: ...e Lower thread tension Upper thread tension Para controlar la tensi n del hilo inferior coger el porta canillas lleno por la punta del hilo y dejarlo colgado en el aire Si la canilla no se desenrolla...

Page 20: ...del agujero del plato Dejar ambos hilos a atr s bajo el pie prensatela 2 Hold the upper thread with the left hand Turn the handwheel forwards until the needle is raised 1 Pull on the upper thread to b...

Page 21: ...sione la palanca de mando de coser para atr s Haga unas pocas puntadas hacia atr s Suelte la palanca y la m quina coser de nuevo hacia delante A Reverse sewing Coser para atr s Turn the handwheel coun...

Page 22: ...Use polyester threads on synthetic materials and cotton on natural woven fabrics for best results Always use the same thread on top and bottom Heavy duty thread carpet thread Matching needle fabric t...

Page 23: ...idos para tapicer as algunos cueros y 18 110 Agujas de afilado normal Gama de tama o desde delgada a grande 9 65 a 18 110 Agujas de punta semiesf rica biselada 9 65 a 18 110 Aguja doble Agujas para cu...

Page 24: ...diagonally away from you Thread cutter is a slot on the back of the presser bar 1 Hay tres longitudes de costura recta para su elecci n Seleccione la de su agrado con el dial selector 2 Colocar la agu...

Page 25: ...Loosen upper tension slightly a Back side b Right side Zigzag stitching Punto en zig zag El ancho m ximo de la costura zig zag es 5 Sin embargo hay solamente 4 costuras de selecci n Una costura zig za...

Page 26: ...s The zig zag should sew over the gimp Note Buttonholes Coser ojales 1 3 2 4 2 4 Preparar Consejos tiles 1 Sacar el pi prensatelas universal y colocar el pi ojalador 2 Midir el di metro y el espesor d...

Page 27: ...ric along the edge of the guide Note Para dobladillos cortinas pantalones faldas etc Costura invisible para tejidos el sticos Costura invisible punto de lenceria para tejidos fuertes Regular la m quin...

Page 28: ...rk forward and then sew through the back two holes as described 3 Instalar la zurcida plancha 1 Poner la labor debajo del pie Colocar el bot n en el sitio marcado Bajar el pie Dejar el ancho de la pun...

Page 29: ...of cord into a bias strip to form a welt 3 Ajuste la m quina seg n se ilustra Cambie al prensatelas para cremalleras 1 El prensatelas para cremalleras puede incorporarse a la derecha o a la izquierda...

Page 30: ...on the type of fabric and damage sew between 3 and 5 rows B Para cosido de encaje y el stico zurcido remiendos refuerzos y presillas Ponga el bot n selector de puntos en Coloque el remiendo en su posi...

Page 31: ...ewing and better results Regular la m quina seg n la ilustraci n Instalar la zurcida plancha 1 Quitar el porta pie 2 Fijar el pie para zurcir en la barra prensatelas La planca A tiene que estar detr s...

Page 32: ...ot substitute the all purpose foot Ponga el selector del dibujo tal como se ilustra Inserte la gu a de acolchar en el soporte del prensatelas y adjuste el espacio a su gusto Desplace la tela por encim...

Page 33: ...n a low speed to insure quality stitching Aseg rese de que ambos hilos usados para coser con aguja doble sean del mismo t tulo Usted puede usar el mismo o diferentes colores Coloque la aguja doble de...

Page 34: ...thread Tie top and bottom thread under the applique to avoid unraveling Regular la m quina seg ina segun la il straci n Estre char el amplitud de puntada de zig zag 1 Hilvane el dise o sobre la super...

Page 35: ...move the hook race cover 4 and the hook 5 and clean with a soft cloth Lubricate at the point 6 1 2 drops with sewing machine oil Turn the handwheel until the hook race 7 is in the left position Replac...

Page 36: ...te la punta 6 con 1 a 2 gotas con aceite para m quinas de coser Gire el volante hasta que la zona de recorrido del garfio 7 est en la posici n de la izquierda Vuelva a colocar el garfio 5 Vuelva a col...

Page 37: ...The needle is damaged Thread is caught in the hook 1 Rethread the machine 2 Reduce the thread tension lower number 3 Select a larger needle 4 Remove and reinsert the needle flat side towards the back...

Page 38: ...te usado 4 La aguja da ada El hilo est cogido en el gancho 1 Enhebrar la m quina correctamente 2 Disnminuir la tensi n del hilo superior n mero menor 3 Usar una aguja m s gruesa 4 Colocar la aguja cor...

Page 39: ...415QV MINI B Feb 04 All manuals and user guides at all guides com...

Reviews: