background image

Illustrations


MODEL 2081 TURNTABLE SERIES 

26  

© ETS-LINDGREN L.P. – JANUARY 2003 


REV D – PN 399212 

ILLUSTRATIONS 


Archived 3/18/10

Summary of Contents for 2081-2.0

Page 1: ... ETS LINDGREN L P JANUARY 2003 REV D PN 399212 Model 2081 Turntable Series 2081 2 0 2081 2 5 2081 3 0 2081 4 0 2081 5 0 2081 6 0 MANUAL Archived 3 18 10 ...

Page 2: ... 2003 by ETS Lindgren L P All Rights Reserved No part of this document may be copied by any means without written permission from ETS Lindgren L P E MAIL INTERNET Support ets lindgren com http www ets lindgren com USA 1301 Arrow Point Dr Cedar Park TX 78613 P O Box 80589 Austin TX 78708 0589 Phone 512 531 6400 Fax 512 531 6500 FINLAND Euroshield OY Mekaanikontie 1 27510 Eura Finland Phone 358 2 83...

Page 3: ...RATION 12 RECOMMENDED PARAMETERS FOR THE MODEL 2090 POSITIONING CONTROLLER 13 EDITING MODEL 2090 POSITIONING CONTROLLER CONFIGURATION PARAMETERS 14 TURNTABLE ENCODER CALIBRATION 14 TT CALIBRATION EXAMPLE 15 SETTING CURRENT POSITION ON 2090 17 CAUTION ON RESETTING CURRENT POSITION ON 2090 17 CHANGING ROTATION SPEED 18 SETTING TRAVEL LIMITS 19 ALTIVAR MOTOR BASE CONFIGURATION 20 HAND CONTROL UNIT 21...

Page 4: ...ns could result in SEVERE personal injury and or property damage Included text gives proper procedures BEFORE POWER IS APPLIED TO THIS INSTRUMENT GROUND IT PROPERLY through the protective conductor of the AC power cable to a power source provided with protective earth contact Any interruption of the protective grounding conductor inside or outside the instrument or disconnection of the protective ...

Page 5: ... directly on the outside and will easily support most heavily weighed equipment under test EUT Casters underneath the table surface aid in the support of a cantilevered load Leveling screws are located at each caster between the casters and in the center section of the assembly for ease in matching height on an uneven ground plane To prevent over travel of the turntable in either direction of move...

Page 6: ...ase electric motor unit standard Heavy duty two speed drive system standard Conductive sectional top Convenient rotational limit adjust switches Limit override feature Ten meter fiber optic control cables standard Overall height 400 mm 15 75 in Sectional top for easy service access Full supporting leveling screws Archived 3 18 10 ...

Page 7: ...latest technology in mercury slip rings The slip ring option is typically supplied with Schuko or NEMA connectors Specify part 103441 for NEMA connectors and part 103351 for Schuko connectors The amperage rating for the standard electrical assembly is 20 amps Consult the factory for all custom requirements on slip rings Shield Room Feed through This option allows the customer to take the fiber opt...

Page 8: ...ltage setting is selected on the Motor Base unit when applicable The fiber optic cable must be looped through the P clip installed on the front panel of the motor base Failure to do so will increase the chance of the cable being accidentally pulled thus breaking the fiber optic connectors Do not attempt to service unless qualified to do so As with any electrical equipment ensure unit electrical po...

Page 9: ...e factory recommendations provided Only use replacement parts and fasteners ordered directly from the factory or specified by ETS Lindgren The access plate s above the pinion gear should remain firmly attached with the screws provided at all times When the plate is removed for servicing the electrical breaker located on the electrical control enclosure should be in the OFF position Archived 3 18 1...

Page 10: ...trical Considerations A qualified and licensed electrical contractor should be used to install power lines and the installation should comply with all applicable regulatory agencies A dedicated circuit should be used with the shortest distance possible between the power source and the turntable Access An access area underneath the turntable is advisable for large diameter installations A service s...

Page 11: ...nter drive section 3 Attach lifting chains or slings though the eye bolts CAUTION Lifting and placement of turntable center drive unit into a pit should only be performed by qualified personnel 4 Safely lift the turntable into the pit using a forklift or other appropriate lifting device place the turntable bottom or bearing support section into position 5 Remove the drive pinion so the turntable m...

Page 12: ...n section provides guidelines for the installation of the electrical connection 11 Return the breaker in the center of the turntable to the ON position CAUTION Keep all body parts away from the drive pinion when the turntable in energized 12 Rotate the turntable using the controller to verify proper operation 13 Set the travel limits if desired by following the instructions in the section titled S...

Page 13: ... diameter in the floor needs to be per the Dimensional Drawing for the table 2 Install the floor flange around the turntable A gap of 5 16 to 7 16 should be maintained around the turntable Trim flange to length by match drilling with floor and installing 20 flathead screws 3 Install wear strip on inside of floor flange by aligning with top of turntable flange 4 Make sure that pre drilled mounting ...

Page 14: ...emoves motor power from both the control enclosure assembly and the motor WARNING With the circuit breaker in the off position some parts with AC hazards still present a potentially lethal shock hazard 2 Check that the conductor size is adequate for the motor load and the distance from the mains source Improperly sized conductors will lead to a high voltage drop in the power conductors and cause r...

Page 15: ...rimary OUT port of the motorbase A fiber connected to the OUT port of the device should at the other end be connected to the primary IN port of the motorbase Older motor base designs have only one fiber optic connector pair while the newest motor base interface provides a secondary interface reserved for future expansion NOTE Fiber optic cabling for each device should not be allowed to hang unsupp...

Page 16: ...ase and controller in order to continue Refer to the section titled Connection the Model 2090 Positioning Controller if you have questions about how to connect the fiber optic cables Using the Model 2090 Positioning Controller check the CW and CCW rotation in both directions by a few degrees The position in degrees increases in the CW direction and decreases in CCW direction The turntable is calib...

Page 17: ...tinuous rotation P8 2 5 2 5 Second reverse delay P9 9 Primary GPIB address 9 b1 000 User options disabled c 3608 3600 encoder counts per meter S0 1 Step speed run speed S1 31 Speed 1 12 5 of max speed S2 63 Speed 2 25 of max speed S3 95 Speed 3 37 5 of max speed S4 127 Speed 4 50 of max speed S5 159 Speed 5 62 5 of max speed S6 191 Speed 6 75 of max speed S7 223 Speed 7 87 5 of max speed S8 255 Sp...

Page 18: ... in the list allowing easy transition between parameter adjustment and device operation Once the desired limit position or parameter is visible in the display window pressing INCRM DECRM or ENTER will toggle into edit mode The lowest adjustable digit will flash on and off Pressing the LOCAL key for that device will switch the flashing digit to the next higher digit In this way it is possible to ra...

Page 19: ...ow and thus the 2090 will not provide 0 1 degree resolution even though the display shows that digit If the value has gone past 9999 the encoder has too many counts per meter and the 2090 can not correct for it In this case contact ETS Lindgren for assistance 6 Enter this value for the encoder calibration value and reset the limits and position information 7 Test the turntable by moving it a compl...

Page 20: ...tton is set on the C setting The C digits display 3430 A new C setting is now calculated New C 356 3 divided into 360 times 3430 3395 rounded off Decrement the C parameter to 3395 and ENTER is pressed Then the current position button is pressed to get back to operation mode The table is rotated from 0 to 360 and the mark is now within one degree of being one full TT revolution Calibration is compl...

Page 21: ...ill keep it from hitting both mechanical limits when rotating from 0 to 360 during operation by the 2090 CAUTION ON RESETTING CURRENT POSITION ON 2090 The 0 degree position of the 2090 controller is fixed with respect to the mechanical limits described in the Setting Current Position on 2090 section if they are not disabled per the instructions in the Setting Travel Limits section Should it become...

Page 22: ... interface The shift from high to low speed as well as from low to high speed should be a relatively smooth transition A smooth pole changer is utilized in the motor control assembly which compensates for changes in torque when switching speeds No adjustments are necessary The ETS Lindgren optional variable speed drive provides smooth speed adjustment throughout the range of adjustment A variable ...

Page 23: ...s indicated WARNING Ensure the current ravel limit settings will not cause damage to existing cables and equipment located underneath the turntable You may decide not to use any mechanical limits if you want the turntable to rotate continuously To do this the coupling between the encoder and threaded shaft must be disengaged To gain access remove the knobs and cover to the encoder Disengage one si...

Page 24: ...efaults for the Altivar motor base set by ETS Lindgren Altivar Setting 208 230 VAC 60 Hz 400 VAC 50 Hz bFr 60 50 ACC 0 1 0 1 dEC 0 1 0 1 LSP 0 0 HSP 75 75 UnS 230 400 FrS 60 60 tFr 90 90 Should you need to change the configuration on the Altivar motor base supplied with your turntable the Altivar manual is available at www SquareD com Archived 3 18 10 ...

Page 25: ... When the HCU is selected the Model 2090 Positioning Controller is overridden until control is returned from the HCU If the Model 2090 Positioning Controller is left on while the HCU is used all changes in position are recorded by the Model 2090 Device Positioner CAUTION Do not plug the hand control unit into the motor base while that device is operational Coordinate with the operator of the Model...

Page 26: ...cate the casters Check the gearbox for fluid leakage A slight film that collects is normal You should not have puddles of fluid The gearbox is lubricated and sealed at the factory Under normal conditions it should not require servicing during its life Apply conductive grease on the ground brush along the wear strip contact area approximately 1 to 2 from the top of the strip Inspect the ground brus...

Page 27: ...ed exactly the same as the original EVERY TWELVE MONTHS Lubricate the main bearing race Use a grease gun with a good quality bearing grease The grease fittings are located inside the race 90 degrees apart underneath the top Three discharges from the grease gun in each fitting are adequate Grease the gear teeth with a good quality grease Archived 3 18 10 ...

Page 28: ...0 3 Variable 5 2 0 380 50 14 3 2081 6 0 Series Dual 5 2 0 208 230 60 13 3 Dual 5 2 0 380 50 8 3 Variable 5 2 0 208 230 60 20 3 Variable 5 2 0 380 50 14 3 PHYSICAL Model Diameter Nominal Height Distributed Load Rating Top Construction 2081 2 0 Series 2 0 m 6 56 ft 40 0 cm 15 75 in 1 500 kg 3 300 lb Sectional Aluminum 2081 3 0 Series 3 0 m 9 84 ft 40 0 cm 15 75 in 4 000 kg 8 800 lb Sectional Aluminu...

Page 29: ...exclusive of any duties or taxes If the Seller determines that warranty service can only be performed at the Buyer s location the Buyer will not be charged for the Seller s travel related costs This warranty does not apply to Normal wear and tear of materials Consumable items such as fuses batteries etc Products that have been improperly installed maintained or used Products which have been operat...

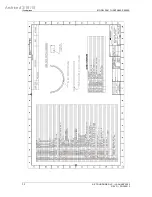
Page 30: ...Illustrations MODEL 2081 TURNTABLE SERIES 26 ETS LINDGREN L P JANUARY 2003 REV D PN 399212 ILLUSTRATIONS Archived 3 18 10 ...

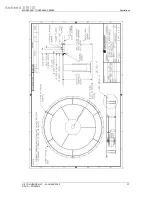
Page 31: ...MODEL 2081 TURNTABLE SERIES Illustrations ETS LINDGREN L P JANUARY 2003 27 REV D PN 399212 Archived 3 18 10 ...

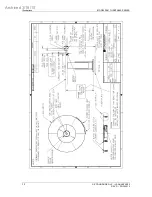
Page 32: ...Illustrations MODEL 2081 TURNTABLE SERIES 28 ETS LINDGREN L P JANUARY 2003 REV D PN 399212 Archived 3 18 10 ...

Page 33: ...MODEL 2081 TURNTABLE SERIES Illustrations ETS LINDGREN L P JANUARY 2003 29 REV D PN 399212 Archived 3 18 10 ...

Page 34: ...Illustrations MODEL 2081 TURNTABLE SERIES 30 ETS LINDGREN L P JANUARY 2003 REV D PN 399212 Archived 3 18 10 ...

Page 35: ...MODEL 2081 TURNTABLE SERIES Illustrations ETS LINDGREN L P JANUARY 2003 31 REV D PN 399212 Archived 3 18 10 ...

Page 36: ...Illustrations MODEL 2081 TURNTABLE SERIES 32 ETS LINDGREN L P JANUARY 2003 REV D PN 399212 Archived 3 18 10 ...

Page 37: ...MODEL 2081 TURNTABLE SERIES Illustrations ETS LINDGREN L P JANUARY 2003 33 REV D PN 399212 Archived 3 18 10 ...

Page 38: ...Illustrations MODEL 2081 TURNTABLE SERIES 34 ETS LINDGREN L P JANUARY 2003 REV D PN 399212 Archived 3 18 10 ...

Page 39: ...MODEL 2081 TURNTABLE SERIES Illustrations ETS LINDGREN L P JANUARY 2003 35 REV D PN 399212 Archived 3 18 10 ...

Page 40: ...Illustrations MODEL 2081 TURNTABLE SERIES 36 ETS LINDGREN L P JANUARY 2003 REV D PN 399212 Archived 3 18 10 ...

Page 41: ...MODEL 2081 TURNTABLE SERIES Illustrations ETS LINDGREN L P JANUARY 2003 37 REV D PN 399212 Archived 3 18 10 ...

Page 42: ...Illustrations MODEL 2081 TURNTABLE SERIES 38 ETS LINDGREN L P JANUARY 2003 REV D PN 399212 Archived 3 18 10 ...

Page 43: ...MODEL 2081 TURNTABLE SERIES Illustrations ETS LINDGREN L P JANUARY 2003 39 REV D PN 399212 Archived 3 18 10 ...

Page 44: ...Illustrations MODEL 2081 TURNTABLE SERIES 40 ETS LINDGREN L P JANUARY 2003 REV D PN 399212 Archived 3 18 10 ...

Page 45: ...MODEL 2081 TURNTABLE SERIES Illustrations ETS LINDGREN L P JANUARY 2003 41 REV D PN 399212 Archived 3 18 10 ...

Page 46: ...Illustrations MODEL 2081 TURNTABLE SERIES 42 ETS LINDGREN L P JANUARY 2003 REV D PN 399212 Archived 3 18 10 ...

Page 47: ...MODEL 2081 TURNTABLE SERIES Illustrations ETS LINDGREN L P JANUARY 2003 43 REV D PN 399212 Archived 3 18 10 ...

Reviews: