


9
A s s e m b ly A n d o p e r A t i n g i n s t r u c t i o n s | e n e x h o - c i – i n d o o r c A m e r A
H o W t o V i E W i m A g E S f r o m t H E C A m E r A ?
H o W t o C o n f i g u r E t H E W i - f i C o n n E C t i V i t y o f t H E C A m E r A ?
H o W t o C o n f i g u r E y o u r r o u t E r t o A C C E S S f r o m t H E o u t S i D E ?
Run the application and go to "Security systems". In the Selec-
tion tab choose one of the cameras. You can find it by looking
for the cameras symbol
located before the name.
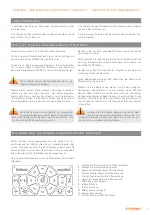
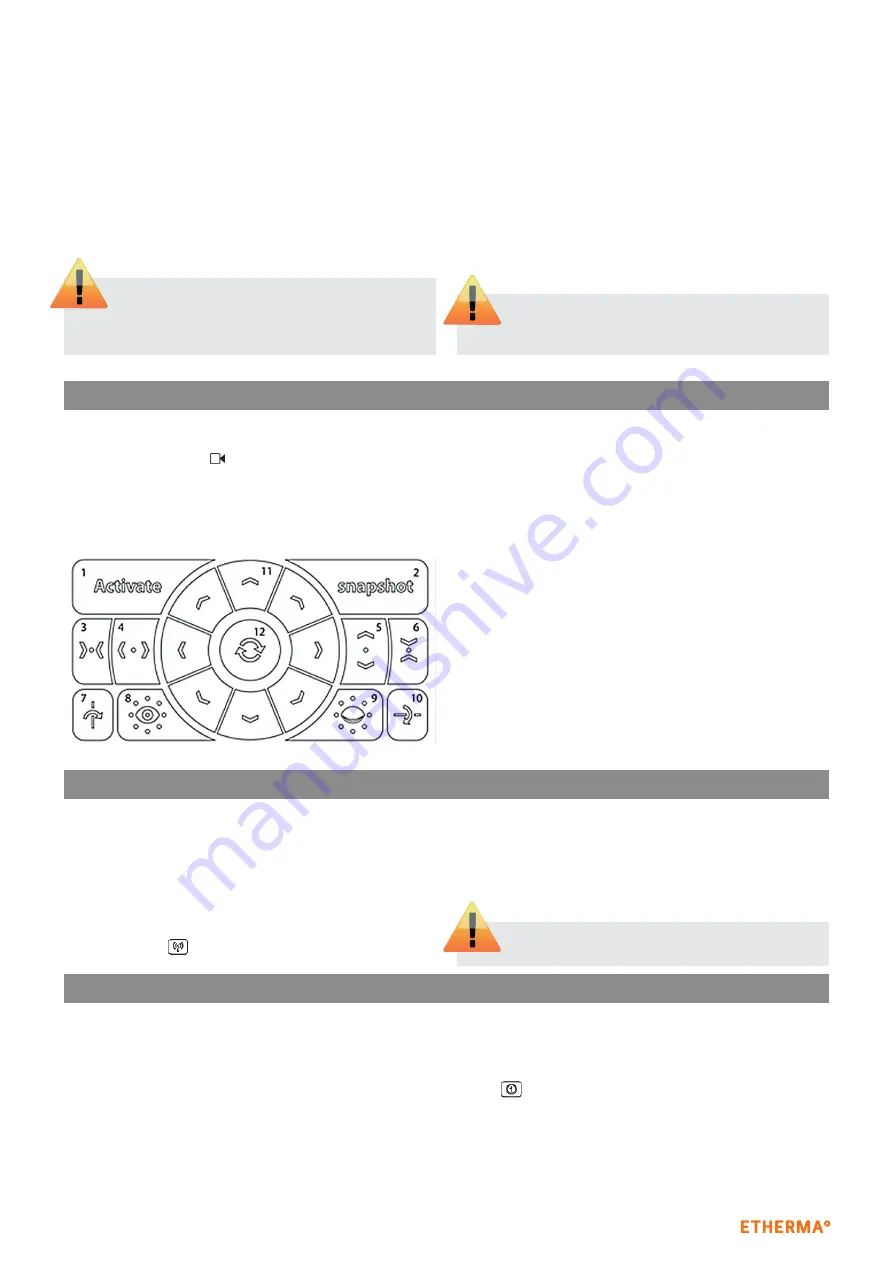
Once selected, you are able to see live images from the camera.
Below the live image you can see a control panel similar to the
following:
1. Enable / Disable the presence detector
2. Take a snapshot
3. Stop horizontal patrol
4. Start horizontal patrol
5. Start vertical patrol
6. Stop vertical patrol
7. Mirror image horizontally
8. Turn on infrared light
9. Turn off infrared light
10. Mirror image vertically
11. Movement cursors
12. Start a 360º sweep
After selecting the zone, the looking for new cameras process
starts. Remember that both, the camera and the device run-
ning the app, must be connected to the same router as the
eNEXHO-NT module.
After the search process ends, the app shows a list of cameras
found.
Select a camera and wait until the configuration process ends
(This may take a few minutes. Please, do not turn off the came-
ra or the application)
Once the configuration process finish, at the setup menu
After a few seconds you can see the setup menu of the camera.
Enter a name for the camera and press "Save".
The camera has been added to the system.
If the camera is not listed, check the connections and
the router configuration. If the problem remains, re
-
set the camera to factory defaults (See "How to reset the
camera to factory defaults?").
Do not turn off the rest of the cameras while you are
installing new ones. All previously installed cameras
must be connected before trying to add a new one.
Run the application and go to "Security systems". Within this
menu, select the "Configure" tab. Enter the security password
(default 0000) if the app requested.
Choose the "Edit installed sensors" option and then the camera
you want to configure.
At the bottom you can see four buttons, press the wireless con-
figuration button
.
After a few seconds you can see all the Wi-Fi signals found
around the camera. Choose the correct one and type the pass-
word (press refresh if your network doesn't appear in the list).
To access from outside your local network, you must configu
-
re your router to authorize such access. You need to access to
your router configuration in order to make a port-forwarding.
First of all, to get the needed information about the camera you
have to run
the application and go to "Security systems". Within this menu,
select the "Configure" tab. Enter the security password (default
0000) if the app requested.
Choose the "Edit installed sensors" option and then the camera
you want to configure.
At the bottom you can see four buttons, press the information
button
. There are 2 useful values in the dialog box: IP and
port. Record these values in order to use them later.
To do the port-forwarding you will need a device with an Inter-
net browser connected to the router by Wi-Fi or better wired
directly to it.
The security encryption of your network must be
WPA or WPA2.


