


8
A s s e m b ly A n d o p e r A t i n g i n s t r u c t i o n s | e n e x h o - c i – i n d o o r c A m e r A
t E C H n i S C H E D A t E n
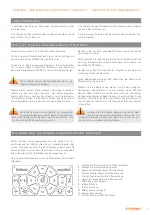
C A m E r A p l A C E m E n t
D A t A S H E E t
C o m m i S S i o n i n g
It is recommended to locate the camera away from:
› Heat sources
› Flammable products
› Liquids
If you are going to use the camera as a presence detector, avoid
placing it in locations that may cause false alarms. For examp-
le avoid areas where the headlights of approaching vehicles on
the outside, could result on light changes in the monitorized
zone by the camera.
The cameras are very sensitive to changes on the monitorized
image, but the system allows configuring some parameters in
order to reduce false alarms.
For more information, see later in this manual "How to change
the parameters of presence detection?"
1. Connect the antenna. Screw the antenna into the back of the
camera.
2. Connect the network cable between the camera and a LAN
port of your router.
3. Connect the power cord to the camera and plug it into the
mains.
4. After a few seconds the camera is ready to be added to the
system.
The indoor camera eNEXHO-CI, allows you to see remotely
your installation. Also, if you wants it could send alerts to your
device in case of intrusion.
A eNEXHO-NT module and a eNEXHO App compatible device
are required in order to install and use the camera.
Once installed and configured, the camera could act as a pre
-
sence detector. The camera will monitor the zone in which it is
installed and it could send an alert if an intrusion is detected.
With your choice of ETHERMA you have decided on an inge-
nious heating solution. We thank you for your confidence. In
us you have a competent partner with more than 30 years of
experience. ETHERMA relies on constant innovation , highest
product quality and modern design.
We support you with comprehensive personalized services and
find the right product solution for you.
The following instructions will help you, to use your ETHERMA
quality product as effective as possible. They contain important
information about safety, installation, use and maintenance of
the devices. Please read the information in this instruction
carefully and keep them for feedback at a later time on.
G E N E R A L I N F O R M A T I O N
H o W t o A D D A C A m E r A t o t H E S y S t E m ?
You must have previously followed the steps listed in "Commis-
sioning".
To the remaining process you will need a device with the latest
version of the eNEXHO app installed.
Run the application and go to "Security systems". Within this
menu, select the "Configure" tab. Enter the security password
(default 0000) if the app requested.
Select the option "Add new sensors" and then select the sensor
type "Camera". The application will now ask you for the zone in
which you want to install the camera. You can choose between
the existing zones or you can create a new zone.
Power supply: . . . . . . . . . . . . . . . . . . . . . . . . . 230 V AC – 5 V CC
Dimensions (length, width, height): . . . . . . . 145x105x125 mm
Weight:. . . . . . . . . . . . . . . . . . . . . . . . . 418gr (with accessories)
› Color CMOS sensor, 300k pixels (640x480)
› MJPEG video compression, 15 fps (VGA)
› ADPCM audio compression
› Viewing angle 67 º
› Night vision with infrared light (8m)
› Ability to move on x and y axis
x-axis angle : 300 º
y-axis angle: 120 º
› Connectivity Ethernet 10/100Mbps RJ-45
› Wi-Fi 802.11b/g/n compatible
› WPA/WPA2 Wi-Fi security
› Remote access via Internet.
› Presence detection
›
Free alerts by using PUSH notifications
› Settings for simultaneous detection in order to avoid false alarms
› e-mail sending of detection pictures
In order to avoid false alarms, it is recommended to
use at least two cameras for each monitorized zone.
See "How to change the parameters of presence detection?"
in this manual.
It is recommend to change the default passwords by
others of your trust.


