


Lumascope 500/400 Startup Guide
10
Etaluma, Inc. | 3129 Tiger Run Court, Suite 112 | Carlsbad, CA 92010 | 760-298-2355 | www.etaluma.com
For questions or comments, telephone the phone number below, email
, or submit an inquiry
through the Etaluma website at
www.etaluma.com/contact/
. An Etaluma representative will be happy to assist you.
Appendix A
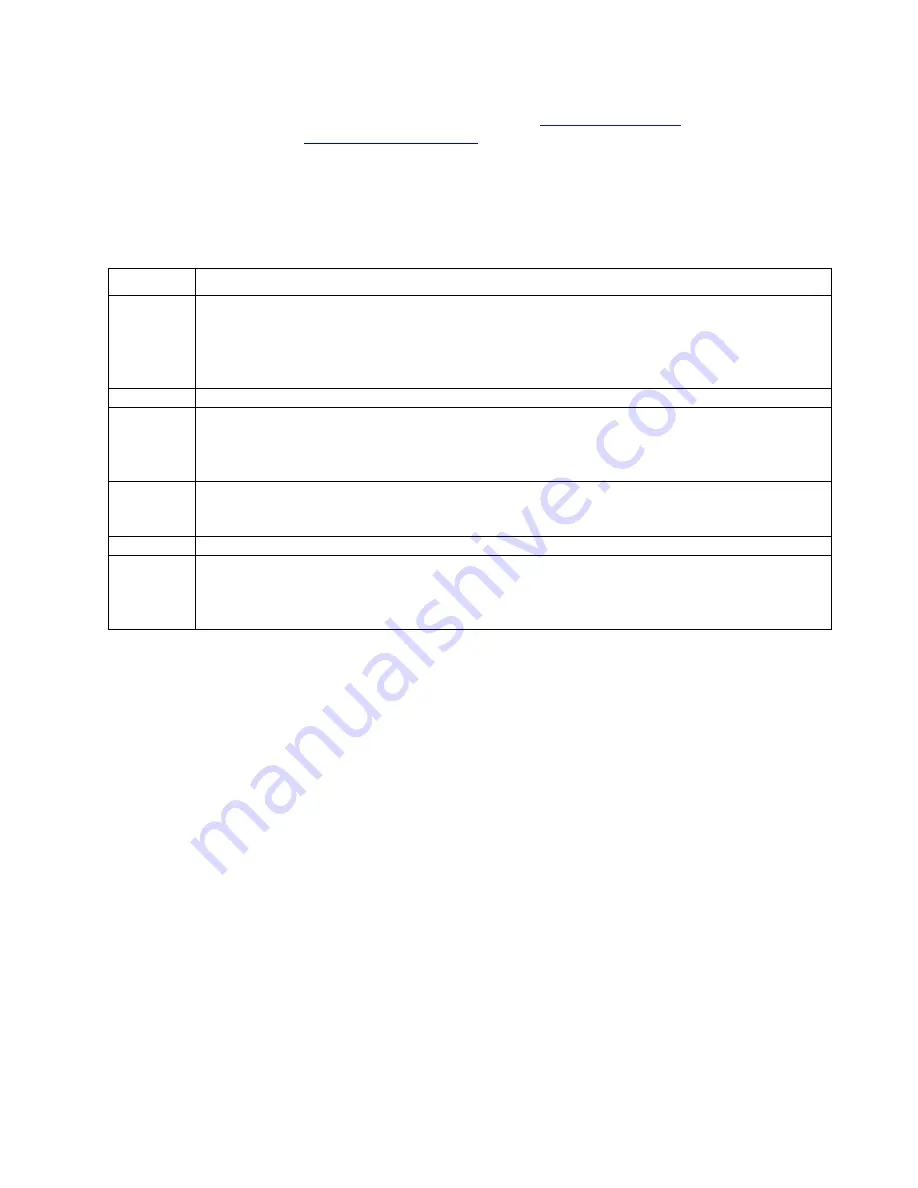
Versions of Lumaview 500/400
Version
Changes Compared to Previous Version
15.9.23
Improvements in time-lapse image capture and video creation, including use of Duration and Interval
(both in HH:MM:SS format) for setting time points, automatic creation of AviSynth script files, and
images named with numbers in sequence as needed by AviSynth. Added pixel-intensity display in Live
Image Window status bar for determining level of pixel saturation. Added creation of log file for each
channel during time-lapse; files contain file sequence number, date and time in ms resolution.
15.5.11
Red/green/blue color gain adjustment
15.3.31
Added option to select between LS500 and LS400. When LS400 is selected, fluorescent LED controls
are hidden in Illumination and Time Lapse dialog boxes. LumaView changed to Lumaview, eliminated
option for saving images by left clicking of mouse, eliminated playing of WAV file when image is
saved.
14.10.28
(a) Fixed a bug where the incorrect data rate was displayed in the live image window; (b) Added the
exposure time (in milliseconds) to the 'Exposure' dialog; (c) Fixed a bug in that the false video rate
was saved to the AviSynth script file.
14.9.3
Scale-bar bug fix. The scale was incorrect.
14.7.9
Video capture at full-frame rate using freeware – the recommended freeware is used after the
images are captured, the same freeware could be used to convert time-lapse images to video too;
optional scale-bar on image; optional date/time stamp on image; improved help; finer LED brightness
granularity; robust behavior for plugging in and out of the USB cable; simplified dialog boxes.
Appendix B
Installing Lumaview 500/400 on a Computer with a Different Lumaview Version Installed
1.
If Lumaview 600-Series (which may be Lumaview 600 or Lumaview 620) is already installed on your
computer, it may be necessary to uninstall the software program before installing Lumaview 500/400.
Go to C:/Program (x86)/Etaluma folder and inside will be a folder named Lumaview 620 or
Lumaview600. Go to Control Panel/Programs & Features, right click on the Lumaview 620 or 600 file,
and click Uninstall. After uninstall is completed, verify that the Lumaview 620 or 600 folder is now gone
from the C:/Program (x86)/Etaluma folder. You are now ready to install Lumaview 500/400 (Section I.E
above).
2.
If you have an older version of Lumaview 500/400 already installed and want to replace it with the
newest version, download the new version from the Etaluma website (Section I.C. above). You will
most likely not see the Device Driver Installation Wizard open because the new version uses the same
driver.
3.
If you previously installed any version of Lumaview 500/400 and then installed Lumaview 600-Series
over it (replaced the 500/400 version), the 500/400 driver should still be present and you most likely
will not see the Device Driver Installation Wizard open. This is because the 500/400 driver (Windows


