background image

22

10.4. Disabling the pulse signal and power supply

To avoid “twitching” of conventional servos you can disable the 

pulse signal being sent to the servo after it reaches the end position. 
Further you can set the power supply to each individual servo be 

interrupted after it reaches the end position. You may refer to CV 

50 to do these settings.

Bit

Description

0

Initial impulse after command received: If set, then the pulse 

signal will be sent to the servo only after first command is given 

to the servo.

1

Timeout impulse after position reached: After the servo reaches 

the end position, the signal is turned off.

2

Power on servo only while moving: The power supply to the 

servo is interrupted usually and enabled only while the servo 

should be moving

11. RailCom® 

RailCom® is a technology which was developed by the company 

Lenz Elektronik, Giessen for transmitting information from the de-

coder back to the digital control unit. The past DCC system could 

only transmit data from the control unit to the decoder but could 

never verify whether the data actually arrived or not.

The following information can be sent from the SwitchPilot deco-

der to the central unit:

CV Information:

 The decoder can return all CV values to the cen-

tral unit via Railcom®. A programming track will not be necessary 

in the future.

11.1. How to activate RailCom®  

All SwitchPilot decoders are capable of using Railcom®. It is disab-

led by factory default and can be enabled as follows:
Set CV 29 Bit 3.
Set CV 28 Bit 1.

The first time the Railcom® function is being enabled it should 

be done on the programming track (see sections 7 and 8). After 

Railcom® has been turned on you can directly continue with the 

other programming steps.

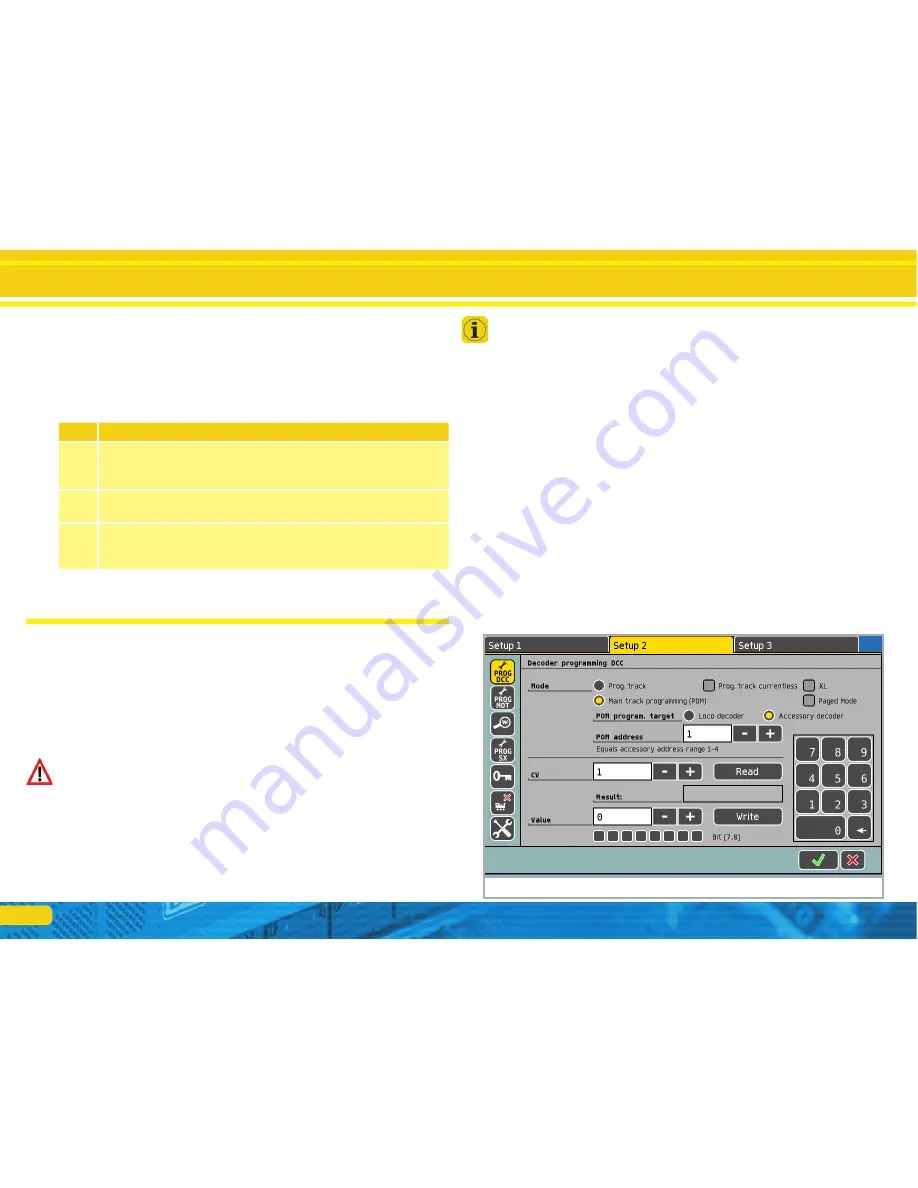
11.2. How to read out CVs with RailCom® and ESU ECoS

After a successful Railcom® activation you can directly read CVs 

from the main track – as long as this is being supported by your 

central unit. The approach to do this for the ESU ECoS is displayed 

here. In our example a decoder which is configured for turnout 

numbers 13 – 16 needs to be read. The turnout numbers 13 – 16 

correspond to decoder address 4. 

•  Go to the general programming menu of the ECoS

• Choose „Main Track Programming, „DCC“, and then „Solenoid 

Accessories“

• Enter the decoder address of the SwitchPilot on the bottom right. 

In our example, this is number 4.

• Enter the number of the CV that you would like to read in the  

CV field

• Press the „Read“ button

• The read value must be displayed immediately.

Servo outputs

Figure 13: SwitchPilot programming

Summary of Contents for 51801

Page 1: ...Instruction Manual 4 Edition December 2017 P N 04213 13564 SwitchPilot V2 0 SwitchPilot Extension V1 0 SwitchPilot V2 0...

Page 2: ...zing electric frogs 13 7 Decoder settings programming 14 7 1 Changeable decoder settings 14 7 1 1 Configuration Variables CV 14 7 1 1 1 Standardization regarding NMRA 14 7 1 1 2 Bits und Bytes 14 7 2...

Page 3: ...ot suitable for children under 14 years of age Inappropriate use may result in injury due to sharp points and edges M rklin and mfx is a registered trademark of the company Gebr M rklin and Cie GmbH G...

Page 4: ...as outlined in this manual for wiring any external components Other circuitry may cause da mage to the SwitchPilot SwitchPilot is not water proof It is not intended for outside use If you use this pro...

Page 5: ...021 Central Station or with DCC compliant command stations SwitchPilot Decoders are able to control all current DCC program ming modes and can be set up either on the main track or the programming tra...

Page 6: ...equested the pulse signal can be disabled when the end po sition of the lever is reached Furthermore the power supply to each servo can be interrupted to prevent any twitching of some cheaper servos D...

Page 7: ...e du ration Subject to the pulse duration and also in continuous mode it may happen that several outputs are on at the same time Please note that the total current of all connected loads must not exce...

Page 8: ...on your layout 6 1 Connecting elements of the SwitchPilot Figure 1 shows the SwitchPilot a Wire turnouts signals un couplers or similar devices to the ter minals of the transistor outputs 1 to 4 The t...

Page 9: ...Separate power supply For larger layouts with many devices controlled by SwitchPilots and simultaneously active we recommend to utilise a separate power supply in this manner the power for switching t...

Page 10: ...The needed ground solder pad is not available on all SwitchPilot sur faces 6 4 2 Wiring daylight signals and light bulbs or LEDs If you use daylight signals with incandescent lamps light bulbs or LEDs...

Page 11: ...d They must have a three pole terminal and operate on a positive pulse The SwitchPilot provides 5V to the servo Simply insert the wire from the servo into the appropriate socket of the SwitchPilot Gen...

Page 12: ...r servo setting B is reached the terminals II and Com are connected b Terminal with ground and voltage power U DC for the use of DC turnout motors like the Tortoise motor 6 6 2 Wiring a motor drive Th...

Page 13: ...6 6 4 Polarizing electric frogs You may polarize supply power of the correct polarity to the electro frog of your turnout If you would like to use a servo with your turnout it is most often necessary...

Page 14: ...s CV All SwitchPilot decoders follow the CV concept which was deve loped in the United States The name CV Configuration Variable is derived from the fact that the memory cells being described above ar...

Page 15: ...CC norm while some manufacturers e g Lenz count the bits from 1 to 8 Please keep this in mind when programming our decoders with such systems 7 2 1 Programming on the programming track For programming...

Page 16: ...Marklin central unit e g 6021 Mobile Station Central Station is not possible due to the missing DCC format However the most important properties can still be changed The desired turnout numbers can b...

Page 17: ...ing of an address on one hand and that all outputs stay together in one block on the other hand 8 2 Decoder address The desired address is divided internally and put into CV 1 and CV 9 Please never mi...

Page 18: ...3 164 41 41 0 165 166 167 168 42 42 0 Turnout number Address CV1 CV9 169 170 171 172 43 43 0 173 174 175 176 44 44 0 177 178 179 180 45 45 0 181 182 183 184 46 46 0 185 186 187 188 47 47 0 189 190 191...

Page 19: ...40 1 417 418 419 420 105 41 1 421 422 423 424 106 42 1 425 426 427 428 107 43 1 429 430 431 432 108 44 1 Turnout number Address CV1 CV9 433 434 435 436 109 45 1 437 438 439 440 110 46 1 441 442 443 44...

Page 20: ...mal operating mode and the LED extinguishes Should you have programed another turnout instead of the first one of the group of four the correct group will be automatically detected and programed 8 4 2...

Page 21: ...7 10 Features of servo outputs Two end positions A and B as well as a turning speed can be assigned to each servo output You can also define when the pulse signal is sended to the servo and if power s...

Page 22: ...he central unit CV Information The decoder can return all CV values to the cen tral unit via Railcom A programming track will not be necessary in the future 11 1 How to activate RailCom All SwitchPilo...

Page 23: ...e solenoid device with a control panel as described in the ECoS manual in section 13 3 If the current setting does not coincide with the desired setting it will be indicated with a small exclamation m...

Page 24: ...o each relay output Example You would like to operate relay outputs 1 and 2 together with servo outputs 5 6 but relay outputs 3 and 4 should be switched in parallel to transistor outputs 3 4 Therefore...

Page 25: ...r hotline only in case of complex enquiries that can t be dealt with by email or fax The hotline is often very busy and you may encounter delays Rather send an email or fax and also check our website...

Page 26: ...er supply Maximum supply voltage 18V AC or 24V smooth DC Transistor outputs 1 to 4 4 outputs with two transistors each each with 1 5A continuous 2 0A peak 20 seconds Total maximum load of device 2 0A...

Page 27: ...c 2 31 Alternating Out A and Out B are alternately active blinker Duration of On status multiple of 130 msec 32 63 Bi stable k84 compatable either Out A or Out B is active variable 64 4 Configuration...

Page 28: ...munication RailCom communication is switched off 0 RailCom communication is permitted 8 7 Decoder is DCC Accessory Decoder 128 read only cannot be reprogramed 33 Function output status Current status...

Page 29: ...r to store the address 1 63 1 36 Decoder address 2 MSB Higher 3 bits bit 6 8 of the second decoder address for the outputs 5 and 6 Is used in conjunction with CV 35 in order to store the address Value...

Page 30: ...n Value 0 Relay 1 decelerated switch addit SwitchPilot Switches with 2nd addr 1 1 Relay 2 decelerated switch addit SwitchPilot Switches with 2nd addr 2 2 reserved 4 3 reserved 8 50 Impuls Configuratio...

Page 31: ...ise as possible and return it with your faulty pro duct Extend of warranty exclusions This warranty covers free of charge repair or replacement of the faulty part provided the failure is demonstrably...

Page 32: ...outputs 1 4 Short circuit Servo outputs Dead On Arrival no function right out the box No function anymore Programming on programming track 3 Error description 4 Receipt of pay Please return the goods...

Reviews: