background image


ESI - Copyright © 2012 

Revision 1, July 2012 


www.esi-audio.com


Summary of Contents for Juli@ XTe

Page 1: ...High Quality 24 bit 192kHz 4x4 reference audio interface with swappable I O socket User s Guide ...

Page 2: ...ESI Copyright 2012 Revision 1 July 2012 www esi audio com ...

Page 3: ...ion 14 Windows XP 14 Windows Vista 7 15 Mac OS X 17 5 Juli XTe Console 18 Pull down Menu 18 Input Panel 19 Output Panel 20 Sample Rate and Clock 21 DirectWIRE 22 What is DirectWIRE 22 DirectWIRE Panel 22 DirectWIRE Examples 23 6 Setting in Applications 25 Windows Multimedia Setup 25 Mac OS X Audio MIDI Setup 25 Cubase LE 6 25 Installation 25 Initial Setup 26 7 Specifications 27 8 General Informati...

Page 4: ...z optical output 16 channel MIDI I O and an EWDM driver with DirectWIRE 3 0 functionality Key Features 2 analog input channels 2 analog output channels 24 bit 192kHz AD converter with 114dB a dynamic range 24 bit 192kHz DA converter with 112dB a dynamic range swappable socket unbalanced RCA with 10dBv or balanced TRS with 4dBu coaxial S PDIF digital input synchronisation to digital S PDIF input si...

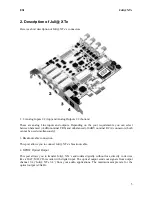
Page 5: ...alanced 10dBV nominal RCA connectors both cannot be used simultaneously 3 Breakout cable connection This port allows you to connect Juli XTe s breakout cable 4 S PDIF Optical Output This port allows you to transfer Juli XTe s audio data digitally without loss directly to devices like a DAT MD CD recorder with digital input The optical output sends out signals from output channel 3 4 Juli XTe 3 4 f...

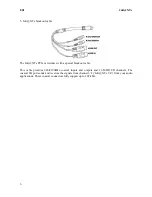
Page 6: ...h a special breakout cable This cable provides 24bit 192kHz coaxial inputs and outputs and 16 MIDI I O channels The coaxial I O port sends and receives the signals from channel 3 4 Juli XTe 3 4 from your audio applications These coaxial connectors fully support up to 192 kHz ...

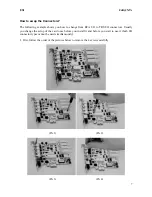
Page 7: ...rom RCA I O to TRS I O connectors Usually you change the setup of the card once before you install it and before you start to use it both I O connector types cannot be used simultaneously 1 First follow the order of the pictures below to remove the 4 screws carefully Pic 1 Pic 2 Pic 3 Pic 4 ...

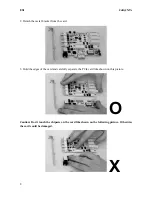
Page 8: ...acket from the card 3 Hold the edges of the card and carefully separate the PCIe card like shown on this picture O O Caution Don t touch the chipsets on the card like shown on the following picture Otherwise the card could be damaged X X ...

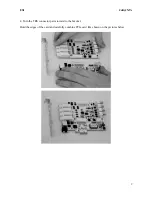
Page 9: ...ESI Juli XTe 9 4 Turn the TRS connector parts toward to the bracket Hold the edges of the card and carefully combine PCIe card like shown on the pictures below ...

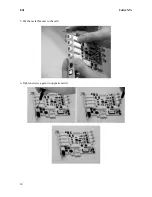
Page 10: ...ESI Juli XTe 10 5 Put the metal bracket to the card 6 Tighten screws again in opposite order ...

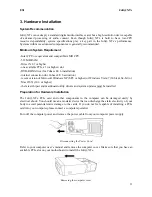
Page 11: ...oft Windows XP SP2 or higher or Windows Vista 7 32 bit 64 bit or Mac OS X 10 6 or higher the latest chipset and mainboard utility drivers and system updates must be installed Preparation for Hardware Installation The Juli XTe PCIe card and other components in the computer can be damaged easily by electrical shock You should use an anti static device that can discharge the static electricity of you...

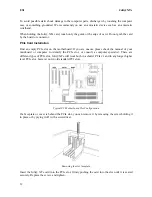
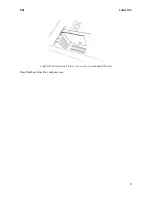
Page 12: ...e check the manual of your mainboard or computer to identify the PCIe slot or consult a computer specialist There are different types of PCIe slot Juli XTe will work both in a shorter PCIe x1 and in any longer higher level PCIe slot however not in old standard PCI slots Typical PC Motherboard Slot Configuration If a faceplate or cover is behind the PCIe slot you can remove it by removing the screw...

Page 13: ...ESI Juli XTe 13 Juli XTe Installed in a PCIe x1 slot next to two standard PCI slots Once finished close the computer case ...

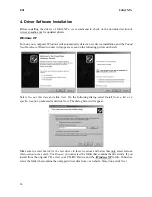
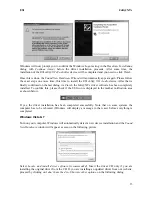
Page 14: ...he left Select No not this time and click Next On the following dialog select Install from a list or a specific location Advanced and click Next The dialog below will appear Make sure to select Search for the best driver in these locations and below that only select Include this location in the search Via Browse you can select the folder that contains the driver data If you install from the origin...

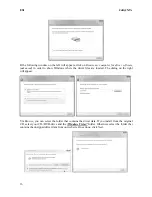
Page 15: ...etely installed To confirm this please check if the ESI icon is displayed in the taskbar notification area as shown below If yes the driver installation has been completed successfully Note that on some systems the computer has to be rebooted Windows will display a message in that case before everything is completed Windows Vista 7 Turn on your computer Windows will automatically detect a new devi...

Page 16: ...indows where the driver files are located The dialog on the right will appear Via Browse you can select the folder that contains the driver data If you install from the original CD select your CD DVD drive and the Windows Vista 7 folder Otherwise select the folder that contains the unzipped driver data from our website Once done click Next ...

Page 17: ... completed successfully Mac OS X To install Juli XTe under Mac OS X insert the CD into your system and navigate in Finder to the Mac OS X folder on the CD Alternatively you can download the latest version of the driver from our website You will find a file called Juli Mac vx_yy dmg where x_yy stands for the driver version number Double click on this file and a new window with the installer opens N...

Page 18: ...g on the icon in the Applications folder when using Mac OS X The following dialog will appear Pull down Menu The Juli XTe console includes a pull down menu bar that contains the configuration menus for Juli XTe 1 File Exit File Exit will close the Juli XTe Console window but it will not shut down the Console You can always launch the Console by clicking ESI icon on the system tray ...

Page 19: ... typically select a sample size between 64 512 Sample sizes of 48 1024 and 2048 are used in special circumstances of which 48 is reserved for very fast and reliable ASIO driver working environments The factory default setting is 256 4 Config Factory Default It resets the Console to default settings 5 Config Always On Top This enables to place the Console on top of every open window which makes it ...

Page 20: ...cture The S PDIF input signal is then routed to output 1 2 and you can monitor the S PDIF input signal in real time The monitoring level can be set using the mouse mouse wheel or cursor keys MON When you activate this button input monitoring for monitoring via the analog output 1 2 level fader will appear for this channel MUTE Select this button to mute each signal source Output Panel Analog Outpu...

Page 21: ...or cursor keys MUTE Select this button to mute each signal source Sample Rate and Clock Sample Rate Selects the sample rate for Juli XTe The green lit will indicate current sample rate Juli XTe supports 44 1 48 88 2 96 176 4 192 kHz as sample rates Select AUTO to match the sample rate of the played audio source automatically a red light shows that AUTO is on Deselecting Auto mode allows you to set...

Page 22: ...n below DirectWIRE What is DirectWIRE DirectWIRE is a driver technology developed by ESI which can be used for routing audio streams internally within applications using EWDM Audio MIDI Drivers exclusively developed by ESI With the DirectWIRE router an application can record from other application s audio outputs without external wiring or any loss of data when they are running at the same time Di...

Page 23: ...e Cakewalk Audition Vegas etc WDM section represents Multi MME application s I O Ex SONAR when using WDM KS PowerDVD WinDVD etc ASIO section represents ASIO application s I O Ex Cubase Reason Nuendo SONAR when using ASIO Samplitude etc GSIF section represents GSIF application like GigaStudio Note that some applications support multiple driver modes DirectWIRE Examples Example 1 Recording from WinA...

Page 24: ...ample 2 Recording from WinAmp MME to SONAR WDM Example 3 Recording from WinAmp MME to Cubase Logic Nuendo ASIO Example 4 Recording from GigaStudio GSIF to SONAR WDM Example 5 Recording from GigaStudio GSIF to Cubase ASIO ...

Page 25: ...t or System Output device if required While audio production and editing applications usually provide an option inside their preferences to select Juli XTe as recording and playback device many general standard applications such as iTunes for example are usually accessing the Default Output device selectable in the Audio MIDI Setup dialog If you want to change settings of Juli XTe you need to sele...

Page 26: ...ESI Juli device on the left The dialog now lists all input and output channels Note that the Control Panel button has no effect Confirm your changes by clicking OK After that its time to select the input and output channels From the Devices menu select VST Connection The VST Connections window appears Configure your input bus in the Inputs tab and your output bus under Outputs A bus can be either ...

Page 27: ...nuation Control 63dB 0dB 0 5dB step size Digital Audio 4 Samplerate 44 1 48 88 2 96 176 4 192KHz 5 A D Converter AK5385A 1 Signal to Noise Ratio 114dB A weighted fs 48kHz 2 Dynamic Range 114dB 60dBFS with A weighted fs 48kHz 3 Inter channel Isolation 120dB 4 Resolution 24 Bit 6 D A Converter AK4358 1 Signal to Noise Ratio 112dB A weighted fs 44 1kHz 2 Dynamic Range S N 112dB 60dBFS with A weighted...

Page 28: ... to provide reasonable protection against harmful interference when the equipment is operated in a commercial environment This equipment generates uses and can radiate radio frequency energy and if not installed and used in accordance with the instruction manual may cause harmful interference to radio communications Operation of this equipment in a residential area is likely to cause harmful inter...

Reviews: