ESAB ES 95i
Manual 0-5458
4-7 OPERATION
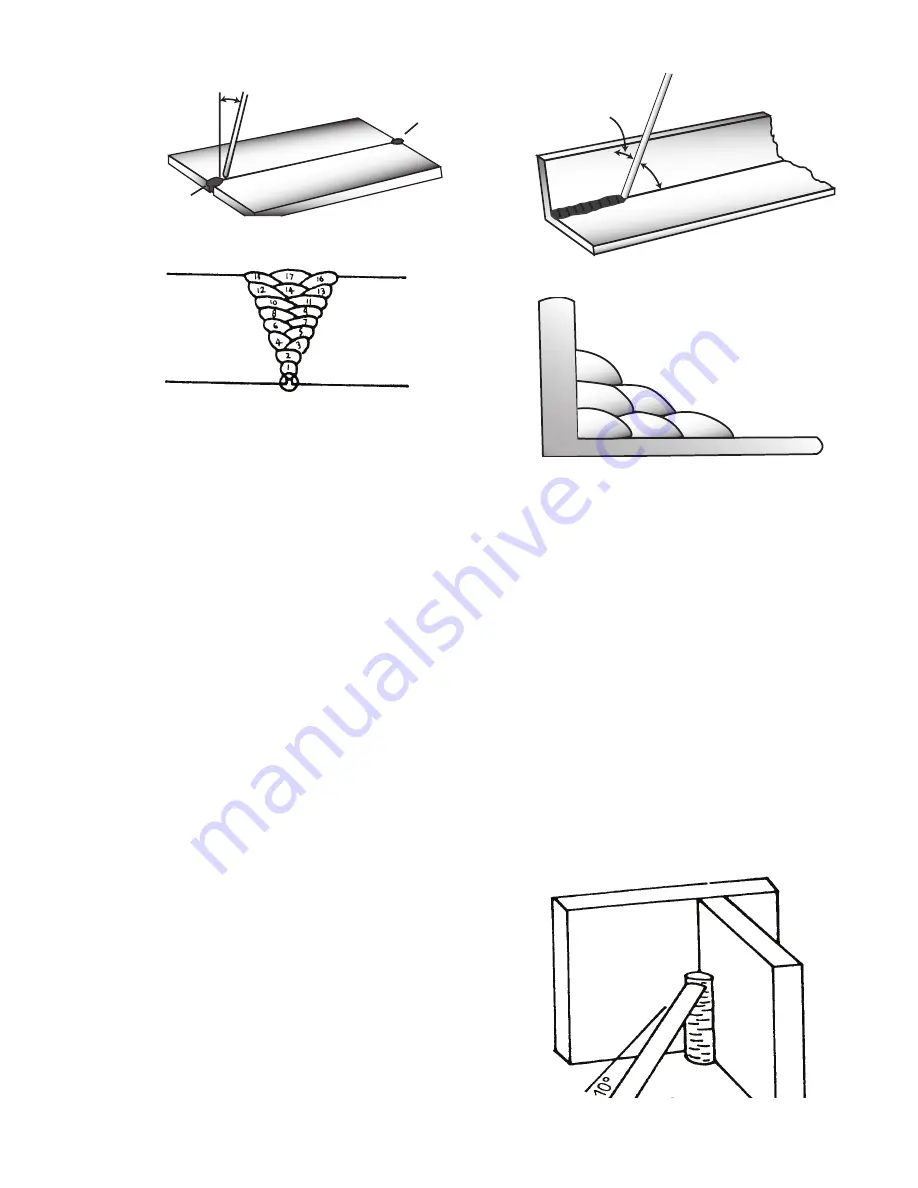
Art # A-07697_AB
Tack Weld
20°-30°
Electrode
Tack Weld
Figure 4-12: Butt weld
Art # A-07698
Figure 4-13: Weld build up sequence
Heavy plate will require several runs to complete the joint. After
completing the first run, chip the slag out and clean the weld
with a wire brush. It is important to do this to prevent slag being
trapped by the second run. Subsequent runs are then deposited
using either a weave technique or single beads laid down in the
sequence shown in Figure 4-13. The width of weave should not
be more than three times the core wire diameter of the electrode.
When the joint is completely filled, the back is either machined,
ground or gouged out to remove slag which may be trapped in
the root, and to prepare a suitable joint for depositing the backing
run. If a backing bar is used, it is not usually necessary to remove
this, since it serves a similar purpose to the backing run in
securing proper fusion at the root of the weld.
B.
Fillet Welds
These are welds of approximately triangular cross-section made
by depositing metal in the corner of two faces meeting at right
angles. Refer to Figure 4-5.
A piece of angle iron is a suitable specimen with which to begin,
or two lengths of strip steel may be tacked together at right
angles. Using a 1/8" (3.2mm) E7014 electrode at 120 amps,
position angle iron with one leg horizontal and the other vertical.
This is known as a horizontal-vertical (HV) fillet. Strike the arc
and immediately bring the electrode to a position perpendicular
to the line of the fillet and about 45° from the vertical. Some
electrodes require to be sloped about 20° away from the
perpendicular position to prevent slag from running ahead of
the weld. Refer to Figure 4-14. Do not attempt to build up much
larger than 1/4" (6.4mm) width with a 1/8" (3.2mm) electrode,
otherwise the weld metal tends to sag towards the base, and
undercut forms on the vertical leg. Multi-runs can be made as
shown in Figure 4-15. Weaving in HV fillet welds is undesirable.
Art # A-07699_AB
45° from
vertical
60° - 70° from line
of weld
Figure 4-14: Electrode position for HV fillet weld
Art # A-07700_AB
1
2
3
4
5
6
Figure 4-15: Multi-runs in HV fillet weld
C.
Vertical Welds
1. Vertical Up
Tack weld a three feet length of angle iron to your
work bench in an upright position. Use a 1/8" (3.2mm)
E7014 electrode and set the current at 120 amps. Make
yourself comfortable on a seat in front of the job and
strike the arc in the corner of the fillet. The electrode
needs to be about 10° from the horizontal to enable a
good bead to be deposited. Refer Figure 4-16. Use a
short arc, and do not attempt to weave on the first run.
When the first run has been completed de-slag the
weld deposit and begin the second run at the bottom.
This time a slight weaving motion is necessary to cover
the first run and obtain good fusion at the edges. At the
completion of each side motion, pause for a moment
to allow weld metal to build up at the edges, otherwise
undercut will form and too much metal will accumulate
in the centre of the weld. Figure 4-17 illustrates
multi-run technique and Figure 4-18 shows the effects
of pausing at the edge of weave and of weaving too
rapidly.
Art # A-07701
Figure 4-16: Single run vertical fillet weld
Summary of Contents for ES 95i
Page 6: ......
Page 38: ...ESAB ES 95i APPENDIX A 4 Manual 0 5458 This Page Intentionally Blank...
Page 39: ......


