background image

CUTMASTER A60

0-5428  

INTRODUCTION 

2-3

2.05  Input Wiring Specifications

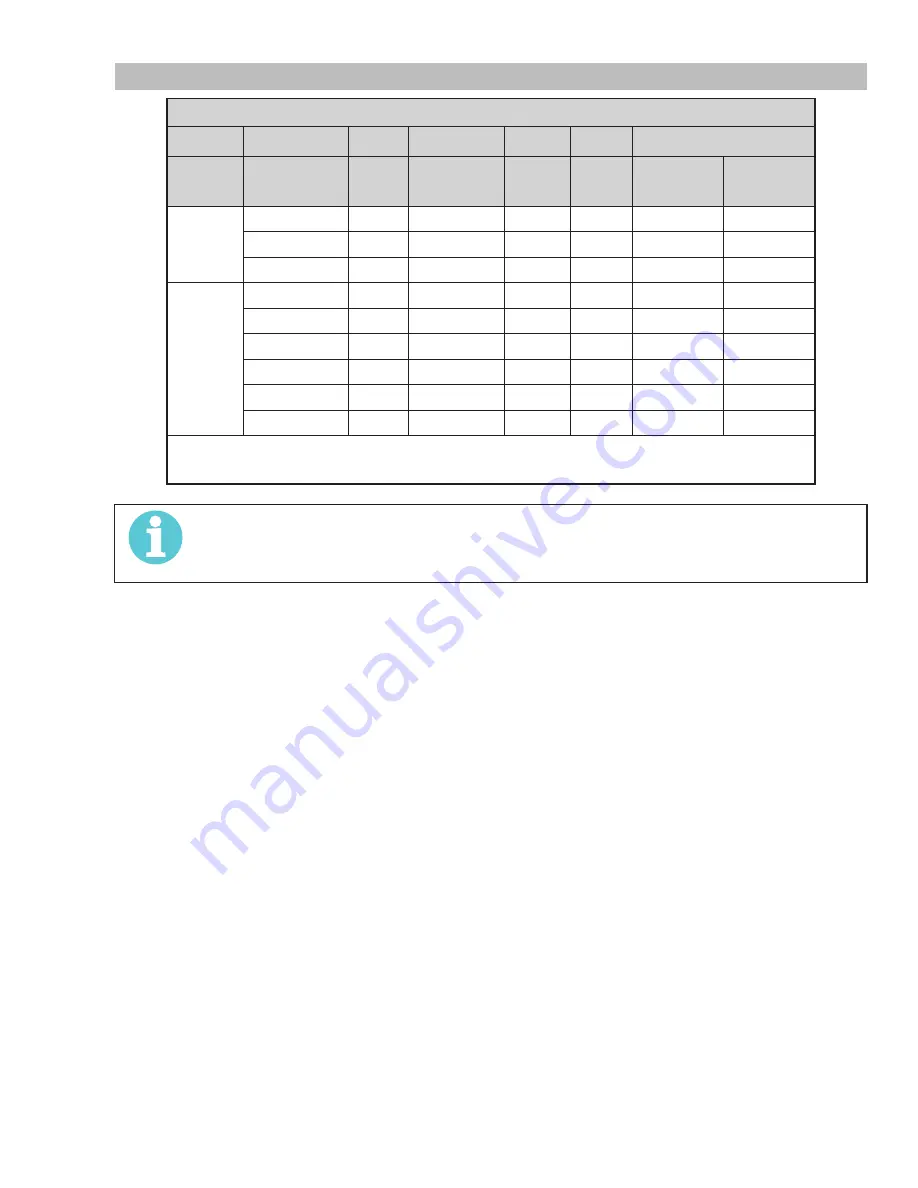
Cutmaster A60 Power Supply Input Cable Wiring Requirements

Input voltage

Freq

Power Input

Suggested Sizes

Volts

Hz

kVA

I max

I eff

Fuse (amps)

Flexible Cord 

(Min. AWG)

1 Phase

208

60

16

75

48

100

6

230

60

17

72

46

100

6

460

60

20

44

28

50

10

3 Phase

208

60

16

40

26

50

8

230

50/60

16

39

25

50

10

380

50/60

11.8

17

11

20

12

400

50/60

11.8

17

11

20

12

460

60

17

21

14

25

12

600

60

9.6

16

10

20

12

Line Voltages with Suggested Circuit Protection and Wire Sizes 

Based on National Electric Code and Canadian Electric Code


NOTE!

Refer to Local and National Codes or local authority having jurisdiction for proper wiring require-

ments.

Cable size is de-rated based on the Duty Cycle of the equipment.

Summary of Contents for CUTMASTER A40

Page 1: ...MA CUTTING SYSTEM Art A 12877 60 OUTPUT MAX OUTPUT INPUT POWER VOLTAGE VOLTAGE VOLTAGE INPUT POWER VOLTAGE PHASE PHASE AMPS 208 230V 600V 400V 460V Revision AA Issue Date August 30 2015 Manual No 0 54...

Page 2: ...take the time to read the entire manual especially the Safety Precautions They will help you to avoid potential hazards that may exist when working with this product YOU ARE IN GOOD COMPANY The Brand...

Page 3: ...his work in whole or in part without written permission of the publisher is prohibited The publisher does not assume and hereby disclaims any liability to any party for any loss or damage caused by an...

Page 4: ...reof contained in this manual and accompanying labels and or inserts when installed operated maintained and repaired in accordance with the instructions provided This equipment must be checked periodi...

Page 5: ......

Page 6: ...ver 3 1 3 05 Primary Input Power Connections 3 2 3 06 Gas Connections 3 4 SECTION 3 TORCH INSTALLATION 3T 1 3T 01 Torch Connections 3T 1 3T 02 CNC Connection 3T 1 3T 03 Automation Interface PCB with O...

Page 7: ...n 6 1 6 03 Power Supply Replacement 6 1 6 04 Replacement Power Supply Parts 6 2 6 05 Options and Accessories 6 2 6 06 Torch Replacement Parts SL100SV Torch w Solenoid on Mounting Tube 6 3 6 07 Torch C...

Page 8: ...This Page Intentionally Blank...

Page 9: ...e is unprotected when the arc is struck 3 The workplace must be suitable for the purpose be free from drafts 4 Personal safety equipment Always wear recommended personal safety equipment such as safet...

Page 10: ...wear protective clothing Protect bystanders with suitable screens or curtains FIRE HAZARD Sparks spatter can cause fire Make sure therefore that there are no inflammable materials nearby NOISE Excessi...

Page 11: ...in your area listed on back cover of this manual Include the Owner s Manual number and equipment identifica tion numbers Electronic copies of this manual can also be downloaded at no charge inAcrobat...

Page 12: ...Power Supply Duty Cycle Ambient Temperature Duty Cycle Ratings 40 C 104 F Operating Range 0 50 C IEC Rating All Units Duty Cycle 40 60 100 Current 80 Amps 65 Amps 50 Amps DC Voltage 112 106 100 NOTE T...

Page 13: ...6 100 6 460 60 20 44 28 50 10 3 Phase 208 60 16 40 26 50 8 230 50 60 16 39 25 50 10 380 50 60 11 8 17 11 20 12 400 50 60 11 8 17 11 20 12 460 60 17 21 14 25 12 600 60 9 6 16 10 20 12 Line Voltages wit...

Page 14: ...8 2 4 2 06 Power Supply Features Art A 08306 Mounting Rails Torch Leads Receptacle Control Panel Work Cable and Clamp Input Power Cord Automation Interface Cable Port Gas Inlet Port Filter Assembly In...

Page 15: ...h the plasma and secondary gas The air flow is divided inside the torch head Single gas operation provides a smaller sized torch and inexpensive operation NOTE Refer to Section 2T 05 Introduction to P...

Page 16: ...ge and torch leads length Refer to gas pressure set tings charts for each model H Direct Contact Hazard For standoff tip the recommended standoff is 3 16 inches 4 7 mm 2T 04 Options And Accessories Fo...

Page 17: ...around the plasma arc C Pilot Arc When the torch is started a pilot arc is established between the electrode and cutting tip This pilot arc creates a path for the main arc to transfer to the work D Ma...

Page 18: ...CUTMASTER A60 INTRODUCTION 0 5428 2T 4 This Page Intentionally Blank...

Page 19: ...secured to a suitable surface using the mounting rails 1 First choose an appropriate location for mount ing the power supply Choose one that allows for free movement of torch leads complies with venti...

Page 20: ...NOTE The upper screws and lower screws are not the same Do not mix them The upper screws are for threading into the plastic of the front and rear panels DO NOT use the finer threaded lower screws for...

Page 21: ...ter what order these wires are at tached 7 With a little slack in the wires tighten the through hole protector to secure the power cable 8 Reinstall the Power Supply cover See B Cover Installation 9 C...

Page 22: ...moisture and debris out of the torch 1 Attach the Single Stage Filter Hose to the Inlet Port 2 Attach the Filter Assembly to the filter hose 3 Connect the air line to the Filter The illustration shows...

Page 23: ...supplied fittings to connect the air line to the Filter A 1 4 NPT to 1 4 hose barbed fitting is shown as an example Regulator Input Gas Supply Hose 1 4 NPT to 1 4 6mm Fitting Regulator Filter Assembl...

Page 24: ...CUTMASTER A60 INSTALLATION 0 5428 3 6 This Page Intentionally Blank...

Page 25: ...g nut clockwise until it clicks DO NOT use the locking nut to pull the connection together Do not use tools to secure the connection 1 2 Art A 07885 Connecting the Torch to the Power Supply 3 The syst...

Page 26: ...while finding height is sensed and activates the signal PLATE CONTACT OUT at J1 11 SW2 set to 0 can disable this sensing During cutting the exposed tip contacting the work will close the relay contac...

Page 27: ...1 for IHT SC3000 3100 Hypertherm DIV1 6 ON 80 1 for TD iHC DIVIDE RATIO SET BY DIP SW DIV1 CONTACT OK to MOVE M ARC START 1 2 3 4 5 6 DIV1 CONTACT Art A 09819_AC ISO GND 3 Connect CNC to the power sup...

Page 28: ...Workpiece Square Pinch Block Assembly Automated and Machine Torch Set Up 3 The proper torch parts shield cup tip start car tridge and electrode must be installed for the type of operation Refer to Se...

Page 29: ...power supply Up is ON down is OFF 4 Air Gas Pressure Control The Pressure Control is used in the SET mode to adjust the air gas pressure Pull the knob out to adjust and push in to lock 5 AC Indicator...

Page 30: ...ion 2 Check connections and turn air supply ON Connect Work Cable Clamp the work cable to the workpiece or cutting table The area must be free from oil paint and rust Connect only to the main part of...

Page 31: ...ce the pilot arc restarts instantly and the cutting arc restarts instantly when the pilot arc contacts the workpiece Use the Rapid Auto Restart position when cutting expanded metal or gratings or in g...

Page 32: ...CUTMASTER A60 OPERATION 0 5428 4 4 This Page Intentionally Blank...

Page 33: ...squarer cut The power source output should be reduced also Refer to the appropriate Control Module Operating Manual for any Corner Slowdown adjustments that may be required Piercing With Machine or A...

Page 34: ...he torch head If resistance is felt when installing the cup check the threads before proceeding 6 If used attach the ohmic clip to the shield cup 4T 03 Machine and Hand Torch Parts Selection Depending...

Page 35: ...ctly perpendicular cut would result in a 0 bevel angle Top Edge Rounding Rounding on the top edge of a cut due to wearing from the initial contact of the plasma arc on the workpiece Bottom Dross Build...

Page 36: ...m a light to heavy bead but does not adhere tightly to the cut edge and can be easily scraped off High speed dross usually forms a narrow bead along the bottom of the cut edge and is very difficult to...

Page 37: ...isibility of the cutting arc During operation position the legs of the standoff guide against the workpiece Shield Cup Workpiece Standoff Guide Art A 04034 Torch Tip Shield Cup With Straight Edge The...

Page 38: ...m heat protection Choose the technique that feels most comfortable and allows good control and movement NOTE The tip should never come in contact with the workpiece except during drag cutting operatio...

Page 39: ...avel speed is dependent on current setting lead angle and mode of operation hand or machine torch Current Setting Current settings depend on torch travel speed mode of operation hand or machine torch...

Page 40: ...rial Thickness Gas Pressure Air Arc Voltage Torch Working Height Travel Speed Initial Piercing Height Pierce Delay Kerf Width Rec Speed GA in inch PSI torch lead length Volts in ipm in sec in 20 0 036...

Page 41: ...c Speed mm Bar torch lead length Volts mm mm min mm sec mm 1 4 8 7 6m 5 2 15 2m 101 3 6 3990 4 6 0 0 1 1 2 105 3 6 2920 4 6 0 1 1 4 3 109 3 6 1810 4 6 0 3 1 5 4 110 3 6 1470 4 6 0 3 1 6 5 112 3 6 1345...

Page 42: ...Torch Working Height Travel Speed Initial Piercing Height Pierce Delay Kerf Width Rec Speed GA in inch PSI torch lead length Volts in ipm in sec in 18 0 050 75 25 80 50 110 0 19 60 0 20 0 00 0 07 16...

Page 43: ...ch lead length Volts mm mm min mm sec mm 1 5 2 7 6m 5 5 15 2m 112 4 8 1670 4 8 0 0 1 7 2 105 4 8 1140 5 1 0 1 1 8 3 109 4 8 980 5 1 0 2 1 8 4 109 4 8 845 5 1 0 3 1 8 5 111 4 8 715 5 1 0 4 1 8 6 118 4...

Page 44: ...re Air Arc Voltage Torch Working Height Travel Speed Initial Piercing Height Pierce Delay Kerf Width Rec Speed GA in inch PSI torch lead length Volts in ipm in sec in 20 0 040 70 25 75 50 95 0 16 300...

Page 45: ...orch lead length Volts mm mm min mm sec mm 1 0 4 8 7 6m 5 2 15 2m 95 4 1 7620 4 1 0 0 1 5 2 0 104 4 1 3500 4 1 0 2 1 6 3 0 115 4 1 2350 4 6 0 3 1 7 4 0 113 4 6 2170 4 6 0 4 1 7 5 0 118 4 6 1740 4 6 0...

Page 46: ...Piercing Height Pierce Delay Kerf Width Rec Speed GA in inch PSI torch lead length Volts in ipm in sec in 16 0 060 85 25 90 50 118 0 19 290 0 19 0 00 0 08 14 0 075 120 0 19 285 0 19 0 10 0 08 11 0 12...

Page 47: ...m 6 2 15 2m 115 4 8 7540 4 8 0 2 1 2 120 4 8 7015 4 0 0 10 1 9 3 118 4 8 4570 4 8 0 10 2 1 4 120 4 8 3650 4 8 0 20 1 9 5 121 4 8 2465 4 8 0 20 2 1 6 122 4 8 2145 4 8 0 30 2 0 8 123 4 8 1635 4 8 0 40 2...

Page 48: ...Travel Speed Initial Piercing Height Pierce Delay Kerf Width Rec Speed GA in inch PSI torch lead length Volts in ipm in sec in 16 0 063 85 25 90 50 119 0 19 350 0 20 0 00 0 05 14 0 078 116 0 19 300 0...

Page 49: ...c mm 1 5 9 7 6m 6 2 15 2m 124 4 8 10890 5 1 0 00 0 8 2 116 4 8 7560 5 1 0 10 1 7 3 122 4 8 4365 5 1 0 10 1 7 4 119 4 8 2865 5 1 0 20 2 1 5 122 4 8 2195 5 1 0 20 2 1 6 123 4 8 1790 5 1 0 30 2 2 8 127 4...

Page 50: ...Working Height Travel Speed Initial Piercing Height Pierce Delay Kerf Width Rec Speed GA in inch PSI torch lead length Volts in ipm in sec in 16 0 064 85 25 90 50 123 0 25 440 0 25 0 00 0 08 14 0 079...

Page 51: ...mm 1 5 9 7 6m 6 2 15 2m 118 6 4 17010 6 4 0 00 1 8 2 126 6 4 7680 6 4 0 10 2 3 3 128 6 4 6410 6 4 0 10 2 3 4 130 6 4 5230 6 4 0 20 2 3 5 132 6 4 4010 6 4 0 20 2 4 6 132 6 4 2640 6 4 0 30 2 4 8 137 6...

Page 52: ...Piercing Height Pierce Delay Kerf Width Rec Speed GA in inch PSI torch lead length Volts in ipm in sec in 16 0 060 85 25 90 50 110 0 19 320 0 20 0 00 0 06 11 0 120 113 0 19 230 0 20 0 10 0 07 10 0 135...

Page 53: ...6 2 15 2m 109 4 8 8915 5 1 0 00 1 5 2 111 4 8 7415 5 1 0 10 1 7 3 113 4 8 5915 5 1 0 10 1 8 4 110 4 8 4095 5 1 0 30 1 7 5 111 4 8 3325 5 1 0 30 1 8 6 114 4 8 2745 5 1 0 40 2 2 8 120 4 8 1775 5 1 0 50...

Page 54: ...ch Working Height Travel Speed Initial Piercing Height Pierce Delay Kerf Width Rec Speed GA in inch PSI torch lead length Volts in ipm in sec in 16 0 063 85 25 90 50 110 0 19 340 0 25 0 00 0 06 11 0 1...

Page 55: ...c mm 1 5 9 7 6m 6 2 15 2m 108 4 8 9020 6 4 0 00 1 5 2 111 4 8 8380 6 4 0 00 1 5 3 114 4 8 7730 6 4 0 10 1 5 4 115 4 8 5865 6 4 0 20 1 6 5 115 4 8 3410 6 4 0 20 1 8 6 117 4 8 2765 6 4 0 30 1 9 8 119 4...

Page 56: ...orking Height Travel Speed Initial Piercing Height Pierce Delay Kerf Width Rec Speed GA in inch PSI torch lead length Volts in ipm in sec in 16 0 064 85 25 90 50 116 0 25 350 0 25 0 00 0 10 11 0 120 1...

Page 57: ...c mm 1 5 9 7 6m 6 2 15 2m 114 6 4 8890 6 4 0 00 2 4 2 117 6 4 8420 6 4 0 00 2 5 3 120 6 4 7170 6 4 0 10 2 5 4 122 6 4 5710 6 4 0 20 2 5 5 125 6 4 4315 6 4 0 20 2 5 6 129 6 4 3190 6 4 0 30 2 4 8 133 6...

Page 58: ...CUTMASTER A60 OPERATION 0 5428 4T 26 This page intentionally blank...

Page 59: ...CUTMASTER A60 0 5428 OPERATION 4T 27 This page intentionally blank...

Page 60: ...ss Gas Pressure Air Arc Voltage Torch Working Height Travel Speed Initial Piercing Height Pierce Delay Kerf Width Rec Speed GA in inch PSI torch lead length Volts in ipm in sec in 20 0 036 75 25 80 50...

Page 61: ...ec Speed mm Bar torch lead length Volts mm mm min mm sec mm 1 5 2 7 6m 5 5 15 2m 108 4 1 3266 4 1 0 0 1 4 2 108 4 1 2239 4 1 0 0 1 5 3 112 4 1 1794 4 1 0 1 1 7 4 114 4 1 1651 4 1 0 2 1 7 5 115 4 1 157...

Page 62: ...ch Working Height Travel Speed Initial Piercing Height Pierce Delay Kerf Width Rec Speed GA in inch PSI torch lead length Volts in ipm in sec in 18 0 050 75 25 80 50 110 0 16 60 4 1 0 0 0 06 16 0 063...

Page 63: ...Rec Speed mm Bar torch lead length Volts mm mm min mm sec mm 1 5 2 7 6m 5 5 15 2m 109 4 1 1670 4 1 0 0 1 7 2 114 4 1 1140 4 1 0 1 1 8 3 114 4 1 980 4 1 0 2 1 8 4 116 4 1 845 4 1 0 3 1 8 5 115 4 1 725...

Page 64: ...ltage Torch Working Height Travel Speed Initial Piercing Height Pierce Delay Kerf Width Rec Speed GA in inch PSI torch lead length Volts in ipm in sec in 20 0 040 75 25 80 50 110 0 19 300 0 20 0 0 0 0...

Page 65: ...idth Rec Speed mm Bar torch lead length Volts mm mm min mm sec mm 1 0 5 2 7 6m 5 5 15 2m 110 4 8 7660 5 1 0 0 1 6 2 0 116 4 8 3490 5 1 0 2 1 8 3 0 124 4 8 2350 5 1 0 3 1 8 4 0 126 4 8 2170 5 1 0 4 1 8...

Page 66: ...ght Pierce Delay Kerf Width Rec Speed GA in inch PSI torch lead length Volts in ipm in sec in 16 0 060 85 25 90 50 128 0 19 250 0 20 0 00 0 09 14 0 075 129 0 19 237 0 20 0 10 0 09 11 0 120 126 0 19 20...

Page 67: ...6m 6 2 15 2m 127 4 8 6804 5 1 0 2 2 2 129 4 8 5942 5 1 0 10 2 2 3 126 4 8 5080 5 1 0 10 0 1 4 130 4 8 3316 5 1 0 20 2 3 5 132 4 8 2794 5 1 0 20 2 2 6 134 4 8 2230 5 1 0 30 2 1 8 133 4 8 1425 5 1 0 40...

Page 68: ...Initial Piercing Height Pierce Delay Kerf Width Rec Speed GA in inch PSI torch lead length Volts in ipm in sec in 16 0 063 85 25 90 50 110 0 13 165 0 20 0 00 0 06 14 0 078 116 0 13 155 0 20 0 10 0 07...

Page 69: ...c mm 1 5 9 7 6m 6 2 15 2m 101 3 3 4590 5 1 0 00 1 2 2 116 3 3 3925 5 1 0 10 1 7 3 118 3 3 3285 5 1 0 10 1 7 4 126 3 3 1985 5 1 0 20 2 2 5 125 3 3 1850 5 1 0 20 2 1 6 127 3 3 1605 5 1 0 30 2 1 8 131 3...

Page 70: ...t Travel Speed Initial Piercing Height Pierce Delay Kerf Width Rec Speed GA in inch PSI torch lead length Volts in ipm in sec in 16 0 064 85 25 90 50 118 0 13 350 0 20 0 00 0 07 14 0 079 118 0 13 350...

Page 71: ...ec mm 1 5 9 7 6m 6 2 15 2m 118 6 4 8890 6 4 0 00 2 2 118 6 4 8890 6 4 0 10 2 0 3 123 6 4 7070 6 4 0 10 2 1 4 124 6 4 5095 6 4 0 20 2 0 5 126 6 4 3335 6 4 0 20 2 0 6 130 6 4 2370 6 4 0 30 2 0 8 134 6 4...

Page 72: ...Pierce Delay Kerf Width Rec Speed GA in inch PSI torch lead length Volts in ipm in sec in 16 0 060 85 25 90 50 115 0 13 280 0 20 0 00 0 06 11 0 120 112 0 13 190 0 20 0 10 0 06 10 0 135 110 0 13 176 0...

Page 73: ...m 6 2 15 2m 116 3 3 7895 5 1 0 00 1 6 2 114 3 3 6395 5 1 0 10 1 6 3 112 3 3 4895 5 1 0 10 1 5 4 115 4 8 4025 5 1 0 30 1 7 5 123 4 8 3300 5 1 0 30 2 0 6 126 4 8 2735 5 1 0 40 2 2 8 131 4 8 1745 5 1 0 5...

Page 74: ...eight Travel Speed Initial Piercing Height Pierce Delay Kerf Width Rec Speed GA in inch PSI torch lead length Volts in ipm in sec in 16 0 063 85 25 90 50 114 0 125 340 0 2 0 00 0 06 11 0 125 115 0 125...

Page 75: ...c mm 1 5 9 7 6m 6 2 15 2m 114 3 2 9410 5 1 0 00 1 5 2 114 3 2 8120 5 1 0 00 1 4 3 115 3 2 6830 5 1 0 10 1 4 4 116 3 2 5635 5 1 0 20 1 5 5 115 3 2 4010 5 1 0 20 1 8 6 117 3 2 2640 5 1 0 30 2 0 8 123 4...

Page 76: ...ge Torch Working Height Travel Speed Initial Piercing Height Pierce Delay Kerf Width Rec Speed GA in inch PSI torch lead length Volts in ipm in sec in 16 0 064 85 25 90 50 115 0 13 320 0 2 0 00 0 09 1...

Page 77: ...c mm 1 5 9 7 6m 6 2 15 2m 113 3 3 9020 5 1 0 00 2 4 2 116 3 3 7595 5 1 0 00 2 2 3 120 3 3 6165 5 1 0 10 2 0 4 121 3 3 5045 5 1 0 20 2 1 5 122 3 3 3955 5 1 0 20 2 2 6 124 3 3 2905 5 1 0 30 2 3 8 132 4...

Page 78: ...No s 6774336 7145099 6933461 Other Pat s Pending 9 8231 Tip US Pat No s 6774336 7145099 6933461 Other Pat s Pending 9 8211 Tip US Pat No s 6774336 7145099 6933461 Other Pat s Pending 9 8212 Tip US Pa...

Page 79: ...Cap US Pat No s 6914211 D505309 Other Pat s Pending 9 8245 Shield Cap US Pat No s 6914211 D496951 Other Pat s Pending The following parts are also licensed under U S Patent No 5 120 930 and 5 132 512...

Page 80: ...CUTMASTER A60 OPERATION 0 5428 4T 48 This Page Intentionally Blank...

Page 81: ...of torch tip and electrode Weekly Visually inspect the torch body tip electrode start cartridge and shield cup Visually inspect the cables and leads Replace as needed 3 Months Clean exterior of power...

Page 82: ...mon Faults Problem Symptom Common Cause Insufficient Penetration 1 Cutting speed too fast 2 Torch tilted too much 3 Metal too thick 4 Worn torch parts 5 Cutting current too low 6 Non Genuine ESAB part...

Page 83: ...E Indicates that the shield cup is not properly installed or tightened START ERROR Indicates that the START SIGNAL was active ie Torch Trigger depressed hand held pendant switch ON or CNC signal for t...

Page 84: ...components in unit 1 Refer to clearance information Section 2 04 2 Allow unit to cool 3 Return to authorized service center for repair or replacement GAS indicator OFF FAULT and MIN pressure indicator...

Page 85: ...Worn or faulty torch parts 4 Shorted Torch 5 Temporary Short indicated by 5 blinks per second 6 Power Supply Failure Standard rate of blinking 1 Remove shield cup from torch check upper O Ring positio...

Page 86: ...tion NOTE When installing the upper screws at tempt to reuse the original threads The easiest way to do this is by turning the screw counter clockwise until you feel the threads line up then begin to...

Page 87: ...fer to Section 6 Parts Lists for replacement filter element catalog number 1 Remove power from power supply 2 Shut OFF air supply and bleed down system before disassembling Filter to change Filter Ele...

Page 88: ...ut the old Filter Elements First Second Stage Cartridges as marked Art A 02942 Optional Two Stage Filter Replacement 6 Slide the replacement Filter Elements into the Filter Assembly with the same orie...

Page 89: ...blowing it through with compressed air CAUTION Dry the torch thoroughly before reinstall ing O Ring Lubrication An o ring on the Torch Head and ATC Male Connec tor requires lubrication on a scheduled...

Page 90: ...ay be an O ring between the shield cup body and drag shield cap Do not lubricate the O ring Drag Shield Cap Shield Cup Body O Ring No 8 3488 Art A 03878 4 Remove the tip Check for excessive wear indic...

Page 91: ...n will not be accepted 6 02 Ordering Information Order replacement parts by catalog number and complete description of the part or assembly as listed in the parts list for each type item Also include...

Page 92: ...Bracket Filter Mounting not shown 1 Two Stage Air Filter Assembly 9 7527 1 First Stage Cartridge 9 1021 1 Second Stage Cartridge 9 1022 1 Extended Work Cable 50 ft 15 2 m with Clamp 9 8529 1 Multi Pu...

Page 93: ...End Cap Assembly 9 7044 10 2 Body Mounting Pinch Block 9 4513 11 1 Pin Mounting Pinch Block 9 4521 12 1 Torch Holder Sleeve 7 2896 13 1 Pinion Assembly does not include positioning tube 7 2827 14 1 T...

Page 94: ...CUTMASTER A60 PARTS LIST 0 5428 6 4 Art A 07113 6 1 4 2 3 5 8 10 12 11 7 10 22 19 15 14 16 17 18 20 21 21 13 9 24 23...

Page 95: ...G Shield Cup Body 9 8237 Shield Cup 9 8218 Shield Cap Deflector 9 8243 Shield Cup Body 9 8237 Shield Cup 9 8218 Shield Cap Machine 50 60A 9 8238 Drag Shield Cup 9 8235 Drag Shield Cup 70 100A 9 8236 D...

Page 96: ...8237 70 120A 50 60A 40A Shield Cap Deflector 9 8243 Shield Cup Body 9 8237 Shield Cup 9 8218 Tip Tips Tips Tips DRAG TIP CUTTING 40 120A GOUGING CUTTING CUTTING CUTTING Art A 08065_AE DRAG SHIELD CUT...

Page 97: ...9 8062 4 1 Torch Head Assembly Replacement Kit includes items No 5 6 9 8219 5 1 Large O ring 8 3487 6 1 Small O ring 8 3486 7 Leads Assemblies with ATC connectors includes switch assemblies 1 SL60 20...

Page 98: ...CUTMASTER A60 PARTS LIST 0 5428 6 8 This Page Intentionally Blank...

Page 99: ...to set pressure ACTION RUN Rapid Auto Restart SET LATCH switch to RUN for most applications or to Rapid Auto Restart for gouging trimming or expanded metal applications or to LATCH is used for specif...

Page 100: ...ower supply manufacturer s test procedures Second row Rated cutting current values Third row Conventional load voltage values 4 Sections of the Data Tag may be applied to separate areas of the power s...

Page 101: ...Female Receptacle Front View ATC Male Connector Front View Negative Plasma 3 White Pendant Connector 4 Black Pendant Connector 2 Orange PIP 1 Black PIP Pilot 2 PIP 1 PIP 6 Open 7 Open 5 Open 8 Ground...

Page 102: ...White Black Orange Green Main PC Board Solenoid Torch Leads Torch Head Not Connected Not Connected Main PC Board Main PC Board B Machine SL100 Torch Connection Diagram Torch Unshielded Mechanized SL10...

Page 103: ...TC Connector Power Supply with ATC Receptacle Pilot Negative Plasma Power Supply PIP Switch Male ATC Leads Connector ATC Female Receptacle Pilot Negative Plasma Black Orange Torch Leads Torch Head To...

Page 104: ...alled PCB2 SOLENOID Q1 PRIMARY AC INPUT PCB1 40 PIN RIBBON CABLE SIGNALS 460_IN LATCH SET RUN RAR 40 CIRCUIT RIBBON CABLE MAX 90 85 80 75 70 65 MIN 460 230 J2 7 JUMPER D1 L1 L2 L3 GND D C AIR INLET FI...

Page 105: ...WORK SEC2 SEC2 L1 L1 J8 J8 1 2 J11 J11 1 2 V OUT 1 V OUT 1 TORCH SWITCH TORCH SWITCH ELECTRODE1 ELECTRODE1 J10 J10 3 5 6 7 8 1 2 4 J2 J2 2 3 4 5 6 7 8 9 10 11 12 13 14 1 PIP SWITCH PIP SWITCH 1 2 3 4...

Page 106: ...T PCB1 40 PIN RIBBON CABLE SIGNALS LATCH SET RUN RAR 40 CIRCUIT RIBBON CABLE MAX 90 85 80 75 70 65 MIN J2 7 D1 L1 L2 L3 GND D C AIR INLET FILTER REGULATOR SOLENOID VALVE TP1 TP2 TP3 TP4 TP5 TP6 TP7 AT...

Page 107: ...V OUT 1 T1 T1 J11 J11 1 2 J10 J10 3 5 6 7 8 1 2 4 ELECTRODE1 ELECTRODE1 TORCH SWITCH TORCH SWITCH J2 J2 2 3 4 5 6 7 8 9 10 11 12 13 14 1 PIP SWITCH PIP SWITCH 1 2 3 4 5 6 7 8 ISO GND 12V 1 2 3 4 5 6 7...

Page 108: ...tional codes 1 Disconnect the power from the power supply 2 Remove the screws that attach the power supply cover to the chassis Remove the cover 3 Route the cable through the customer supplied strain...

Page 109: ...CUTMASTER A60 0 5428 APPENDIX A 11 V_out2 Polarity Work2 Polarity Art A 10288_AB 5 Tighten the strain relief 6 Replace the cover 7 Connect the cable to negative and positive of Torch Height Control...

Page 110: ...CUTMASTER A60 APPENDIX 0 5428 A 12 REVISION HISTORY Date Rev Description 09 25 2015 AA Manual release...

Page 111: ...This page intentionally blank...

Page 112: ...x 46 31 50 92 22 ESAB international AB Gothenburg Tel 46 31 50 90 00 Fax 46 31 50 93 60 SWITZERLAND ESAB AG Dietikon Tel 41 1 741 25 25 Fax 41 1 740 30 55 UKRAINE ESAB Ukraine LLC Kiev Tel 38 044 501...

Reviews: