EROAD ehubo2 Installation Manual Download Page 8

9

NOTE:

 If the screen remains black or if you cannot successfully complete 

the instructions on the screen, the wiring of the Ehubo2 may not be quite 

right. Please refer to the Wiring Diagrams in this Installation Guide or to the 
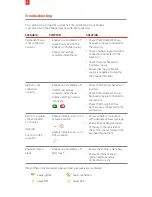
Troubleshooting

 section and adjust your wiring. If the screen still remains 

black, please contact the EROAD Helpdesk.

The installation remains unfinished until the on-screen instructions have been 

successfully completed!

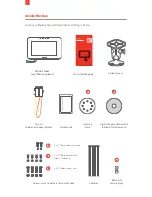
INSTALLING THE EHUBO

Refer to wiring diagrams and table in this Guide.

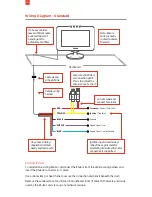
1.  Connect the black wire to an appropriate Grounding location that is 

considered fit for purpose.

2.  Connect the red wire to a permanent power source.

3.  Connect the yellow wire to ignition that is switched on when the engine  

is running and off when the engine is not running (true idle). Connection 
to the alternator may be necessary.

4.  Connect the blue wire to a Speed Signal (-ve) or Ground.

5.  Connect the purple wire to a Speed signal (+ve).

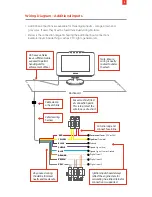
6.  If required, connect additional wires (orange, brown and gray) for  

monitoring vehicle activity on three digital inputs.  

Refer to 

“Wiring Diagram – Additional Inputs” 

and table above.

7.  Trim and make safe all unused wires. 

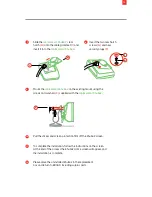
8.  Pull the sticker and screen protection film off the Ehubo2 screen.

9.  To complete the installation, follow the instructions on the screen.  

At the end of the process the Ehubo2 Home screen will appear, and  
the installation is complete.

Summary of Contents for ehubo2

Page 1: ...EROAD Ehubo2 Installation Guide...

Page 2: ...regarding the installation and use of the Ehubo2 and use and follow all standard safety precautions 2 Choose a suitable mounting location and mount the Ehubo2 3 Install the Ehubo2 by connecting it to...

Page 3: ...afety glasses safety shoes work gloves hard hat high visibility vest and work uniform Make sure to comply with appropriate standards and check with customers or third parties to verify whether they ha...

Page 4: ...first consideration while driving should be road safety Where the screen displays the speed limit or the vehicle s speed this is for information only Please ensure that you observe all posted speed li...

Page 5: ...h security plugs Inside the box RAM RAM Ehubo2 mount High strength adhesive tape optional for tape mount Mounting plate Screws nuts and washers to mount Ehubo2 2 x 19mm screws washers 4 x 13mm counter...

Page 6: ...correct position Proceed with 2A PERMANENT MOUNT dashboard or 2B TAPE MOUNT windscreen or flat surface 1 2B 2A A A B 3 4 Mount the Ehubo2 C E The Ehubo2 can be mounted on the dashboard or windscreen w...

Page 7: ...tted with a wiring loom which is used to connect to the vehicle and for optional digital inputs WIRE FUNCTION FUSE NOTES Red 12V 24V DC Supply Use supplied fuse kit Connect to a 12V or 24V DC permanen...

Page 8: ...fit for purpose 2 Connect the red wire to a permanent power source 3 Connect the yellow wire to ignition that is switched on when the engine is running and off when the engine is not running true idl...

Page 9: ...ficient cable exposed to permit handing unit to enforcement officer RAM EROAD RED Permanent Power 12V or 24V Ignition True Idle Ground Speed Signal ve Speed Signal ve or Ground YELLOW BLACK PURPLE BLU...

Page 10: ...enerator etc Permanent Power 12V or 24V Ignition True Idle Ground Speed Signal ve Speed Signal ve or Ground Digital Input 1 Digital Input 2 Digital Input 2 RED YELLOW BLACK PURPLE BLUE ORANGE BROWN GR...

Page 11: ...to safely secure the plug Lift the rear hatch H off the existing Ehubo2 and slide it off the cable grommet I Lift the rear hatch off the replacement Ehubo2 Remove the existing Ehubo2 from its mount an...

Page 12: ...h H onto the cable grommet I and insert it into the replacement Ehubo2 Pull the sticker and screen protection film off the Ehubo2 screen Please place the uninstalled Ehubo2 in the replacement box and...

Page 13: ...ected to the red wire Check that the ignition has been properly connected to the yellow wire Poor or no cellular connection after 1 2 minutes AND OR Poor or no GPS reception Ehubo2 indicates poor or n...

Page 14: ...rotocol Buffer compiler is owned by the owner of the input file used when generating it This code is not standalone and requires a support library to be linked with it This support library is itself c...

Page 15: ...16 INNOVATION AND INTEGRITY EROAD COM...

Reviews: