


8
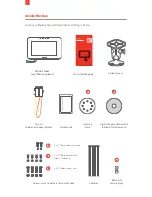
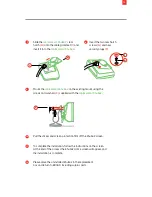
Install the Ehubo2
NOTE
• The engine must be turned off prior to installing the Ehubo2.
• Do not connect in any way to a CANBUS or other engine management system.
• Power supply must not be taken from any ABS/EBS braking system.
The Ehubo2 needs a permanent power source and a good view of the sky to operate
optimally. While the vehicle is off, the Ehubo2 will shut down to a low power mode and will
draw a very small current from the vehicle supply. Remove the Ehubo2 permanent power
fuse if the vehicle is in storage or parked up for more than a month to avoid discharging the
vehicle battery.
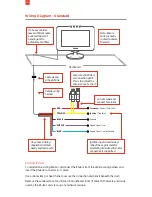
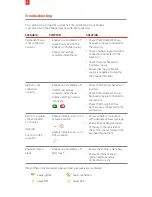
WIRING
The Ehubo2 is fitted with a wiring loom which is
used to connect to the vehicle and for optional
digital inputs.
WIRE
FUNCTION
FUSE
NOTES
Red
+12V / 24V
DC Supply
Use supplied
fuse kit
Connect to a 12V or 24V DC permanent
power source.
Yellow
Ignition
(True Idle)
Connect to ignition.
Black
Ground
Do not fuse
Connect to an appropriate Grounding
location that is considered fit for purpose.
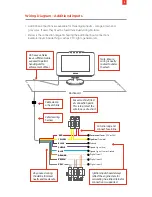
Purple
Speed Signal
(+ve)
Do not fuse
Analogue (+ve) speed signal
OR Digital speed signal input
Blue
Speed Signal
(-ve)
Do not fuse
Analogue (-ve) speed signal OR if using
digital signal this must be Grounded
Orange
Digital Input 1
Fuse individually
with 3A fuse
Optional digital inputs for
integration purposes.
Brown
Digital Input 2
Gray
Digital Input 3
NOTE:
Fuse connections at vehicle
connection points to protect the
wiring in case of a short circuit.