background image


 RIP Configuration


54 (98)

EN/LZT 108 6492 R1

April 2003

10

RIP Configuration

The HM210dp/di can be configured to communicate with other routing devices to
determine the best path for sending data to its intended destination. This chapter
describes how to configure your HM210dp/di to use one of these, called the Routing
Information Protocol (RIP).

Most small home or office networks do not need to use RIP. You may want to
configure RIP if any of the following circumstances apply to your network:

Your network includes an additional router or RIP-enabled PC. The HM210dp/di
and the router will need to communicate via RIP to share their routing tables.

Your network connects via the ADSL line to a remote network, such as a
corporate network. In order for your LAN to learn the routes used within your
corporate network, they should both be configured with RIP.

Your ISP requests that you run RIP for communication with devices on their
network.

10.1

Configuring the RIP

1

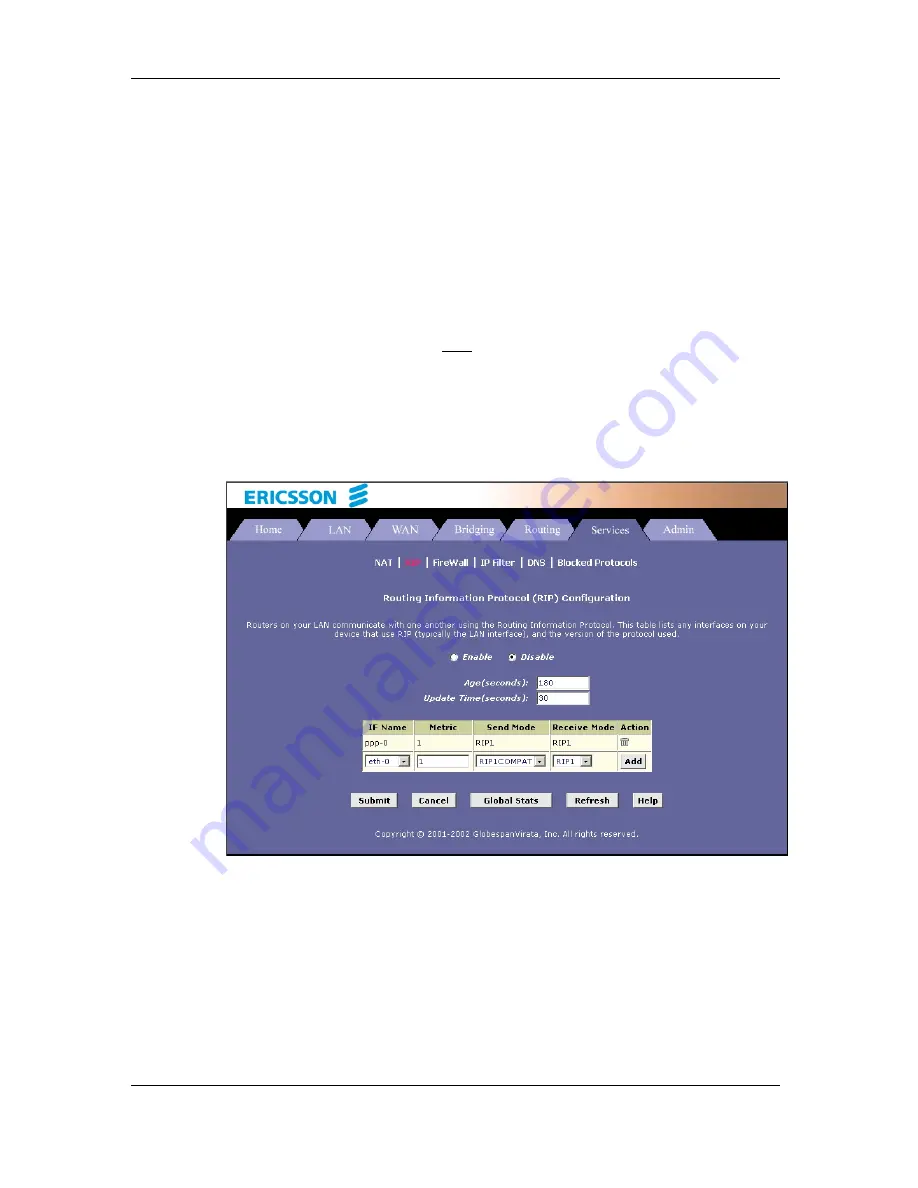
Select Services > RIP and the RIP Configuration page appears:

Figure 45: RIP Configuration

2

If necessary, change the Age and Update Time. These are global settings for all
interfaces that use RIP.

Age Time is the amount of time in seconds that the device's RIP table will retain
each route that it learns from adjacent computers.

Update Time specifies how frequently the HM210dp/di will send out its routing
table to its neighbors.

3

In the IF Name column, select the interface on which you want to enable RIP.

Summary of Contents for HM210di

Page 1: ...ADSL Modem HM210dp di User Guide Ericsson AB 2003 All rights reserved ADSL Modem HM210dp di User Guide...

Page 2: ...s and changes to this manual necessitated by typographical errors inaccuracies of current information or improvements to programs and or equipment may be made by Ericsson AB at any time and without no...

Page 3: ...essing the Configuration Manager 13 4 2 Commonly Used Buttons and Icons 15 4 3 Committing Changes to Permanent Storage 16 4 3 1 Rebooting the HM210dp di using the Configuration Manager 17 4 4 Quick Co...

Page 4: ...lations 42 8 5 Adding NAT Rules 43 8 5 1 The NAPT Rule 44 8 5 2 The RDR Rule 45 8 5 3 The BASIC Rule 46 8 5 4 The FILTER Rule 47 8 5 5 The BIMAP Rule 49 8 5 6 The PASS Rule 50 9 DNS Configuration 51 9...

Page 5: ...LEDs 81 14 2 Internet Access 81 14 3 Configuration Manager Program 81 15 Important Information 83 15 1 Product Care and Maintenance 83 15 2 Regulatory Information 83 15 2 1 EU Directives 83 15 2 2 Saf...

Page 6: ...ervice The main features of the HM210dp di are listed below Internal ADSL modem for high speed Internet access 10 100Base T Ethernet router to provide Internet connectivity to all computers on your LA...

Page 7: ...thernet 10Base T 100Base T network interface card NIC An Ethernet hub switch if you are connecting the device to more than one computer For system configuration using the built in Configuration Manage...

Page 8: ...m Figure 1 Front Panel of HM210dp di Label Color Function PWR green ON Unit is powered on OFF Unit is powered off DIAG green Flashes ON OFF at boot up to indicate that the device software is operation...

Page 9: ...to its original factory default settings To reset the device to factory defaults you don t need to power off the device Just push a paper clip into the hole and hold for 3 times before releasing Then...

Page 10: ...Connect to a PC or hub switch To a single PC Attach one end of the provided Ethernet cable straight through to the port labeled LAN on the HM210dp di Connect the other end to your PC s Ethernet port...

Page 11: ...the instructions that correspond to the operating system installed on each PC 3 1 Configuring your PCs as DHCP Clients 3 1 1 In Windows 95 98 and Me 1 In the Windows task bar click the Start button po...

Page 12: ...e the IP address and default gateway given by your ISP You have obtained one or more public IP addresses that you want to always associate with specific computers for example if you are using a comput...

Page 13: ...the Configuration Manager You can access the Configuration Manager from any computer connected to the HM210dp di 1 At any PC connected to the HM210dp di open a web browser type the following URL in th...

Page 14: ...ssful login the System View page appears Figure 4 System View The System View table provides a snapshot of your system configuration You can click on the provided links that enable you to configure ea...

Page 15: ...any changes you have made on the current page Redisplays the current page with updated statistics When accumulated statistics are displaying this button resets the statistics to their initial values L...

Page 16: ...vice is reset or turned off Follow these steps to commit changes to permanent storage 1 Select Admin Commit Reboot The Commit Reboot page appears Figure 5 Commit Reboot page 2 Click the Commit button...

Page 17: ...tting Description Reboot Reboots the device to activate your new settings if any Reboot from Default Configuration Reboots the device to default settings provided by your ISP or the manufacturer Choos...

Page 18: ...for Internet connection Your ISP should provide you with necessary information to complete the quick setup To quickly configure the system go to Home Quick Configuration The Quick Configuration page...

Page 19: ...he default 0 0 0 0 0 0 0 0 Use DHCP Default Route When enabled the IP address specified above will be used as the default route for your LAN Gateway IP Address Specify the IP address that identifies t...

Page 20: ...s are given for your better understanding You should consult with your ISP to determine your connection mode and enter the actual values provided by your ISP Note Your HM210dp di may already be precon...

Page 21: ...3 Mux Type Select LLC or VC as required by your ISP Max Proto per AAL5 Keep the default 2 After entering the fields above click the Submit button c When the confirmation page appears click Close d You...

Page 22: ...interface you created in Step 1 e g aal5 0 Config IP Address Net Mask 0 0 0 0 0 0 0 0 To use the HM210dp di as a bridge you don t need to set the IP address and subnet mask Just keep the default Use...

Page 23: ...Configuration page b Select eth 0 from the list and click Add c Select the EOA interface to be used e g eoa 0 from the drop down list and then click Add d Set the Bridging item to Enable and click Sub...

Page 24: ...ion Figure 13 WAN IF Status 5 1 3 Configuring the PC Option 1 Your PC uses the IP information given by your ISP If this is the case configure your PC to use the static IP information given by your ISP...

Page 25: ...Add The ATM VC Add page appears Figure 14 ATM VC Add b Enter the provided fields as below Field Description VC Interface Select a VC interface from the available interfaces e g aal5 0 VPI and VCI Ente...

Page 26: ...tion 26 98 EN LZT 108 6492 R1 April 2003 Figure 15 ATM VC Configuration 2 Creating a PPP interface a Select Routing PPP Add to add a new PPP interface Figure 16 PPP Interface Add b Enter the provided...

Page 27: ...PoE as required by your ISP Service Name For PPPoA no need to set up For PPPoE enter the Service Name if this is required by your ISP Otherwise leave it blank Use DHCP Select Disable unless your ISP i...

Page 28: ...h your ISP A green ball in the Status field indicates a successful connection Figure 18 WAN IF Status 5 2 3 Configuring the PC Keep your PC s setting as a DHCP client No further configuration is requi...

Page 29: ...he VPI VCI values given by your ISP e g 0 34 Mux Type Select LLC or VC as required by your ISP Max Proto per AAL5 Keep the default 2 After entering the fields above click Submit c When the confirmatio...

Page 30: ...Sec Type Select Public Private or DMZ Netmask Enter the IP address given by your ISP e g 255 255 255 248 RFC 1577 For RFC 1577 Classical IP and ARP over ATM select Yes For RFC 1483 Router select No U...

Page 31: ...down list select the ATM VC you created in step 1 to be mapped to this IPoA interface and then click Add Click Close to exit the confirmation page 5 3 2 Check Your Connection Status Select Home Syste...

Page 32: ...two or more ISP services You connect to a remote corporate LAN 6 1 Viewing the IP Routing Table To view the HM210dp di routing table select Routing IP Route The following page appears Figure 25 IP Ro...

Page 33: ...nation and Netmask fields Enter your ISP s IP address in the Gateway NextHop field Note You cannot specify the interface name route type or route origin These parameters are used only for routes that...

Page 34: ...t If your ISP performs the DHCP server function for your network then you can configure the device as a DHCP relay agent When the HM210dp di receives a request for Internet access from a computer on y...

Page 35: ...llows you to assign a specific IP address to a specific computer identified by this MAC address If this is the case you must have specified the same IP address in both the Start End IP Address fields...

Page 36: ...ommit Reboot and click Commit to save your changes to permanent storage 7 2 3 Configuring Your PCs as DHCP Clients For each computer that you want to configure to receive IP information automatically...

Page 37: ...CP Relay 7 3 1 Defining the DHCP Relay Interface s 1 Select LAN DHCP Relay The DHCP Relay Configuration page appears Figure 30 DHCP Relay Configuration page This page provides a text box for entering...

Page 38: ...Select Admin Commit Reboot and click Commit to save your changes to permanent storage 7 3 3 Configuring Your PCs as DHCP Clients For each computer that you want to configure to receive IP information...

Page 39: ...APT rule configured that translates any private address on the LAN side to your ISP assigned public IP address on the WAN side 8 2 Viewing NAT Configuration To view your NAT settings select Services N...

Page 40: ...s TCP Idle Timeout but for ICMP packets GRE Timeout sec Same as TCP Idle Timeout but for GRE packets Default NAT Age sec For all other NAT translation sessions the number of seconds after which a tran...

Page 41: ...R1 41 98 April 2003 Figure 32 NAT Rule Global Statistics page 8 3 Viewing NAT Rules and Rule Statistics To view the NAT Rules currently defined on your system select Services NAT NAT Rule Entry The NA...

Page 42: ...one below appears Figure 34 NAT Rule Statistics page The statistics show how many times this rule has been invoked and how many curently active sessions are using this rule 8 4 Viewing Current NAT Tr...

Page 43: ...rule definition Protocol The IP protocol used by the data packets that are undergoing translations from the rule definition Example TCP UDP ICMP Alg Type The Application Level Gateway ALG if any that...

Page 44: ...the IF Name drop down list select the interface on the HM210dp di to which this rule applies Typically NAT rules apply to communication between your LAN and the Internet Because the device uses the W...

Page 45: ...obtain a public IP address for that computer The computer s private IP address is translated to your public IP address in all incoming and outgoing data packets Note Without an RDR rule or BIMAP rule...

Page 46: ...ending port number in the Destination Port From To fields if incoming traffic destined for these port types should be redirected to the address es specified in step 3 Or enter the same addres in both...

Page 47: ...ress that identify the pool of public IP addresses to which to translate your private addresses Or type the same IP address in both fields if you also specified a single address in step 3 5 When you h...

Page 48: ...ranslated Or type the same address in both fields If you specify a range each address will be translated in sequency to a corresponding address in a range of global addresses which you specify in step...

Page 49: ...AN device They do not provide the same level of security as RDR rules because RDR rules also reroute incoming packets based on the port ID BIMAP rules do not account for the port number and therefore...

Page 50: ...isplay the NAT Rule Add page select PASS as the Rule Flavor and type a Rule ID 2 Select the interface and if desired a protocol that this rule applies to 3 In the Local Address From To fields type the...

Page 51: ...the HM210dp di 9 2 Configuring DNS Relay Follow these steps to configure DNS relay 1 Configure the LAN PCs as DHCP clients of the HM210dp di 2 Go to LAN DHCP Server enter the LAN IP address e g 192 16...

Page 52: ...using PPP connection to the ISP or a protocol other than PPP is used such as EoA You use PPP connection and Use DNS is already enabled Then these configured addresses will be used in addition to thos...

Page 53: ...il 2003 Figure 44 DNS Configuration b Type the IP address of the DNS server in an empty row and click Add Click the Enable radio button and then click Submit c Select Admin Commit Reboot and click Com...

Page 54: ...outing tables Your network connects via the ADSL line to a remote network such as a corporate network In order for your LAN to learn the routes used within your corporate network they should both be c...

Page 55: ...st be passed to the HM210dp di in order to it to be accepted into its routing table RIP version 1 is the original RIP protocol Select RIP1 if you have devices that communicate with this interface that...

Page 56: ...RIP Configuration 56 98 EN LZT 108 6492 R1 April 2003 10 2 Viewing RIP Statistics To view the RIP statistics select Services RIP Global Stats Figure 46 RIP Global Statistics page...

Page 57: ...r attempted attacks and who should be automatically notified 11 1 Global Firewall Settings 1 Select Services Firewall and the Firewall Configuration page appears Figure 47 Firewall Configuration 2 Con...

Page 58: ...In ordinary TCP communication packets are in the half open state only briefly as a connection is being initiated the state changes to active when packets are being exchanged or closed when the exchan...

Page 59: ...e e mail message will contain the time of the violation the source address of the computer responsible for the violation the destination IP address the protocol being used the source and destination p...

Page 60: ...your LAN and the Internet 11 2 1 Viewing Your IP Filter Configuration Select Services IP Filter The IP Filter page appears Figure 48 IP Filter Configuration page 11 2 2 Configuring IP Filter Global Se...

Page 61: ...m external computers are denied discarded at the public interface except for those allowed by a specific IP Filter rule Private Typically the global setting for private interfaces is Accept so that LA...

Page 62: ...Firewall Configuration 62 98 EN LZT 108 6492 R1 April 2003 Figure 49 IP Filter Rule Add 2 Enter or select data for each field that applies to your rule...

Page 63: ...l be created on the system each time this rule is invoked Security Level The security level that must be enabled globally for this rule to take affect A rule will be active only if its security level...

Page 64: ...ed to specify the address so the address fields are dimmed Protocol The basic IP protocol criteria that must be met for a rule to be invoked Using the options in the drop down list you can specify tha...

Page 65: ...ed value or you can select any to enable the rule to be invoked on all ICMP packets This field will be dimmed unavailable for entry unless you specify ICMP as the protocol IP Frag Pkt Determines how t...

Page 66: ...t storage 11 2 3 1 IP Filter Rule Examples Example 1 Blocking a specific computer on your LAN from accessing web servers on the Internet 1 Add a new rule for outgoing packets on the ppp 0 interface fr...

Page 67: ...ervices IP Filter Session to display the IP Filters Session page Figure 51 IP Filter Session The IP Filter Session table displays the following fields Field Description Session Index The ID assigned b...

Page 68: ...n to or going out from the interface This action is specified in the rule definition 11 3 To Block Specific Protocols The Blocked Protocols feature prevents the HM210dp di from passing any data that u...

Page 69: ...e 52 Blocked Protocols Check the protocol type you want to block and click the Submit button Make sure to use the Commit feature to save your changes to the permanent memory To unblock a specific prot...

Page 70: ...Date and Time The HM210dp di keeps a record of the current date and time which it uses to calculate and report various performance data You can select Home Modify to change the date and time as requi...

Page 71: ...evice s settings while user privilege is provided with read only access rights To add login User ID or change login password 1 Select Admin User Config The User Configuration page appears Figure 54 Us...

Page 72: ...new firmware After upgrading your customized configuration will still exist and not be reset to the factory defaults To perform the upgrade task download the required firmware file to your host PC an...

Page 73: ...he following should appear the file name may differ File TEDsl gsz successfully saved to the flash Please reboot for the new image to take effect 3 Power off the unit wait a few seconds and then turn...

Page 74: ...perform diagnostics on ATM VC select Admin Diagnostics Select the VC on which you want to execute diagnostics and then click Submit The diagnostic result will be displayed Note that only the VCs defin...

Page 75: ...ettings page Figure 59 Port Settings page Modify the port settings and click the Submit button Then select Admin Commit Reboot and click Commit to save your changes to permanent storage Note If you se...

Page 76: ...ect Admin Alarm Figure 60 Alarm page Each row in the table displays the time and date when an alarm occurred the type of alarm and a brief statement indicating its cause You can click on the Refresh R...

Page 77: ...mance statistics for the ADSL line select WAN DSL The DSL Status page displays Figure 61 DSL Status page The DSL Status page displays the current information on the DSL line performance The page refre...

Page 78: ...View DSL Parameters 78 98 EN LZT 108 6492 R1 April 2003 Figure 62 DSL Parameter From the DSL Status page you can click Stats to display DSL line performance statistics...

Page 79: ...l the current day and the previous day At the bottom of the page the Detailed Interval Statistics table displays links you can click to display detailed data for each 15 minute interval in the past 24...

Page 80: ...ZT 108 6492 R1 April 2003 14 Troubleshooting This chapter suggests solutions for problems you may encounter when installing or using your HM210dp di and provides instructions for using several IP util...

Page 81: ...r about 10 15 seconds If it does not turn of the HM210dp di wait 10 seconds and then turn it back on 14 2 Internet Access Problem Troubleshooting Suggestion PC cannot access the Internet Use the PING...

Page 82: ...uration Manager program from your browser Use the PING utility to check whether your PC can communicate with the LAN IP address by default 192 168 1 1 of the HM210dp di If it cannot check the Ethernet...

Page 83: ...in consumer serviceable components Service should only be performed by Certified Service Centres Do not allow children to play with the product as it contains small parts that could be detached and cr...

Page 84: ...EN LZT 108 6492 R1 April 2003 15 2 1 1 CE Requirement Hereby Ericsson AB declares that this ADSL Modem HM210dp di is in conformity with the essential requirements and other relevant provisions of the...

Page 85: ...Important Information EN LZT 108 6492 R1 85 98 April 2003 15 2 1 2 Declaration of Conformity...

Page 86: ...Important Information 86 98 EN LZT 108 6492 R1 April 2003...

Page 87: ...all telephone lines from the wall outlet before servicing or disassembling this equipment 15 2 3 EMC Approvals The HM210dp di is approved according to the following EMC standards EN 300386 2000 EN 550...

Page 88: ...is encouraged to eliminate the interference by one or more of the following measures Reorient or relocate the receiving antenna of the affected equipment Increase the separation between the ADSL Modem...

Page 89: ...Important Information EN LZT 108 6492 R1 89 98 April 2003...

Page 90: ...label The Ringer Equivalence Number REN Not that if several devices are connected on the same line the RENs must not add up to more than 5 0 This REN figure is important to your telco and can be found...

Page 91: ...AA 161A Input 120VAC 60Hz Output 16VAC 1A or OEM AA 1860 Input 120VAC 60Hz Output 16VAC 600mA Note The HM210dp di is for use only with one of the above approved supplied power adapters In the event of...

Page 92: ...ter data over the same network and assure that no single type of data hogs the line Bridge A device that connects two local area networks LANs or two segments of the same LAN that use the same protoco...

Page 93: ...eam signal is from the ISP service provider to the user s computer downloading DSL Short for Digital Subscriber Line which is a data communications technology that transmits information over the exist...

Page 94: ...ry ROM Firmware is a combination of software and hardware FTP Abbreviation of File Transfer Protocol the protocol used on the Internet for sending files Host A computer that is connected to a TCP IP n...

Page 95: ...SP Short for Internet Service Provider a company that provides access to the Internet LAN Short for Local Area Network a computer network that spans a relatively small area Most LANs are confined to a...

Page 96: ...rotocol a method of connecting a computer to the Internet PPP sends the computer s TCP IP packets to a server that puts them onto the Internet PPPoE Acronym for Point to Point Protocol over Ethernet P...

Page 97: ...uters Routers do not care about the type of data they handle 10BaseT One of several adaptations of the Ethernet standard for Local Area Networks LANs The 10Base T standard also called Twisted Pair Eth...

Page 98: ...he user s computer to the ISP service provider uploading VPI and VCI A VPI Virtual Path Identifier is an 8 bit field while VCI Virtual Channel Identifier is a 16 bit field in the ATM cell header A VPI...

Reviews: