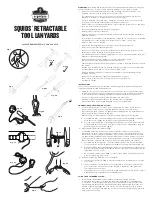


SQUIDS
®
RETRACTABLE
TOOL LANYARDS
WWW.ERGODYNE.COM // 800 225 8238
WARNINGS:
All warning and instructions must be read and understood before using this
product. Failure to do so may result in property damage, serious injury, or death.
• Never exceed the allowable capacity for any tethering system component. Your
tethering system is only as strong as your weakest link.
• Tool lanyards are for tool use only. They are not for human support, nor are they
intended to be part of a human fall protection system. [fig. 1]
• For tools weighing more than 5lbs / 2.26kg, do not tether such tools to the human
body, unless specifically authorized per the product instructions.
• Always inspect tool lanyards and all parts of your tethering system prior to, and after,
each use (refer to inspection steps).
• Do not wrap lanyards around sharp or rough edges.
• Never modify or alter tool lanyards.
• Never modify a tool or primary anchoring location that could result in manufacturer
guideline deviation.
• Never attach tool lanyards to straight-shafted or tapered tools, unless the tool lanyard
design permits, or if the lanyard is secured with a Tool Trap™. [fig. 2a, 2b]
• Never tie knots in a tool lanyard.
• Never wrap the lanyard back onto itself, unless specifically instructed.
• Never connect multiple lanyards together.
• Do not use this product if it interferes with the tool’s safe working condition, or the
anchoring location—including personal fall protection.
• Use extra precaution around moving machinery or parts, electrical hazards, chemical
hazards or other apparent hazards.
• Ensure adequate tool drop clearance (see “User Instructions” below)
and be cautious of the swing fall/path of a dropped tool.
• Lanyards must not be used as hoisting taglines or used to statically suspend tools and
equipment.
• Bungee style lanyards should not be used at full extension. Do not use Tool Lanyards
in temperatures below -30°F / -35°C or above 160°F / 71°C.
• Always wear appropriate personal protective equipment when installing or using
tethering systems.
• Do not leave retractable tool lanyards extended when not in use,
allow cord to retract back into housing when tool is holstered, or
lanyard is in storage.
INSTRUCTIONS
Prior to connecting and using tool lanyards, all tethering system product warnings and
instructions should be read and understood.
• Weigh the tool or tools to be tethered to ensure they do not exceed the maximum
safe working capacity of the tool lanyard or any part of your tethering system. Refer
to the label or product marking information for maximum capacity information.
• If you are using retrofit Tool or Anchor Attachments, ensure the
Maximum Tether Length identified on the attachments is compatible
with the identified tether length indicated on the tool lanyard label.
CONNECTING YOUR TETHERING SYSTEM
1. For tools WITH captive connection points engineered into them, locate the tool’s
connection point [fig. 3]. For tools WITHOUT engineered connection points
engineered into them [fig. 4a], use appropriately-rated Squids® Tool Attachments to
create a retrofit connection point [fig. 4b].
Once a secure tool attachment is located or created, attach your tool lanyard.
a. For carabiner ends, open the carabiner and secure it to an identified connection
point. Be sure to engage the carabiner’s locking mechanism. [fig. 5a].
b. For loop ends, thread the loop through the attachment point. Feed the other end
of the lanyard through the loop. Pull tight to remove slack. If applicable, snug the
barrel lock against the handle. [fig. 6]
2. Attaching Squids® Retractable Lanyards
For primary anchoring locations (on body or structure) with connection points
engineered into them, locate the anchor’s connection point. For primary anchoring
locations (on body or structure) WITHOUT connection points engineered into them,
use appropriately-rated Squids® Anchor Attachments to create a retrofit connection
point on the anchor. Once a secure anchor attachment is located or created, attach
the tool lanyard’s opposite end using one of the following attachment methods:
a. For carabiner anchoring ends, open the carabiner and secure it to an identified
connection point. Be sure to engage the carabiner’s locking mechanism. [fig. 5b]
b. For belt/webbing anchoring ends undo the belt or strap and weave it through the
belt slot on the back of the retractable. Reconnect the belt or strap and ensure the
retractable is secure. [fig. 7]
c. Do not attach Squids® model 3010 or other solution with a belt specific anchor to
a non-rated belt (e.g. pants belt).
3. Additional anchoring guidelines for tool lanyards
a. If a tool exceeds 5lbs / 2.26kg, it must be anchored to a structural anchor, not the
user’s body.
b. The best practice is to always anchor your lanyard to a structure other than the
user’s body. If the user does anchor the lanyard to their body, take great care
selecting the anchor location.
c. For any questions or concerns about selecting appropriate anchor points, consult
a qualified person or primary anchor manufacturer.
USING YOUR TETHERING SYSTEM
1. To use Squids® Retractable Tool Lanyards extend the tool being tethered
to a distance necessary to complete the task. If the retractable tool lanyard has a
“stop tension” feature engage the “stop tension” mechanism to give yourself slack
while performing the task (see below). When finished with the task ensure the tool
is being held and disengage the “stop tension feature allowing the cord to retract
back into the housing. Slowly draw the tool back to its holstering location while cord
retracts into the housing.
Fig. 1
Fig. 7a
Fig. 7b
Fig. 3
Fig. 5a
Fig. 5b
Fig. 8a
Fig. 9
Fig. 6
Fig. 4a
Fig. 4b
Fig. 2a
Fig. 2b
Fig. 8b
OFF
ON