Erbauer ERN634ATL Handbook Download Page 8

1/2" AIR RATCHET WRENCH

VIBRATION

The European Physical Agents (Vibration) Directive has been brought in to help 
reducehand arm vibration syndrome injuries to power tool users. The directive requires 
power tool manufacturers and suppliers to provide indicative vibration test results to 
enable users to make informed decisions as to the period of time a power tool can be 
used safely on a daily basis and the choice of tool.Further Advice can be found at 

www.hse.gov.uk

The declared vibration emission value should be used as a minimum level should be 
used with the current guidance on vibration.
Calculating the actual period of the actual period off use can be difficult and the HSE 
website has further information.
The declared vibration emission been measured in accordance with a standardised 
test stated above and may be used to compare one tool with another.
The declared vibration emission value may also be used in a preliminary assessment 
of exposure.

- The declared vibration total value has been measured in accordance with a standard 
test method and may be used for comparing one tool with another.
- The declared vibration total value may also be used in a preliminary assessment 
of exposure.

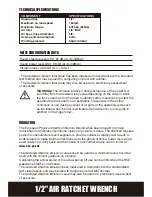
TECHNICAL SPECIFICATIONS

WARNING! The vibration emission during actual use of the power tool 
can differ from the declared total value depending on the ways in which 
the tool is used; and of the need to identify safety measures to protect the 
operator that are based on an estimation of exposure in the actual 
conditions of use (taking account of all parts of the operating cycle such 
as the times when the tool is switched off and when it is running idle in 
addition to the trigger time).

NOISE AND VIBRATION DATA

Sound pressure level LPA: 87 dB (A) (K=3dB(A))
Sound power level LWA: 98 dB (A) (K=3dB(A))
Vibration level: 4.35m/s

2

 (K = 1.5m/s

2

)

SPECIFICATIONS

COMPONENT

1/2"
160rpm
60Ft-Lb (85Nm)
1/4" BSP
3/8"
4cfm
90psi (6.3bar)

Square drive
Maximum no load speed
Maximum torque
Air inlet
Air hose (inner diameter)
Average air consumption
Working pressure

Summary of Contents for ERN634ATL

Page 1: ...1 2 AIR RATCHET WRENCH ERN634ATL...

Page 2: ...er s guidelines Loss of use of the goods Congratulations on your purchase of a quality power tool from Erbauer UK Ltd This product should give you reliable service but for your peace of mind this powe...

Page 3: ...d or under the influence of alcohol drugs or medication 2 Do not overreach Keep proper footing and balance at all times 3 Always wear eye protectors which provides protection from flying particles fro...

Page 4: ...o a complete stop before putting it down after use 11 If necessary use clamps or proper devices to securely fix the workpiece when installing tightening or removing loosening threaded fasteners on the...

Page 5: ...creen filter for blockage weekly Clean if necessary 8 Usually a 3 8 inner diameter air hose is recommended for air supply and airflow to get the optimum performance of tool 9 A long air hose usually o...

Page 6: ...roperty SYMBOLS Revolution per minute Pound per square inch RPM PSI CFM Cubic feet per minute Caution Warning Read the instruction manual Wear hearing protection Wear eye protection xxWxx Manufacturin...

Page 7: ...RATCHET WRENCH PRODUCT DESCRIPTION DESCRIPTION QUANTITY PART F R Knob Exhaust Deflector 1 2 Air Ratchet Wrench Steel Ball Air Inlet Air Regulator Trigger Anvil 1 1 1 1 1 1 1 1 A B C D E F G H H A G C...

Page 8: ...sed in a preliminary assessment of exposure The declared vibration total value has been measured in accordance with a standard test method and may be used for comparing one tool with another The decla...

Page 9: ...vibration syndrome if its use is not adequately managed WARNING The vibration emission value during actual use of the power tool can differ from the declared value depending on the ways in which the...

Page 10: ...ee Figure 1 3 Place 2 3 drops of air tool oil not included into the male plug before each use See Figure 3 2 Mount the male plug by hand into the air inlet E See Figure 2 NOTE Use thread sealant tape...

Page 11: ...F position F Forward or Tighten Press the trigger G The tool anvil H runs clockwise See Figure 6 5 Connect air supply hose to the male plug See Figure 5 WARNING Only use impact sockets that have a RPM...

Page 12: ...til desired output is achieved The settings 1 2 3 4 are only for reference and do not denote a specific power output Setting 1 one line symbol is the least amount of power while Setting 4 four line sy...

Page 13: ...LEM TROUBLESHOOTING CORRECTIVE ACTION POSSIBLE CAUSE CARE AND MAINTENANCE An in line oiler is recommended to be installed on air supply line as it increases tool life and keeps the tool in sustained o...

Page 14: ...1 1 1 1 1 1 1 1 1 1 1 1 1 1 1 1 1 1 1 1 1 1 1 1 1 1 4 1 29 30 31 32 33 34 35 36 37 38 39 40 41 42 43 44 45 46 47 48 49 50 51 52 53 54 55 56 Pin Front plate Bearing Washer Thread ring gear Idle gear G...

Page 15: ...natory and technical file holder Date 05 05 2015 Signature Name title Peter Harries Quality Manager Erbauer UK Ltd Trade House Mead Avenue BA22 8RT Complies with the following Directive s EC Machinery...

Page 16: ...1 2 AIR RATCHET WRENCH...

Reviews: