background image


August 2012 – Ed.1.2 

 EQUITEL – E451 Technical manual


Page 2 

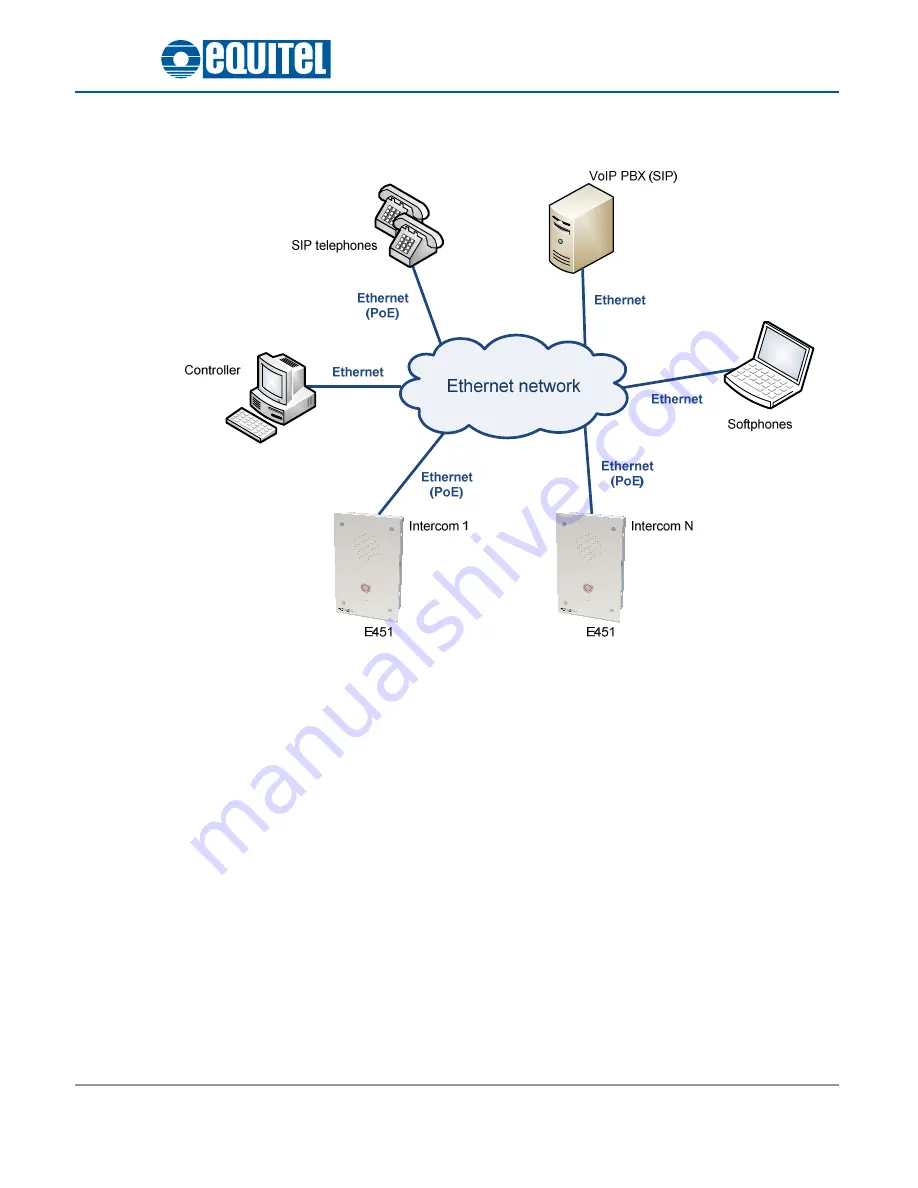
The  general  architecture  of  an  intercom  network,  based  on  Voice  over  IP  communication  standards  using 
E451 systems, can be depicted as follows: 


Figure 1.


IP intercom system scheme with E451 units  


Each E451 unit is connected through the Ethernet interface to a VoIP network, in which there may be a PBX, 
physical SIP telephones or software based (softphone) and a controller. 

By controller we refer to a computer running a software capable of communicating with the intercom E451 
for management and audio transmission. 

E451 has three operation modes for establishing the IP communication (see Chapter 3): 

1.1.1.


Proprietary mode 

The  EQUITEL  proprietary  protocol  for  control  and  communications  establishment  is  used  in  the 
connection between the intercom E451 and the controller. For the audio transport, we have considered a 
standard VoIP protocol. 

Using an industrial standard for the voice transport is important, since it eases the voice communication 
establishment between an E451 unit and the standard IP telephones. 

Apart  from  establishing  the  audio  communication,  using  this  protocol  allows  adding  particular 
functionalities of these systems such as: incidents recording (alarms, calls, etc) and constant knowledge of 
its status, even if the SIP protocol is used for the communication initiation.  

In this mode, it is possible to use the demo application supplied by EQUITEL to control several E451 and 
send audio from a computer. 

Summary of Contents for E451

Page 1: ...IP audio intercom VoIP audio intercom VoIP audio intercom E451 E451 E451 E451 Technical and installation manual Technical and installation manual Technical and installation manual Technical and installation manual IP Intercom system ...

Page 2: ...eference of the EQUITEL module E451 for IP intercom systems This edition is valid for the following version o Hardware version V121 o Firmware version V1 03 Equipos de Telecomunicación Optoelectrónicos S A Zaragoza August 2012 Ed 1 2 ...

Page 3: ... 2 Installation 11 Chapter 3 Functionality 13 3 1 Proprietary mode 13 3 1 1 Connection with the controller 13 3 1 2 Sending a call 13 3 1 3 Audio communication establishment 13 3 1 4 Audio communication closing 14 3 2 SIP mode with PBX 14 3 2 1 SIP network basic configuration with PBX 15 3 2 2 Sending a call 15 3 2 3 Call reception 15 3 2 4 Audio communication 16 3 2 5 Closing of the audio communi...

Page 4: ...neral information 20 5 2 Network configuration 20 5 3 Working mode configuration 21 5 4 Audio configuration 24 5 5 Inputs and outputs 26 5 6 Credentials configuration 27 5 7 Firmware update 27 5 8 Factory default and reboot 28 Chapter 6 Maintenance 29 6 1 Firmware update 29 6 2 Factory default recovery 29 ...

Page 5: ...grated SIP agent which allows establishing a communication with external devices by means of P2P SIP mode or the SIP mode with a PBX Calls supervision internal operation test contacts control and management by proprietary protocol One user button with one status LE Electret microphone and 8 Ω loudspeaker 1 opto isolate input and 1 relay output normally open for external connections System configur...

Page 6: ...on see Chapter 3 1 1 1 Proprietary mode The EQUITEL proprietary protocol for control and communications establishment is used in the connection between the intercom E451 and the controller For the audio transport we have considered a standard VoIP protocol Using an industrial standard for the voice transport is important since it eases the voice communication establishment between an E451 unit and...

Page 7: ...rotocol without the need of a PBX using peer to peer P2P strategies to initiate sessions We must take into account that the supervision control performed by a PBX is lost expiry time forwarding calls etc Should the auxiliary input or output be used it is necessary a control software to remotely manage the E451 intercom input or output regardless the working mode chosen for the audio communication ...

Page 8: ... Equipment elements E451 is housed in a flush or surface mounting enclosure with anti vandal front and push button that confers a high degree of ruggedness In Chapter 2 we explain in detail the E451 mechanical mounting for a proper installation We list below the unit most important elements and in the Figure 3 and Figure 4 it is shown where they are placed Element Description 1 Laudspeaker 2 Micro...

Page 9: ...August 2012 Ed 1 2 EQUITEL E451 Technical manual Page 5 Figure 3 E451 front elements Figure 4 E451 inner elements 13 14 12 5 7 6 9 15 8 10 11 1 3 2 4 ...

Page 10: ... triple functionality call answer the call and hang up 1 5 Status LED E451 has a visual indicator of the audio communication status When ringing input or output call LED blinks Open bidirectional audio channel LED on Closed audio channel LED off This status LED in Figure 4 is placed in the same call button 1 6 Power supply connector In the absence of a PoE Ethernet network to power the unit E451 c...

Page 11: ...ut Pin Signal Description 1 IN Input 2 IN Ground for input The input contact activation is carried out by joining the corresponding line IN with the common IN The opto isolated input internal electrical scheme of is shown in the following figure Figure 5 Electrical scheme of the input contact 1 10 Output contact connector The output contact is a free of voltage dry contact between the two male con...

Page 12: ...s a LED indicating the correct connection status The Link LEDs for the connector ETH and for ETH PoE are the ones with the numbers and respectively in Figure 4 1 11 1 Daisy Chain E451 intercoms can be connected using a Daisy Chain configuration Figure 7 using their two RJ 45 connectors This way we avoid the use of an external switch However in this case redundancy is lost should any of the E451 di...

Page 13: ...August 2012 Ed 1 2 EQUITEL E451 Technical manual Page 9 Figure 7 E451 Daisy Chain connection ...

Page 14: ...nt for its installation afterwards 2 1 Materials and dimensions E451 is composed of main pieces 1 Galvanized steel sheet box Dimensions 200 x 120 x 56 mm 2 Stainless steel box Dimensions 220 x 140 x 1 5 mm 3 Aluminum middle plate Dimensions 220 x 140 x 2 mm The front elements are anti vandal button with LED and screws Figure 8 E451 external dimensions ...

Page 15: ...l front and is locked with the anti vandal button crossing both of them Furthermore it is included the microphone with a wrapping that avoids harmful vibrations for the audio quality PIECE 2 Flush mount sheet box It has to be fixed by 4 wall bolts two at each side It has 5 further holes for an easy and safe cabling Figure 9 E451 outer case opening Element Description 1 Point for 2 holes anti vanda...

Page 16: ...ting it there will be no more orientation possibilities The necessary cabling for the E451 Ethernet and power connections must be carried out through the holes in the box intended for this purpose in Figure 9 Once the power and Ethernet connections are made explained in the points 1 6 and 1 11 espectively the equipment must be locked by screwing again the 4 anti vandal screws as shown in Figure 10...

Page 17: ...received and will remain like that for a maximum of 1 minute waiting to receive the audio activation message from the central While playing the status LED see Figure 3 will light intermittently 4 In case of not receiving the ACK or if one minute has passed by and the audio has not been activated E451 will play twice the pre recorded message offline tone which indicates destination not available an...

Page 18: ...ion and finalization management of multimedia services interchange sessions among several participants through digital networks SIP is a very complex protocol since it covers several aspects and in E451 we have given the application of VoIP calls management We have implemented a small part that allows answering and making calls to the configured device by means of a push to call function associate...

Page 19: ...the user button is activated and E451 is correctly registered in the PBX begins the communication establishment by using the SIP protocol 1 If the device to which it is desired to call telephone E451 is registered available and accepts the same audio codification as E451 the latter begins to play the prerecorded message calling tone which indicates call received at destination It remains like that...

Page 20: ... by pressing the user button In this case if the audio deactivation has been correctly made the status LED will turn off 3 3 P2P SIP mode This working mode is quite similar to the previous one with the exception that it is not necessary the use of a PBX to make the communication establishment Once the destination extension is configured in the E451 it is possible to make and receive calls with oth...

Page 21: ...SINFO 3 5 Audio prerecorded messages E451 is capable of playing up to 3 prerecorded audio messages to indicate the call status described above calling pcm Proprietary mode It is played when the call enquiry has been received in the control centre Mode SIP P2P SIP It is played when the call has progressed correctly and has been received ring pcm Mode SIP P2P SIP It is played when an incoming call f...

Page 22: ...n dedicated to this output In order to restore it to its original status we will have to write a 0 1 In order to remotely write the desired value over the pin configured as output the controller send the command WRITEPPORT followed by the desired parameter 1 0 2 E451 will answer with the corresponding ACK in this case ACK_WRITEPPORT 4 1 3 Contacts reading The input contact has to be normally open ...

Page 23: ...5 255 255 0 Gateway 0 0 0 0 not used We will explain now the procedure to follow to gain access to the E451 web server Configure the computer IP address so as to be in the same subnet as E451 and make sure that there are no other units in the network with the same IP Launch the explorer and type http 192 168 1 1 in the address bar A page will ask for the password to access the web server Initially...

Page 24: ...re the factory default values and furthermore reboot the equipment from a remote site 5 1 General information The system general parameters are seen in the home page shown in Figure 13 Some data are fixed and cannot be modified such as the serial number firmware version or MAC address The unit identification name can be configured and afterwards we must click in the button Apply Changes to save it...

Page 25: ...lained we have to choose one working mode out of the following three ones Proprietary Mode the communications establishment is done through an EQUITEL proprietary protocol see point 3 1 SIP PBX Mode the calls establishment is done by using the SIP protocol and one PBX see point 3 2 In this case the PBX is necessary P2P SIP Mode the communications are established using the SIP protocol directly bet...

Page 26: ...time of the unit in the PBX Values from 90 to 9000 seconds Authenticated User This is the extension assigned to in the PBX to the intercom E451 Authenticated Password This is the password configured in the PBX for the assigned extension Destination Number This is the extension of the SIP device to which we wish to call by pressing the user button Auto Answer When this option is activated E451 answ...

Page 27: ... to the extension previously configured Destination Port This is the SIP port for the destination device In case of communication between the E451 using the mode P2P SIP this port must be 5060 No Answer Timeout This is the time in seconds to finalize the call enquiry should the intended recipient not answer Values from 10 to 300 seconds Auto Answer When this option is activated E451 answers automa...

Page 28: ... NLMS adaptative filter By default activated o Squelch Activation or not of the incoming audio By default deactivated It is important to take into account that there must not be any communication running to change the audio configuration That is we have to close properly the audio depending on the working mode after that we can change the parameters and press the Apply Changes button to save the c...

Page 29: ...August 2012 Ed 1 2 EQUITEL E451 Technical manual Page 25 Figure 18 Audio prerecorded messages upload ...

Page 30: ...lish the output relay activation configuration controlled by DTMF tones Those tones are generated by the SIP device with which we have established the communication with the intercom E451 Method of detection DTMF tones These are the different methods for sending DTMF tones that are detectable by E451 o None The option to activate the relay using DTMF tones is deactivated o In band Audio The DTMF s...

Page 31: ...pdate process is very simple see Figure 21 We only have to select the audio file by pressing the button in the File to upload dialogue box and afterwards the Upload File one The update process will take a few minutes after which E451 will reboot automatically Depending on the update it might be necessary to updated as well the configuration parameters In this case EQUITEL will furnish the necessar...

Page 32: ...rom this page by pressing the Reboot button Restore to Factory By clicking on Restore we get back to the factory default values configuration Please note that the unit keeps its IP since all the parameters are restored but the network configuration Restore Audio Tones The system comes with some audio default messages for the different communication tones They can be updated by the user see Figure ...

Page 33: ...1 this update is done through its own web page in order to make this process as comfortable and simple as possible 6 2 Factory default recovery Should we wish to recover the E451 internal configuration to the factory default values there are two different options 1 Through the web server as we have already described in the point 5 8 2 If the problem is that the network information is lost and it i...

Reviews: