


QuadroE1/T1 Manual II: Administrator's Guide
Administrator's Graphical User Interface
QuadroE1/T1; (SW Version 3.0.x)
17
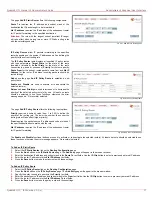
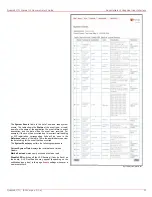
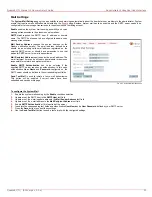
The page Add IP Static Route offers the following components:
Route To requires the IP address and subnet mask of the
destination the IP packet ought to be forwarded to.
Via IP address requires the IP address of the subsequent router
for IP packet forwarding to the specified destination.
Attention:
The rule with the longest subnet (smallest IP range)
will take effect when having two or more IP Static routing rules
with the coinciding subnets.
Fig. II-21: Add IP Static Routing page
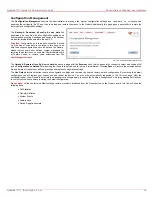
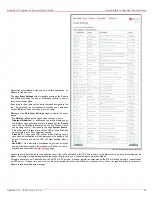
IP Policy Routes allow IP packets forwarding to the specified
router depending on the source IP address as well as defining the
priority for the current routing rule.
The IP Policy Routes table displays all specified IP policy routes
with their parameters: Target State for the state of the route
(enabled or disabled), Actual State for the state of the route
connection (up, down or erroneous), Priority for the route priority,
Route From for the subnet, routed packets come from and Via IP
Address for the router IP address incoming packets should be
routed through.
Add opens the page Add IP Policy Route to establish a new
policy route.
Enable and Disable are used to activate or to deactivate the
selected route(s).
Raise and Lower Priority are used to increase or to decrease the
priority of the selected policy route(s) by one. At least one route
should be selected to use these functions, otherwise the error
message appears: “No record(s) selected.”
Fig. II-22: IP Policy Routing table
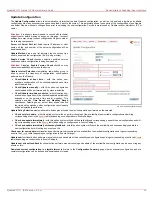
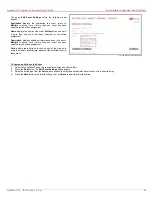
The page Add IP Policy Route offers the following input options:
Priority requires a numeric value (from 1 to 252) to define the
priority of the routing rule. The lower the number, the sooner the
routing rule will take effect (higher priority).
From requires the packet source IP address and subnet mask of
the specified destination to match with the rule.
Via IP address requires the IP address of the subsequent router
for IP packet forwarding.
Fig. II-23: Add IP Policy Route page
The Enable and Disable functional buttons are used to activate or to deactivate the selected route(s). At least one route should be selected to use
these functions, otherwise the error message appears: “No record(s) selected.”
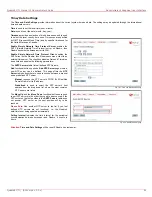
To Add an IP Static Route
1.
Select
the
IP Static Routes link on the Routing Configuration page.
2.
Press
the
Add button on the IP Static Routes page. The Add Entry page will appear in the browser window.
3.
Enter the destination IP address and subnet mask in the Route To text fields. Use the IP-Clip button to select a previously entered IP address.
4.
Enter the router IP address into the Via IP Address text fields.
5.
Press
the
Save button to make the static route with these settings.
To Add an IP Policy Route
1.
Select
the
IP Policy Routes link on the Routing Configuration page.
2.
Press
the
Add button on the IP Policy Routes page. The Add Entry page will appear in the browser window.
3.
Specify the policy routing rule priority in the Priority text field.
4.
Enter the packet source IP address and subnet mask in the From text fields. Use the IP-Clip button to select a previously entered IP address.
5.
Enter the router IP address into the Via IP Address To text fields.
6.
Press
the
Save button to make the policy route with these settings.