150
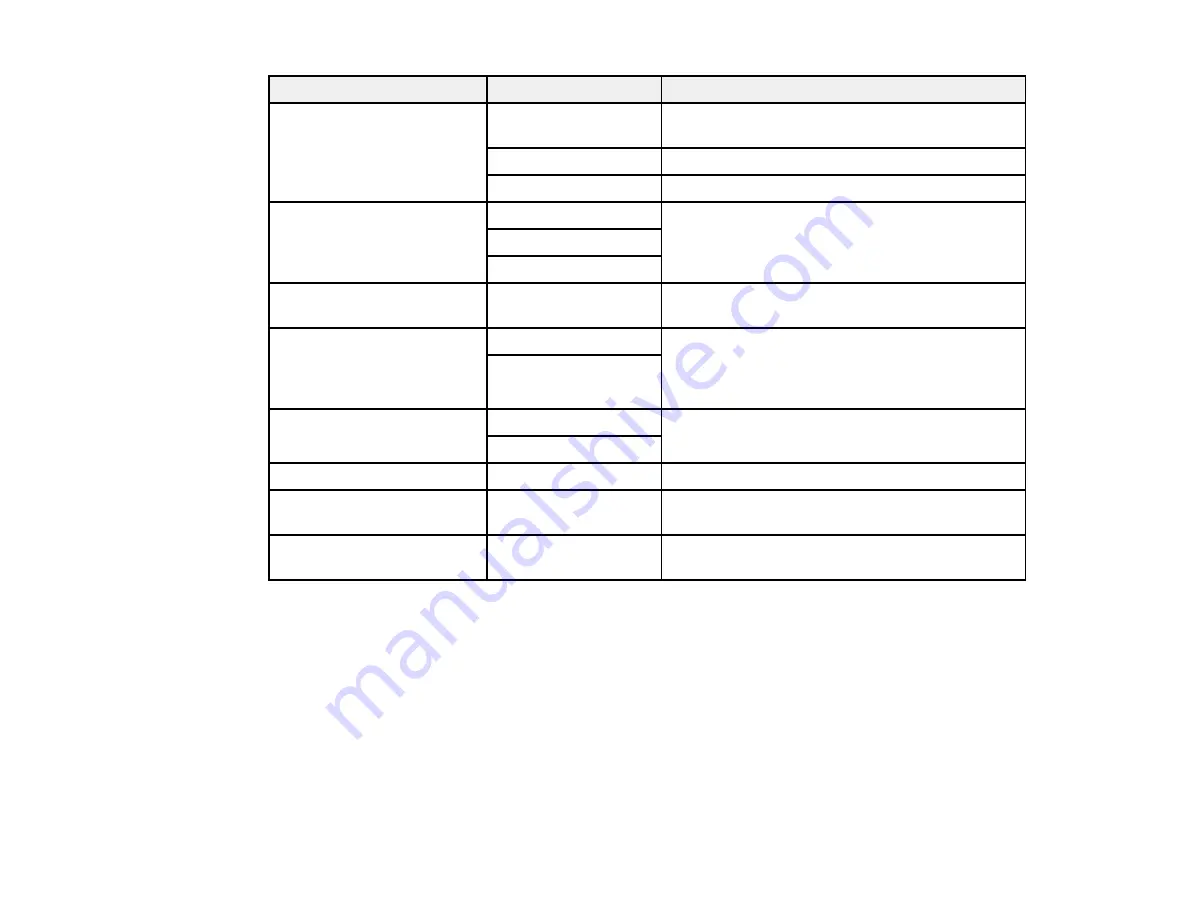
Scan to setting
Available options
Description
Scan Area
Various sizes
Select the page size for documents, then select
the orientation of the original
Auto Cropping
Select for photos with dark edges
Max Area
Select for most photos
Original Type
Text
Specifies the type of original you are scanning
Text & Image
Photo
Density
–4
to
+4
Adjusts the lightness or darkness of scanned
images.
Remove Shadow
On
Erases the shadows that appear in the center of
a document when copying a book or the
shadows that appear around a document when
copying thick paper
Off
Remove Punch Holes
On
Erases the binding holes on a document
Off
Subject
—
Lets you enter a subject for your email
Attached File Max Size
Various sizes
Lets you select the maximum file size that can
be attached to an email
File Name
—
Lets you enter a prefix, the date, and the time to
the file name for your scanned file
Note:
When you turn on password settings, you can use the LCD screen keyboard to set the password.
Parent topic:
Starting a Scan Using the Product Control Panel
Starting a Scan Using the Epson Scan 2 Icon
You can start the Epson Scan 2 program to select scan settings, scan, and save the scanned image to a
file.
Note:
If you are using your Epson product with the Windows 10 S operating system, you cannot use the
software described in this section. You also cannot download and install any Epson product software
Summary of Contents for WF-7710 series
Page 1: ...WF 7710 WF 7720 User s Guide ...
Page 2: ......
Page 67: ...67 3 Slide the edge guides outward 4 Slide the edge guide to your paper size ...
Page 76: ...76 3 Open the rear paper feed slot and push it back 4 Slide out the edge guides ...
Page 94: ...94 4 Slide the ADF edge guide against the originals but not too tightly ...
Page 152: ...152 You see an Epson Scan 2 window like this ...
Page 154: ...154 You see an Epson Scan 2 window like this ...
Page 156: ...156 1 Start Epson Scan 2 You see this window ...
Page 167: ...167 DSL connection 1 Telephone wall jack 2 DSL filter 3 DSL modem ...
Page 168: ...168 ISDN connection 1 ISDN wall jack 2 Terminal adapter or ISDN router ...
Page 248: ...248 You see a window like this 5 Click Print ...
Page 286: ...286 Front 6 Open the duplexer ...
Page 287: ...287 7 Carefully remove any jammed paper stuck inside 8 Reinstall the duplexer ...


